Panels
Panels contains pre-processing and post-processing tools.
The panel area, located below the modeling window, can be turned on or off from the menu bar by clicking . A check mark indicates the panel area is currently displayed.
Each panel contains input controls that allow you to enter necessary information for the procedures you wish to perform. If you press a function button and the data is incorrect or required information is missing, a message is displayed in the status bar stating the error. You can press the Esc key or click return to exit a panel. Returning out of a panel means accepting what was performed on the model while using the panel. This cannot be rejected once the panel is exited.
Subpanel
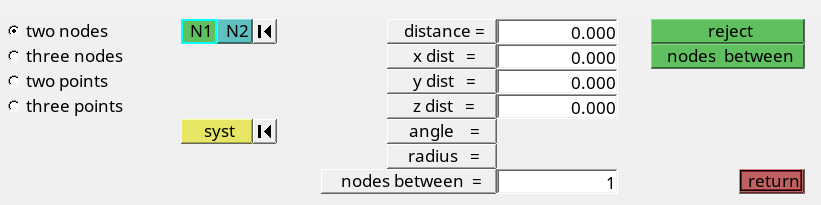
Figure 1. Distance Panel, Two Nodes Subpanel
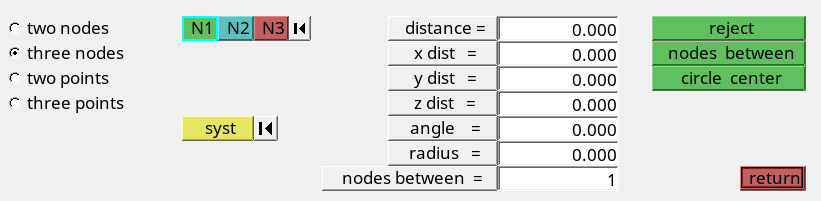
Figure 2. Distance Panel, Three Nodes Subpanel
To select a subpanel, click the radio button next to the subpanel name on the left side of the panel.
Secondary Menus
The secondary menu is a list of panels that can be accessed by using the function keys F1 through F12, or in combination with the Shift or Ctrl keys. Use the secondary menu to add information necessary to complete the currently active panel.
When you use the secondary menu, it interrupts the active panel and allows you to perform a function in the secondary panel, and upon completion, to continue using the initial panel. Entities selected while in the secondary panel are still selected when you return to the initial panel.
| Key | Function key only | plus Shift key | plus Ctrl key |
|---|---|---|---|
| F1 | online help | color | print slide |
| F2 | delete | temp nodes | slide file |
| F3 | replace | edges | print to default printer |
| F4 | distance | translate | create eps file |
| F5 | mask | find | print to default printer |
| F6 | element edit | split | create JPEG file |
| F7 | align node | project | Full Screen mode |
| F8 | create node | node edit | |
| F9 | line edit | surf edit | |
| F10 | check element | normals | |
| F11 | geometry quick edit | organize | |
| F12 | automesh | smooth |
Modules
Panels that are used to perform related functions are sometimes grouped together in modules. For example, the module, xy plots located on the Post page, contains panels that help you read curves, edit curves, perform simple math on curves, and scale the axis of plots.
A module may contain panels that are also found on the main pages, and are grouped to provide easy panel access without unnecessary navigational clicks.
Rapid Menu
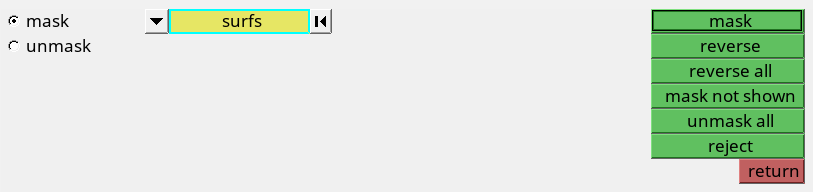
Figure 3. Mask Panel. The mask action is performed when you click the middle mouse button.
The rapid menu function is predetermined and varies between panels. In panels that contain multiple function buttons, rapid menu is assigned to the most commonly used function. The rapid menu function can also vary within a panel. For example, when you enter the Lines panel, return is assigned to the rapid menu. But once you pick a node to create the line, create becomes the rapid menu function. In most panels, the middle mouse button returns you out of the panel if the active entity selector (yellow collector with a blue outline) is empty.
In panels where there is a defined sequence of selections (entity selector), rapid menu advances to the next collector. For example in the Ruled panel, select a few nodes for your first node list or line list, and then click the middle mouse button to advance to the second node list so that you can begin picking more nodes. In panels where there is no clear sequence of selections, the middle mouse button may activate a function for which there is insufficient data, resulting in an error message. For example, when you try to move nodes using the N1, N2, N3 vector option in the Translate panel, if you click the middle mouse button after you select the required nodes, an attempt to perform translate + is executed. Since you do not have N1, N2 and N3 selected or may not have a magnitude value entered, an error message results.
Some panels do not have function buttons and are repetitive. In such cases, using the middle mouse button returns you out of the panel. For example, in the Replace panel, if you pick two nodes, it replaces one with the other and proceeds to repeat the operation with the new selection.
In some panels, the entities in the entity selector are not cleared, allowing you to use the same entities to repeat the operation. In these panels, the middle mouse button repeats the chosen function as long as the entity collector is not reset to empty. For example, in the Translate or Rotate panels once you selected some elements/nodes/comps and direction and distance of translation, clicking the middle mouse button a second time repeats the translate + or rotate + function, thus translating/rotating the same nodes again.
In panels that have pre-filled defaults, a middle mouse click performs the operation with the defaults. For example, collectors/create panels with a preset collector name creates a collector when you click the middle mouse button.
Pull-Down Selections

Figure 4. Pull-Down

Figure 5. Toggle

Figure 6.
- <<
- Go directly to the first page of the list.
- <
- Step backward one page toward the beginning of the list.
- >
- Advance one page toward the end of the list.
- >>
- Go directly to the last page of the list.
Context Sensitive Help
Once a panel is active, press the H or F1 key or select HyperMesh and BatchMesher from the Help menu to display the help topic for the current panel. A description of the panel as well as instructions on how to use it displays.