


|
Working with the Table Selector
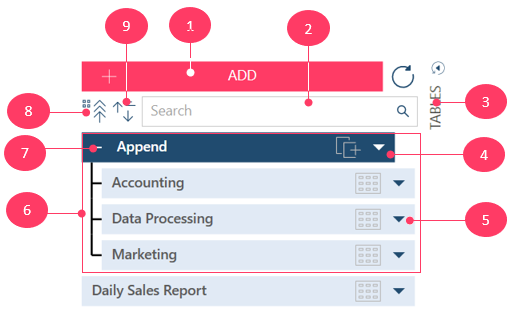
The Prepare Window displays a table selector to the left of the screen that looks like this:
Note this interface is common for all tables, no matter if the data source is a report, XML,JSON, PDF, Excel, or database. However, the context menus may vary slightly and these variations are discussed below.
Table selector icons
|
Icon |
Description |
|
1 |
Add Button Clicking this button allows you to open and add new tables to your workspace. |
|
2 |
Search Bar You can search for specific tables from the table list by entering the name or first few letters of the name of the table of interest into this field and then pressing ENTER on your keyboard. When a search is performed, all load plans are expanded and tables that match the search criteria (or the part of the table that matches the criteria) are highlighted. |
|
3 |
Click this icon to hide or unhide the table list panel |
|
4 |
Table Actions Click on this button to reveal a list of actions you can perform on your table. Note that the actions you can perform vary according to the table type and source. |
|
5 |
Table Menu Clicking on the drop-down buttons located to the right of each table icon displays a menu that lists the table's source and name, row limits (if any), and other buttons that allow you to carry out a number of table actions. Actions will vary depending on the table type selected. |
|
6 |
Load Plan A load plan provides users with a hierarchical view of all of the operations performed on a table. This functionality allows users to easily track, modify, remove, and duplicate tables,especially those obtained through Transform Data and Combine operations. |
|
7 |
Expand/Collapse Load Plan Click to expand or collapse the selected Load Plan, a graphical representation of the tables that make up a table and actions that have been carried out to arrive at the set of data. |
|
8 |
Collapse/Expand All Load Plans Clicking this button allows you to collapse/expand all load plans in the workspace. |
|
9 |
Sort Button Sort the tables in your Table list by clicking on this button. You can sort in ascending or descending order or remove an applied sort order. |

Table actions
When the drop-down arrow beside a table in the Table list is clicked, information about that table, including its source, name, and row limit, is displayed. An action menu is also made available, as shown in the figure below:
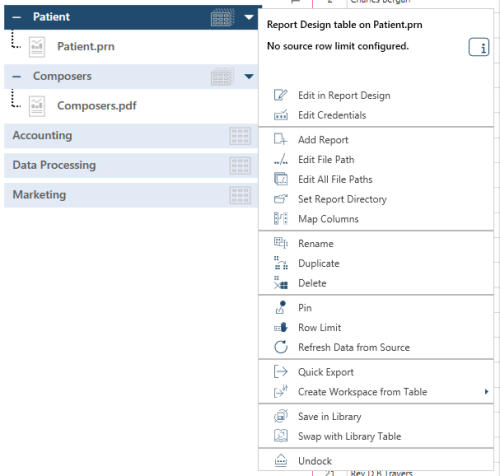
Actions for Basic Tables
Note that different table types display different actions. The table below describes the actions you can do to basic tables.
|
Action |
Description |
|
Object Description |
Clicking on the Object Description icon launches a text field into which you can enter a comment or description of the selected table. |
|
Allows you to modify how data from a some file formats should be imported into your workspace. Some of these settings include: For MS Excel tables:
For MS Access tables:
For delimited text tables:
For HTML tables:
|
|
|
Allows you to provide the necessary details for tables requiring security credentials that were cleared when the workspace was saved. |
|
|
Allows you to change the path to a data source. |
|
|
Edit All File Paths |
Allows you to change the path to all open data sources. |
|
Map Columns |
Allows you to map the columns of two tables with dissimilar schemas without breaking an existing change list. |
|
Rename |
Allows you to change the name of a table. |
|
Duplicate |
Allows you to create a new instance of the table. The duplicate is initially named <TableName>n, where n is number that indicates how many instances of the table are currently in use . You can rename the table after duplication. |
|
Delete |
Allows you to delete the selected table. |
|
Pin |
Allows you to pin a table. When you do so and the workspace is saved, a user without direct access to the table source may open the pinned table when he opens the workspace. |
|
Row Limit |
Allows you to increase or decrease the rows displayed by Monarch Data Prep Studio for the current table. Decreasing the row limit can speed up the load time of the table and improve the response time when carrying out operations. However, this may allow you to miss exceptions and problematic rows, if these are not included in the limited row set. |
|
Refresh Data From Source |
Allows you load the latest data from your data source. Use this option if the values in your table are changed via an external application and you want these changes reflected in your workspace. |
|
Quick Export |
Allows you to quickly export the selected table into a number of formats via the Select an Export Type dialog. |
|
Create Workspace from Table |
Allows you to export tables to a new workspace. |
|
Save in Library |
Saves the data source in the Data Source Library. You can use the Data Source Library to easily access and include commonly-used data sources as you define workspaces without having to open the data source and load tables. |
|
Swap with Library Table |
Allows you to replace the selected table with one from the Data Source Library. |
|
Undock |
Undocks the table from the Monarch Data Prep Studio work area so that you can:
|
PDF/REPORT Tables
If your table uses a report or PDF file as a data source, besides the actions above, you may also:
|
Action |
Description |
|
Edit in Report Design |
Opens the Report Design window, through which you can modify the fields of a table obtained from a PDF/text report. |
|
Add Report |
Allows you to add another report to the node |
|
Set Report Directory |
Allows you to specify a default folder from which to source Monarch report,model or project files. |
EXCEL Tables
If your table uses a worksheet as a data source (via trapping logic), you may also:
|
Action |
Description |
|
Opens the Worksheet Design window, through which you can modify the fields of a table obtained from a spreadsheet. |
XML and JSON tables
If your table uses an XML or JSON file as a data source, besides the actions above, you may also:
|
Action |
Description |
|
Edit Table Info |
Launches the XML/JSON Explorer and allows you to select a new table to open. |
|
Add File |
Allows you to add a file to the table node. |
|
Set File Directory |
Allows you to specify a default folder from which to source JSON/XML files. |
TransfORMATION/COMBINATION TABLES
If your table is obtained from a transform or combine operation, besides the actions above, you may also:
|
Action |
Description |
|
|
Edit <Transformation>/<Combination> |
Allows you to modify the append, join, or transform definition. |
|
|
Discard <Transformation>/<Combination> |
Allows you to discard an append or join operation or transformation. |
|
Multiple tables
The table actions specified in the table above apply to all individual tables.
If you select two tables of the same hierarchy and then right-click on your mouse, the following options display:
|
Action |
Description |
|
Create New Join |
Launches the Join Configuration dialog, which will allow you to create a new join. |
|
Open Append Helper |
Launches the Append Helper, which will allow you to create appends. |
|
Append Tables |
Launches a menu that will further allow you to:
|
|
Delete Tables |
Delete the selected tables. Note that this action only displays when tables of the highest hierarchy (i.e., single tables in the table selector or the top-most tables in a load plan) are selected. |
If you select three tables of the same hierarchy and then right-click on your mouse, the following options display:
|
Action |
Description |
|
Open Append Dialog |
Launches the Append Dialog, which will allow you to create appends. |
|
Append Tables |
Launches a menu that will further allow you to:
|
|
Delete Tables |
Delete the selected tables. Note that this action only displays when tables of the highest hierarchy (i.e., single tables in the table selector or the top-most tables in a load plan) are selected. |
Related Links