


|
Joining Tables
The Combine Data Stage allows you to create joins from two tables in a single join session. Join two or more tables if you want to combine records from each table into a more comprehensive table. Joins allow you to consolidate your data and enrich your view of the information they contain.
Join condition
To be able to successfully join two tables, both tables must have a common field that you can use to join on, called a join key.
In the example above, we can join the Order table with the Order Details table on the join key OrderID.
Standard joins
Continuing the example, we join an Order and Order Details table and use inner join to create a new table that shows both the Shipping Address and Products ordered. You can then easily determine the quantity of products being shipped to each country or region.
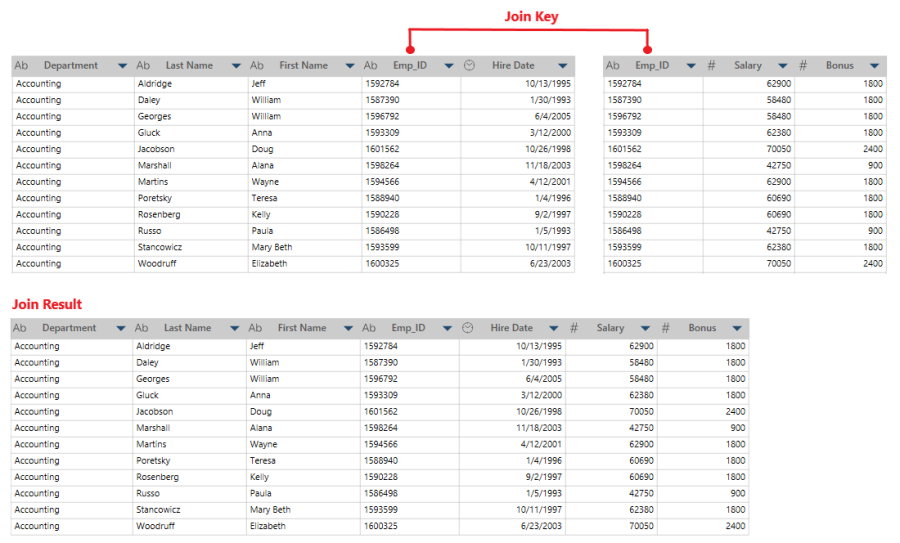
Standard Joins (inner join, left outer join, right outer join, and full outer join) produce tables that show matching rows between two tables.
Negative joins
Monarch Data Prep Studio also supports negative joins or complements, wherein only records that have no match are displayed. This functionality is useful when you are trying to investigate reconciliation issues, and you want to easily look for problematic records.
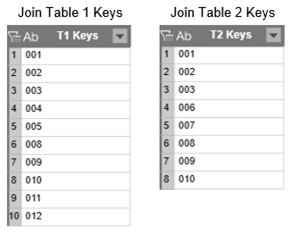
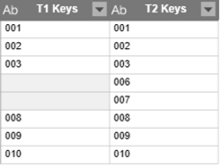
For example, consider the following Employee tables:
Employee Table 1 (Left table)

Employee Table 2 (Right table)
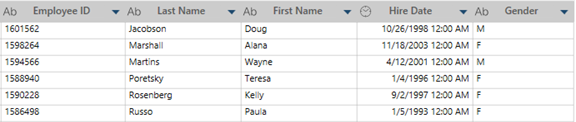
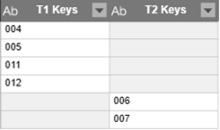
A Left Negative Join will only show the records for the following Employees:

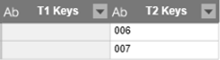
A Right Negative Join will only show the records for the following Employees:

Records for employee 1601562 (Jacobson) and 1598264 (Marshall) are not included in any Join Complement result as these employees have matching records in both tables.
To generate negative joins, select the appropriate icon from the Join Configuration dialog when creating a join.
Joining tables
Steps:
-
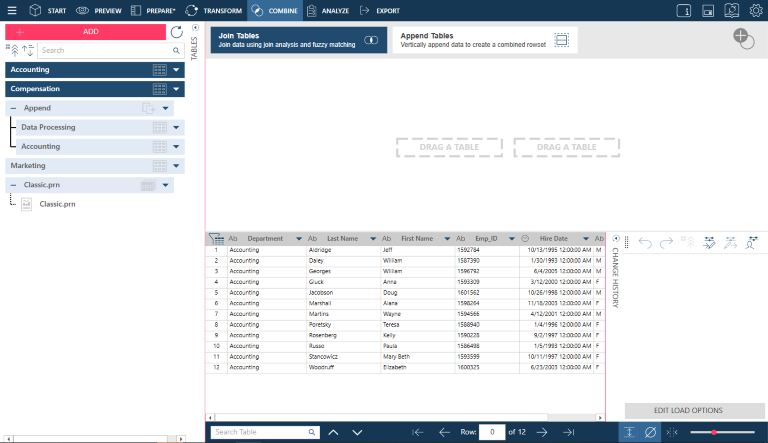
After loading data into the Prepare Window, click Combine > Join to activate the Joining Stage.
-
Do one of the following:
-
Drag a table from the table selector to the
 drop box.
 -
Drop a table from a location on your machine (e.g., from your desktop or local/network drive) to the
drop box. -
Double-click on a table from the table selector to add it to the
drop box.
-
-
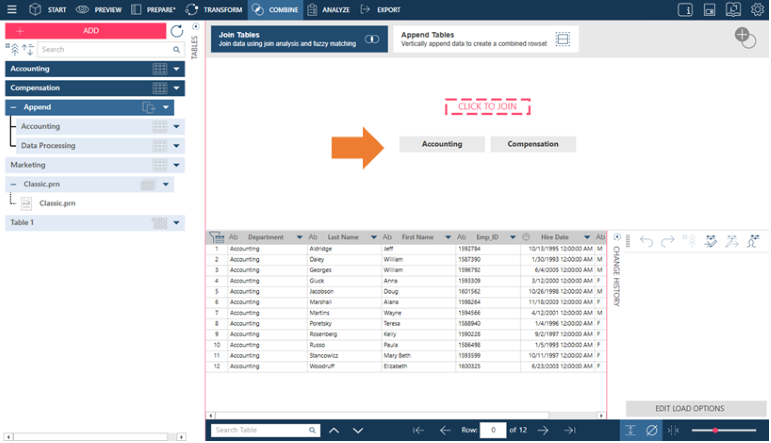
Select a second table following the same procedure in Step 2.
-
Select the Click to Join button.
-
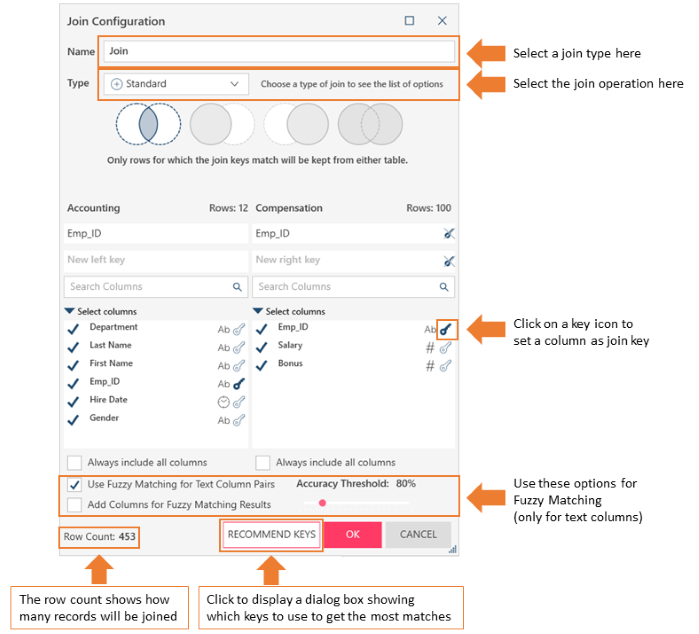
The Join Configuration dialog displays:
-
Set the Join Name. This will become the name of the resulting table.
-
Select a Join Type from the drop down, and then the actual join operation.
-
Select the Join Keys.
-
Select or unselect the fields you want to included or exclude in the resulting table.
-
Select or deselect all columns
-
Select or deselect duplicate records.
-
If you want to be able to match more records, check Fuzzy Matching and set the fuzzy matching tolerance level.
-
Select OK to complete the join.
-
Do one of the following:
-
If you want to join another table with the result, select another table and repeat the steps above.
-
If you want to transform the resulting table, go to the Prepare Window.
Monarch Data Prep Studio assigns sequential default names to the Join result, i.e.: Join, Join(1), Join(2). Rename the result as needed, following the steps in Renaming a Table.
-
-
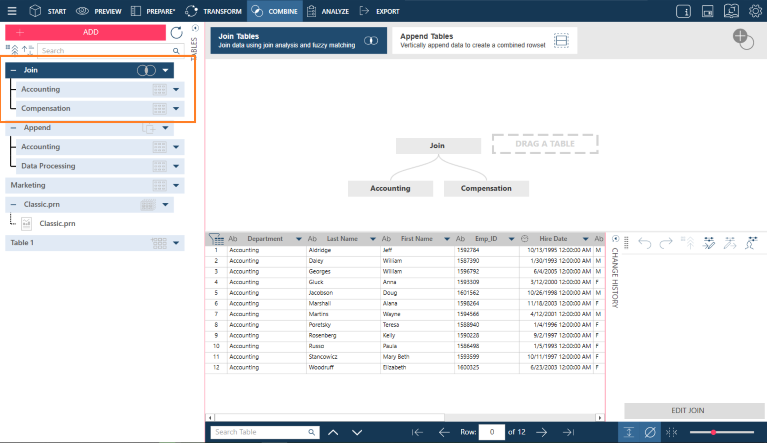
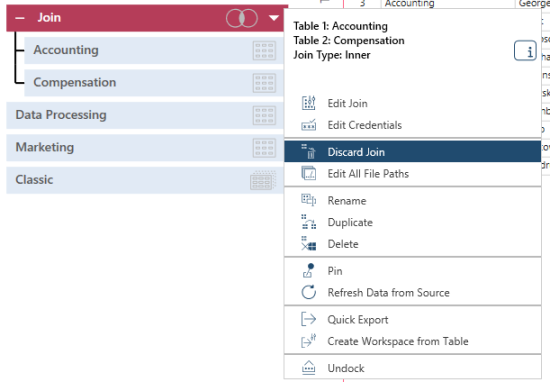
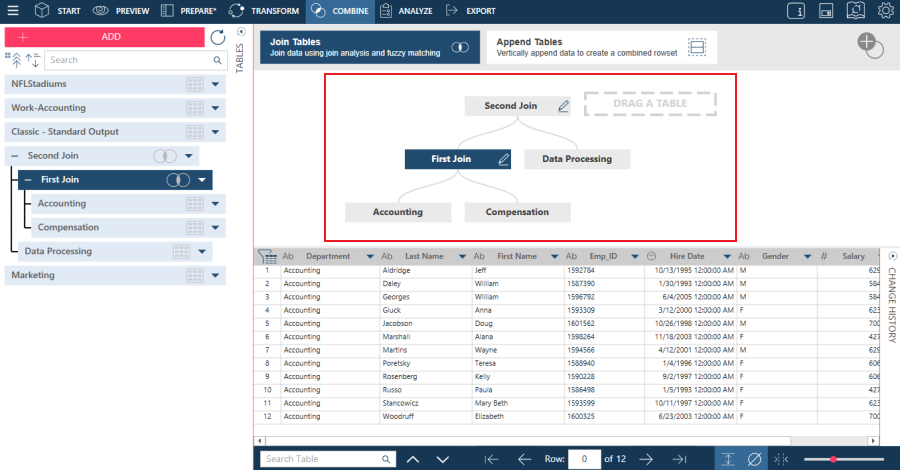
If you want to edit or discard the join, select the corresponding option from the drop-down beside the Join table:
The tables you selected or dropped are displayed on the join work area:
If you wish to replace any of the tables in the join work area, hover over the table to be replaced and then click on the Remove icon.

Then, drag and drop a new table into the table drop box.
A preview of the data in the active table displays.
NOTE: This dialog can be
maximized and returned to its original size by selecting the Maximize  and
Restore
and
Restore  buttons located at the top right-hand corner of the dialog. You can
resize further by using the resizing
handle
buttons located at the top right-hand corner of the dialog. You can
resize further by using the resizing
handle  located at the
bottom right of the dialog.
located at the
bottom right of the dialog.
NOTE: If you want Monarch Data Prep Studio to analyze your two tables and recommend join keys use the Join Analysis feature to do so.
By default, the Join Name is Join. Sequential default names are assigned to the Join result, i.e.: Join, Join(1), Join(2).
If you do not set a name at this point, you can rename the table in the Prepare Window at any time.
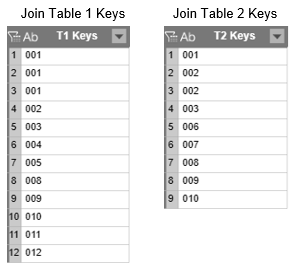
To illustrate the join types and operations below, consider the following examples:
STANDARD JOINS
|
Join Operation |
Description |
|
|
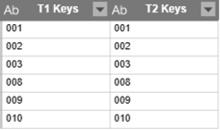
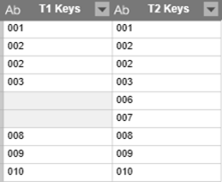
Inner Join Select only rows from both tables for which the join keys match. With the example above, the result will be:
|
|
|
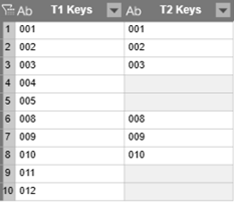
Left Outer Join Keep all rows from the left table. When there is no matching right row from the right table, empty values will be returned. With the example above, the result will be:
|
|
|
Right Outer Join Keep all rows from the right table. When there is no matching values from the left table, empty values will be returned. With the example above, the result will be:
|
|
|
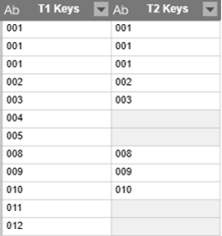
Full Outer Join Keep all rows from both tables. When there is no matching values from either table, empty values will be returned. With the example above, the result will be::
|


NEGATIVE JOINS
|
Join Operation |
Description |
|
|
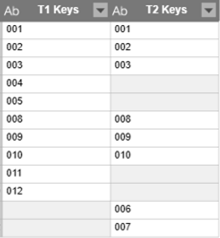
Inner Negative Join Keeps all rows from both tables that have do not have any matches. With the example above, result will be:
. |
|
|
Left Negative Join Keeps all rows from the right table that have no match with records on the left table. With the example above, the result will be:
|
|
|
Right Negative Join Keeps all rows from the left table that have no match with records on the right table. With the example above, result will be:
|


LOOKUP
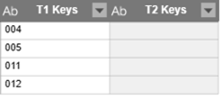
If you want to do only simple lookup, select a Lookup join type. To illustrate the lookup join types below, consider the following example (only keys are shown for simplicity):
|
Join Operation |
Description |
|
|
Left Lookup Join Keeps all rows from the left table and matches only one row per value on the right table, even if there is more than matching row. With the example above, the result will be:
Note that only one record for right key value 002 is retained in the result, even if there are two records that have this key. |
|
|
Right Lookup Join Keeps all rows from the right table and matches only one row per value on the left table, even if there is more than matching row. With the example above, the result will be:
Note that only one record for left key value 001 is retained in the result, even if there are three records that have this key. |


Join keys are the columns that will allow you to match the rows in one table with the rows in another. For instance you can link an Order table with Order Details using Order ID as the join key.
To select join keys, select the key icon on the left table with the matching key icon of the matching column in the right table:
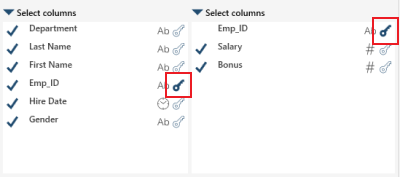
You must use two fields that have the same data type as join keys.
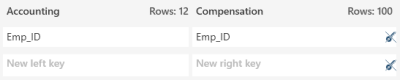
The join keys just selected are displayed above the column list:
If you wish to delete join keys, click on the Delete
Join Key icon  beside the join key pair.
Note that columns need not be of the same data type to be used as join keys. When columns with mismatching data types are used as join keys, Data Prep Studio automatically converts these columns into text to allow joining of the two tables.
Click on the checkmark beside a field to include or exclude this in the result table:
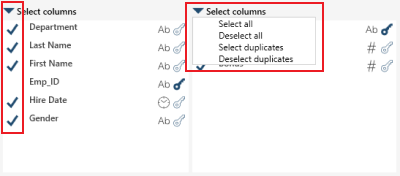
You can also select other options to:
Fuzzy Matching tries to match key values that are not 100% identical but similar.
For example, if you are matching on a column Item_Name (i.e., Item_Name_L and Item_Name_R are join keys), the following will match when Fuzzy Matching is enabled:
|
Item_Name_L |
|
Item_Name_R |
|
ROAD-750 BLACK |
|
ROAD-75 BLACK |
|
HL ROAD FRAME - RED |
|
HLROAD FRAME - RED |
|
TOURING REAR WHEEL |
|
TOURING REAR WHEELS |
|
ML TOURING SEAT ASSEMBLY |
|
ML TUURING SEAT ASSEMBLY |
|
MOUNTAIN-200 BLACK |
|
MOUNTAIN 200 BLACK |
Note that fuzzy join only works for key values that have a text data type.
The new table is included in the table list. A join icon beside the new table's name indicates that this is the result of a combine operation. Also, the table that have been combined are displayed below the join.
Analyzing joins
Monarch Data Prep Studio can analyze your two tables and recommend the best join keys to use.
Steps:
-
In the Join Configuration dialog, select Recommend Keys.
-
You can play around with the analysis further. For instance, you can:
-
Select a different join type at the top of the dialog to see if you get better join results.
-
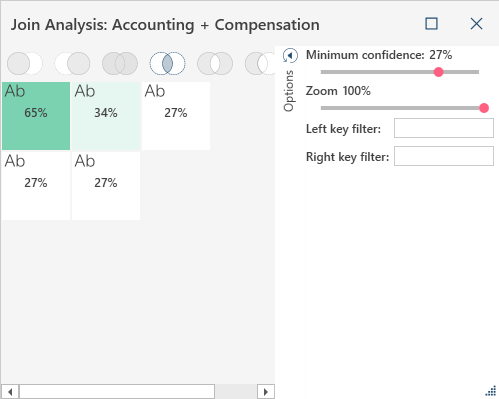
Display the Options panel:
-
Set a minimum match: Move the slider to control the percentage match that displays. For instance, you can ask Monarch Data Prep Studio to show only percentage matches 95% and above. Then you can click on the boxes that display to view which keys you need to join to produce those matches.
-
Zoom: Move the slider to make the boxes bigger for better readability. This functionality is helpful if there are a lot of percentages boxes that are displayed.
-
Left/Right Key filter: Enter key values to see if you get better matches if some values are suppressed.
-
If you are satisfied with a projected join result, click on the box reflecting this result to initiate the join. The Join Configuration dialog displays once more.
-
Double-check your join and then click OK.
The Join Analysis dialog displays:
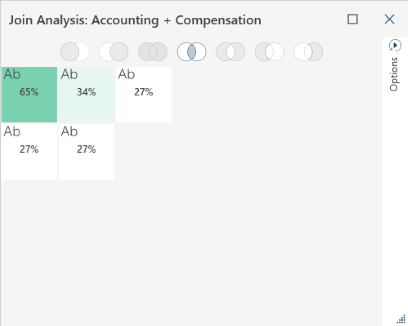
This dialog shows which join fields will produce the best results (the higher the percentage value, the more rows are joined by a join key combination). To determine the join field combination, hover over a percentage value:
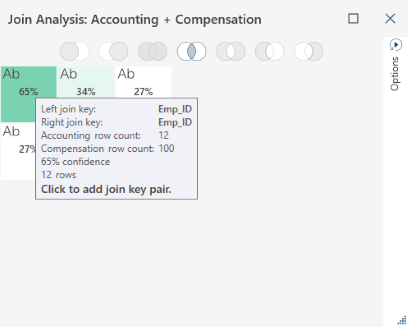
In this example, the mouse is hovered over the box marked 82%. The pop-up notifies you that using OrderID from the Order table and OrderID from the Order Details table will produce an 82% match.
...to do the following:
Creating new joins
If you would like to create a new join after completing a previous one, select the Create New Join button located on the upper right-hand corner of the Combine Data Stage. Doing so removes all tables already placed in the joining stage, as well as the previous join defined. You can now begin creating a new join.
Creating multiple joins
Multiple joins in a single join session are supported in Monarch Data Prep Studio. If you would like to create multiple joins (e.g., join three tables into a single table), complete the join operation for the first two tables and then initiate another join operation to combine the resulting joined table with the third table. You can join as many tables as you wish following this process as long as the join condition stated above (i.e., the two tables have a common join key) is observed.
Related Links