


|
The Combine Data Stage
The Combine stage allows you to join or append two or more tables. The operation to be performed can be selected from a drop-down menu when the Combine tool is clicked.
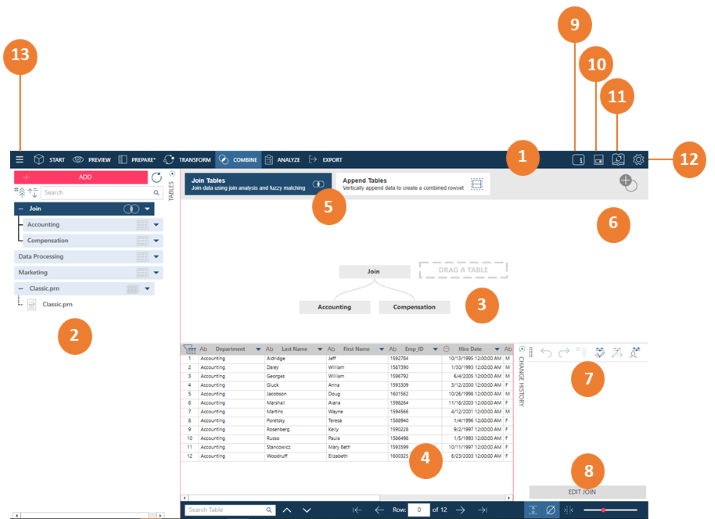
Combine Stage panels
|
Panel |
Description |
|
1 |
The standard Monarch Data Prep Studio Toolbar Select a tool to move to the Start Page, Preview Window, Prepare Window, Transform Pane, Analyze Drop-down, or Export Window. |
|
2 |
List of Tables Lists:
Note that tables on the list are differentiated by the following icons:
|
|
3 |
Joining (Appending) Stage Allows you to join (append) tables. Refer to Combining Data for details. |
|
4 |
Data Preview Displays sample rows from the currently-selected table. The Data Preview panel allows you to visually confirm the data in your tables. Icons on the header readily tell you a column's data type:
|
|
5 |
Create New Join (Append) Clicking this button removes all previous join components from the joining stage allows you to define a new join. |
|
6 |
Join Analysis Click this button to analyze two tables and find out which fields will provide the best join result. Refer to Joining Tables for details on using this feature. |
|
7 |
Change History Panel Click to hide or unhide the Change History Panel and work with Change History. |
|
8 |
Action Bar The buttons displayed in the action bar vary according to the active table displayed in the Prepare window. You can use these buttons to perform quick operations on your table, such as edit file paths or add metadata columns. |
|
9 |
Object Description Click on this icon to launch a text field into which you can enter a comment or description of the workspace. |
|
10 |
Save Workspace Use this icon to automatically save your workspace. |
|
11 |
Data Source Library You can save workspaces and tables to the Data Source Library. Clicking this icon displays the Library dialog. |
|
12 |
Settings Click to set Current Workspace or Application Default settings. |
|
13 |
Application Menu Click on this button to display a menu showing additional Monarch Data Prep Studio options. You can: |
 is a regular table loaded from a
  is a table that is the result of a
  is a table that is the result of an append operation.
 is a table resulting from
opening Monarch (model + report or project) or PDF files. The
group of tables represented by this icon is called a Monarch node.
is a table resulting from
opening Monarch (model + report or project) or PDF files. The
group of tables represented by this icon is called a Monarch node.
 Date/Time
 Number
 Text
Text
Related Links