


|
The Current Workspace Settings
Current Workspace settings allow you to define workspace-level settings for Monarch Data Prep Studio.
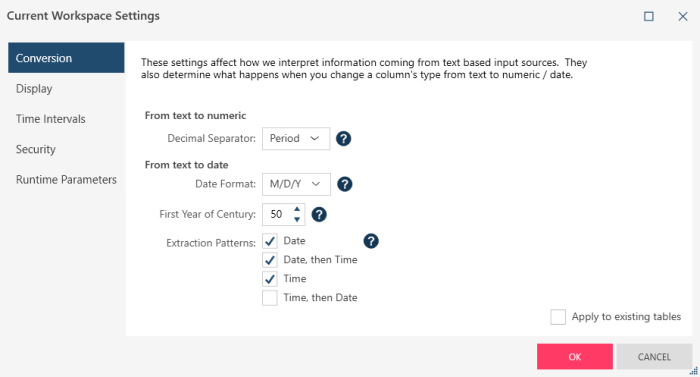
Conversion
These settings affect how information from text-based data sources is interpreted and converted to either the numeric or date/time format for the current workspace. You can specify a decimal separator (for converting text to numeric) and a date format, first year of century, and date/time extraction pattern. Ticking the Apply to existing tables check box applies all settings to all open tables. If the check box is not ticked, only tables that will be opened after you close the dialog will reflect your conversion settings.
Display
These settings allow you to specify the default format when data are displayed in tables for the current workspace. The Default Locale parameter sets the language to be used by the application, and the Default Date Format parameter specifies the default format of date/time columns.
Note that while most data sources, such as delimited text, excel, XML/JSON, etc., will correctly use the default column format settings to display the data, Monarch files will not use the default column format settings of the workspace since the column formats are applied in Monarch Classic and attached to the model when exported. Files opened in Report Design (such as Text and PDF Reports) also do not take into account the default column format settings since each field created in Report Design allows the column formats to be set within Report Design. These column formats take precedence over the default column format settings of the workspace.
Time Intervals
This setting allows you to set the characteristics of a fiscal year, fiscal weeks, and fiscal periods for the current workspace.
Fiscal Year Settings
|
Field |
Description |
|
Month-based |
Specifies that the fiscal year consists of 12 calendar months. |
|
First month of the fiscal year |
Selects the month of which the first day begins the new fiscal year. |
|
Week 1 starts on January 1 |
Specifies that the first week of the fiscal year begins on January 1. |
|
Each week starts on a specified weekday |
Defines the start of a fiscal week and the week number of a partial week. |
|
Week-based |
Specifies that the fiscal year consists of 52 or 53 whole weeks. You can specify the first day of each fiscal week, a reference month and day, and a rule for year start or end. Select to divide the year into four 13-week quarters, then pick one of the following:
|
|
The year is divided into four 13-week quarters |
Divides the year into four 13-week quarters and allows you to choose a week distribution pattern and quarter and period in which to place the 53rd week if necessary. |
|
The year is divided into thirteen 4-week periods. |
Divides the year into thirteen 4-week periods and allows you to choose a period in which to place the 53rd week if necessary. |
Calendar Week Settings
|
Field |
Description |
|
Week 1 starts on January 1. |
Specifies that the first full week of the year starts on the first day of the week on or after January 1.
|
|
Each week starts on a specified weekday |
Specifies that the week begins on a specific weekday and allows you to set a week number for a partial week. |
Formatting Settings
|
Field |
Description |
|
Interval |
Lists the names of the time intervals available.
|
|
Formatting Mask
|
Displays
the formatting mask applied to the adjacent interval. To edit
the formatting mask, double-click on the desired time interval,
or select an interval and press the Edit Formatting Mask button
|
|
Sample Value
|
Shows the effect of the formatting masks on today’s date. To change the date that the sample value is based on, adjust the sample date calendar control accordingly. This control is located on the right-hand side of the dialog immediately below the table containing the time intervals. |
|
Description |
Displays a description of each time interval.
|
 .
.
Ticking the Apply to existing tables check box applies all settings to all open tables in your current workspace as well as newly created workspace. If the check box is not ticked, only tables in the current workspace will reflect your conversion settings.
Security
These settings describe how passwords should be handled when saving workspaces in Monarch Data Prep Studio.
Credentials to Clear from Saved Items
This settings specifies what types of credentials should be cleared from saved items, such as workspaces:
-
Password (always deleted when clearing is employed)
-
Account ID
-
User name
-
Service account email
-
Access token
-
Refresh token
-
Secret key
Sensitive Connection string Parameters
This list identifies strings that should be considered a sensitive connection parameter when saving details for OLE DB data sources and connectors for which the field Other Connection Options is provided in the connection dialog. When Monarch Data Prep Studio saves a connection detail and encounters the specified sensitive connection parameter (e.g., "password"), it "scrubs" (i.e., deletes) the following string according to the save behavior selected in the Application Default Settings.
Note: Microsoft Jet/ACE drivers use a specific password parameter for connection strings that must be added to the default clearing settings to maintain parity with password clearing in other sources.
This parameter is: "Jet OLEDB:Database Password"
This parameter will be added to the default parameters in its normalized, lower case form and will appear as: "jet oledb:database password"
Runtime Parameters
Allows you to define and set values for runtime parameters that can be used by all tables in the current workspace.
Refer to Working with Runtime Parameters for details on defining and using runtime parameters.