Configuring Microsoft Azure Cloud Bursting

Create the necessary components in Microsoft Azure that are required for cloud bursting and then create a Control cloud bursting scenario.

Before you can begin creating the Azure components necessary for cloud bursting, you must purchase an Azure subscription and have created a tenant. For more information about subscriptions see What is an Azure subscription. For more information about tenants How to get an Azure Active Directory tenant. As a final step, add users to the Active Directory.

Register the Control Application with Azure

Register Control with Azure so that you can later create a cloud account in Control.

You must have already purchased an Azure subscription, obtained a tenant and have an Azure user account.

Azure documentation can be found at Quickstart: Register an application with the Microsoft identity platform.

Register the Control web application with the Azure Active Directory and create an client secret key. Manage access to the newly create application by assigning a role. Also, obtain your Azure tenant ID and subscription ID. Once this task is complete, you should have the following information stored in a file:
  • Application ID generated when registering Control with the Azure Active Directory.
  • Client secret key generated for the newly registered Control application.
  • Subscription ID
  • Tenant ID
This information is necessary to create a cloud account in Control.
  1. Login in to your Microsoft Azure account.

Register Control to the Azure Active Directory.

  1. Using the search box, enter app reg.
    A list of search results is listed.
  2. Under Services, click App registrations.
  3. Click New registration.
  4. Enter the following to register Control to the Azure Active Directory:
    1. For Name, enter the name of the application.
      The name can be anything meaningful to your organization, e.g., pc_cloudapp.
    2. For Supported account types, choose the option that best suits your organization.
      Tip: Click the Help me choose link for additional information about the available options.
    3. For Redirect URI, select Web and enter the URL https://hostname:9500/pc.
      where hostname is the hostname of the machine where the Control Web Interface is installed. This is the URL that is used to login to Control.
  5. Click Register.
    Once the application registration is complete, its details are displayed, including an Application ID.

Obtain the application id of the newly registered application.

  1. Hover over the Application (client) ID and click when it appears.
  2. Store the Application ID to a file.
    The Application ID is used later to create a cloud account in Control.

Create a client secret key for your newly registered application.

  1. Click Certificates and secrets from the Manage menu located on the left-hand side of the web page.

    Certificates and Secrets
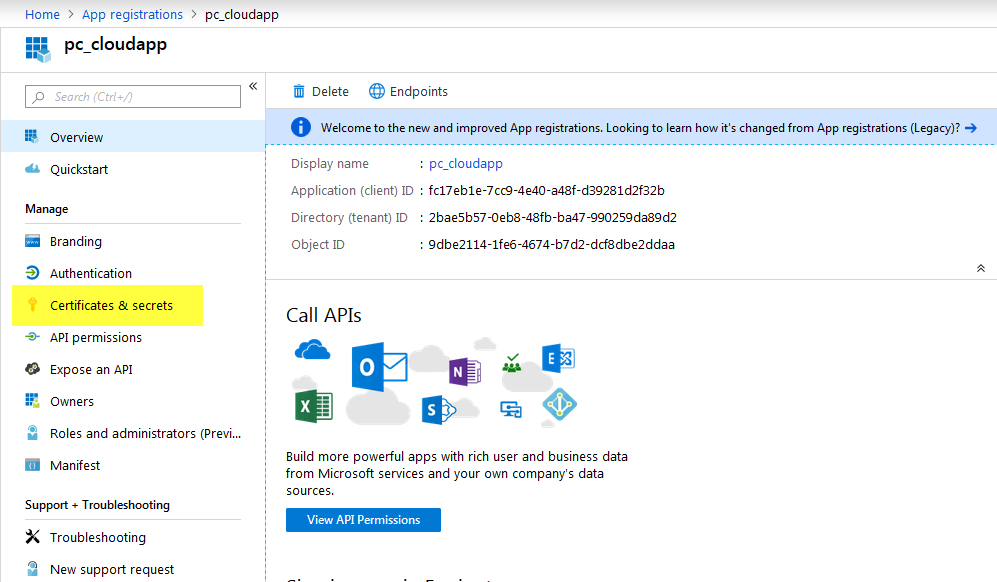
    Figure 1. Certificates and Secrets
  2. Under Client secrets, click New client secret.
  3. Enter the following to add a client secret:
    1. For DESCRIPTION, enter pc_client_secret.
    2. For EXPIRES, select Never.
  4. Click Add.
    A client secret key is generated and is displayed under the heading VALUE.
  5. Click next to the client secret key.
  6. Store the client secret key to a file.
    The client secret key is used later to create a cloud account in Control.

Obtain your Azure subscription ID.

  1. Using the search box, enter subscription.
    A list of search results is listed.
  2. Under Services, click Subscriptions.
  3. Locate and click your subscription.
    Details about the subscription are displayed, including a Subscription ID.
  4. Hover over the Subscription ID and click when it appears.
  5. Store the Subscription ID value to a file.
    The Subscription ID is used later to create a cloud account in Control.

Assign an access control role to the newly registered application.

  1. Click Access control (IAM).

    Add Access Controls
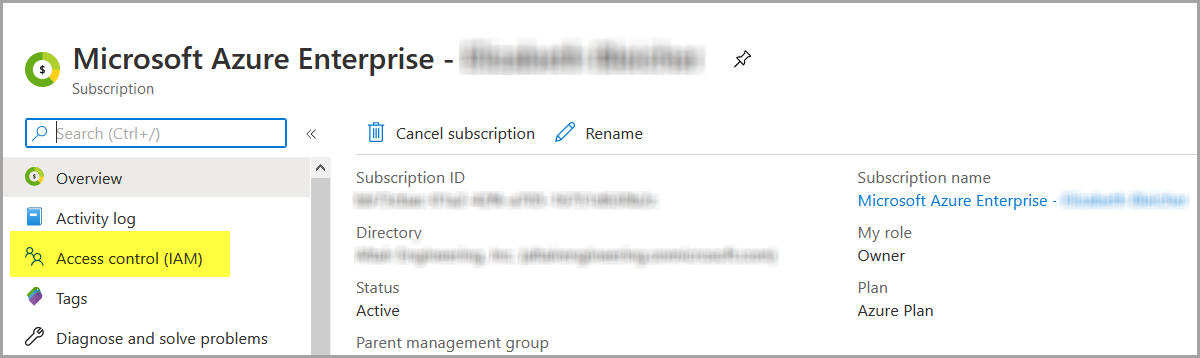
    Figure 2. Add Access Controls
  2. Click Add.
  3. Click Add role assignment.
  4. In the Add role assignment panel, enter the following to assign a role to the newly registered application:
    1. For Role, select Contributor.
    2. For Assign access to, select Azure AD user, group, or service principal.
    3. For Select, search for the newly registered application by entering its name, e.g., pc_cloudapp.
    4. Select the application by clicking on it.
  5. Click Save.

Obtain your Azure tenant ID:

  1. At the top of the web page, click ?.
  2. Click Show diagnostics.
    A dialog box is displayed allowing a file called PortalDiagnostics.json to be saved.
  3. Open the file using any text editor.
  4. Search for tenantId.
  5. Store the value of tenantId to a file.
    The Tenant ID is used later to create a cloud account in Control

Add a Microsoft Azure Cloud Account

Add an Azure cloud account to Control so that you can create a cloud bursting scenario or an appliance.

You should have the following information stored in a file:
  • Application ID generated when registering Control with the Azure Active Directory.
  • Client secret key generated for the newly registered Control application.
  • Subscription ID
  • Tenant ID
This information is necessary to create a cloud account in Control. If you do not have this information see Register the Control Application with Azure.
  1. Login to Control.
  2. Click the Cloud tab.
  3. Click Cloud from the Infrastructure menu located on the left-hand side of the web page.
  4. Click .
  5. Enter the following to add a cloud account:
    1. For Account name, enter any name for the cloud account.
      The name can be anything meaningful to your organization, e.g., azure_cloudaccount.
    2. For Client ID, enter the Application ID generated when Control was registered with the Azure Active Directory.
    3. For Secret Key, enter the client secret key generated for the newly registered Control application.
    4. For AD tenant ID, enter your Azure tenant ID.
    5. For Subscription ID, enter your Azure subscription ID.
  6. Click Create account.

Create a Resource Group

Create a resource group that will contain a virtual network and a virtual machine for cloud bursting.

You must have already purchased an Azure subscription and have an Azure user account.

Azure documentation can be found at What is an Azure resource group and Manage Azure resources through portal.

A resource group is container that holds related resources for an Azure solution. The resource group can include all the resources for the solution, or only those resources that you want to manage as a group. You decide how you want to allocate resources to resource groups based on what makes the most sense for your organization. Once the resource group is created, resources that are placed into the resource group are a virtual network, a virtual machine, and an image of the virtual machine.

  1. Login in to your Microsoft Azure account.
  2. Using the search box, enter resource groups.
    A list of search results is listed.
  3. Under Services, click Resource Groups.
  4. Click Add.

Enter the following to configure the basic settings for the resource group:

  1. For Project Details enter the following:
    1. For Subscription, choose the subscription to be billed for the use of the VM.
    2. For Resource group, enter a name for the resource group.
      The name can be anything meaningful to your organization, e.g., bursting_resource_group.
  2. For Resource Details enter the following:
    1. For Region, select a location based on the geographical location of users.
  3. Click Review + create.
  4. Click Create.
    It may take a moment to create the resource group. All resources (networks, virtual machines, etc.) that are created are placed within this resource group. The name of the resource group is required for creating a bursting scenario in Control.

Create a Virtual Network

Create a virtual network so that you can later create a virtual machine for cloud bursting.

You must have already created a resource group.

Azure documentation can be found at Virtual Network Documentation.

  1. Login in to your Microsoft Azure account.
  2. Using the search box, enter virtual networks.
    A list of search results is listed.
  3. Under Services, click Virtual networks.
  4. Click Add.
  5. For Name, enter a name for the virtual network.
    The name can be anything meaningful to your organization, e.g., bursting_virtual_network
  6. For Address space, enter an address range for the network using CIDR notation.
  7. For Subscription, select the same subscription as was selected for the previously created resource group.
  8. For Resource group, select the previously created resource group.
  9. For Location, select the same geographical location as was selected for the previously created resource group.
  10. For Subnet, enter the following:
    1. For Name, enter a name for the virtual machine's subnet.
      The name can be anything meaningful to your organization, e.g., bursting_subnet
    2. For Address range, enter an address range for the subnet in CIDR notation.
  11. Click Create.
    It may take a moment to create the virtual network. The name of the virtual network is required for creating a bursting scenario in Control.

Create a Virtual Machine

Create a virtual machine in Azure.

You must have already created a virtual network.

You may want to view the following web page to learn about Azure Managed Disks before creating a VM. Additionally, a video is available from Microsoft that shows how to create a virtual machine: Create a Linux Virtual Machine.

  1. Login in to your Microsoft Azure account.
  2. Using the search box, enter virtual machines.
    A list of search results is listed.
  3. Under Services, click Virtual machines.
  4. Click Add.

Enter the following to configure the basic settings for the virtual machine:

  1. For Project Details enter the following:
    1. For Subscription, choose the subscription to be billed for the use of the VM.
    2. For Resource group, choose the previously created resource group.
    3. For Virtual machine name, enter a name for the virtual machine.
      The name can be anything meaningful to your organization, e.g., bursting-vm.
    4. For Region, select the same geographical location as was selected for the previously created resource group.
    5. For Availability options, choose No infrastructure redundancy required.
    6. For Image, click the Browse all public and private images link.
    7. Using the search box:
      • On Linux platforms, enter CentOS 7 or RHEL 7 and press ENTER.
      • On Windows platforms, enter Windows and press ENTER.
    8. Locate the appropriate image and select it.
      On Linux platforms, cloud bursting has been tested on on CentOS 7.2 - 7.6.
      On Windows platforms, cloud bursting has been tested on Windows 10 and Windows Server 2012.
    9. For Size, click the Change size link and select a machine size appropriate for your site's workload based on:
      • the number of cores
      • the amount of memory
      • storage
      • network performance
      Consider the nature of the applications that you plan to deploy on the instance, the number of users that you expect to use the applications, and also how you expect the load to scale in the future. Remember to also factor in the CPU and memory resources that are necessary for the operating system.
    10. Click Select.
  2. For Administrator Account, enter a user account :
    This user will have sudo rights and will be able to connect to the VM to install the PBS MoM.
    • On Linux platforms:
      1. For Authentication type, enable SSH public key.
      2. For Username, enter a username of a user account that exists on your site's PBS Server.
      3. For SSH public key, copy the SSH public key (i.e., id_rsa.pub) of the user account and paste it.
    • On Windows platforms:
      1. For Username, enter a username.
      2. For Password, enter a password.
  3. For Inbound Port Rules, enter the following:
    1. For Public inbound ports, enable Allow selected ports.
    2. For Select inbound ports:
      • For Linux platforms, enable SSH (22).
      • For Windows platforms, enable RDH (3389).
  4. Click Next.

Enter the following to configure the storage settings for the virtual machine:

  1. For Disk Options, enter the following:
    1. For OS disk size, choose an appropriate disk size based on your site's needs.
    2. For OS disk type, choose one of the following options:
      • Premium SSD
      • Standard SSD
      • Standard HDD
      Choose SSD for I/O-intensive applications, where low latency and high throughput are critical. For testing, consider HDD to keep costs down, as you scale up and down quickly.
  2. For Advanced, enter the following:
    1. Click Advanced.
    2. For Use managed disks, choose one of the following options:
      • Yes to use managed disks.
      • No to not use managed disks.
      Enable this feature to have Azure automatically manage the availability of disks to provide data redundancy and fault tolerance, without creating and managing storage accounts on your own. This option is recommended by Azure as it is a lot more scalable.
  3. Click Next.

Enter the following to configure the networking settings for the virtual machine:

  1. For Network Interface, enter the following:
    1. For Virtual network, choose the virtual network previously created.
  2. Click Review + create.
  3. Click Create.
    It may take a few minutes for the VM to be deployed. You will use this virtual machine to create an OS image.
Once the virtual machine is deployed a message is displayed indicating success, click on Go to resource.

Install the PBS MoM on the VM

Install the PBS Professional MoM on the virtual machine and configure the VM per your site's environment.

Install the PBS MoM on the Linux VM

Install the PBS MoM on the Linux virtual machine and configure the VM per your site's environment.

Use SSH to connect to the virtual machine. For more information see Connect to your VM on Linux.

A startup script is provided during the creation of the bursting scenario. This script is ran after a cloud node is burst and is used to set up the system environment so that nodes burst in the cloud can communicate with the PBS Server. A service specifically designed for cloud instance initialization is cloud-init and is utilized by Control when booting cloud nodes, therefore it must be installed on the VM. For more information about installing cloud-init, refer to the Cloudinit Documentation.

The PBS Professional installer package will need to be copied to the virtual machine. Use SCP to copy the tarball file from the PBS Server to the virtual machine. For more information, see Move files to and from a Linux VM using SCP.

  1. Login to your site's PBS Server as the user account (username and the public SSH key) provided during the creation of the VM.
  2. SSH into the virtual machine using the public IP address of the VM:
    ssh IPV4PublicIP
    where IPV4PublicIP is the public IP address of the virtual machine.

    Bursting Virtual Machine
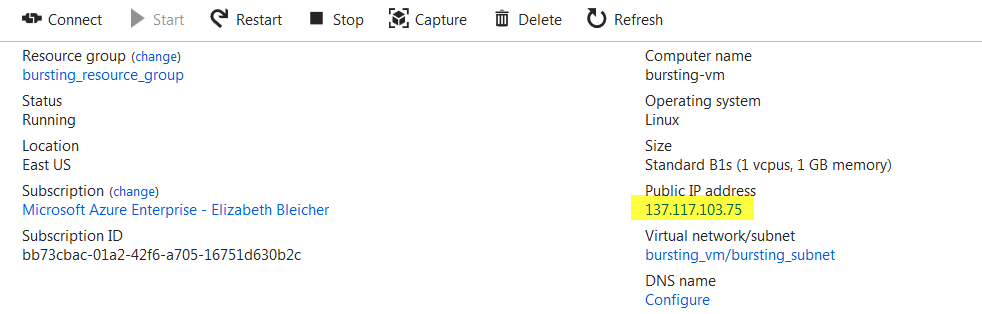
    Figure 3. Bursting Virtual Machine
  3. Enter the command:
    sudo -i
  4. Copy the PBS Professional installation package to the VM.
  5. Using the PBS Professional Installation and Upgrade Guide, install and configure the PBS Professional MOM.
  6. Configure the VM for your site's environment such as mounting file systems, connecting it to the authentication service, installing any applications, etc.
  7. Install cloud-init.
  8. Connect the VM to your PBS Professional server and submit a job to ensure it is working as expected.

Install the PBS MoM on the Windows VM

Install the PBS MoM on the Windows virtual machine and configure the VM per your site's environment.

Use an RDP client to access the virtual machine. A connection can be established to the Windows virtual machine through the Azure portal. For more information see How to connect and sign on to an Azure virtual machine running Windows.

The PBS Professional installer package will need to be copied to the virtual machine. Use RDP to map a local drive to gain access to the installer package.

  1. Login in to your Microsoft Azure account.
  2. Using the search box, enter virtual machines.
    A list of search results is listed.
  3. Under Services, click Virtual machines.
  4. Select the Windows virtual machine created for cloud bursting by clicking its name.
  5. Click Connect.
  6. Click the RDP tab.
  7. Click Download RDP File.
  8. Open the file.
  9. Click Connect.
  10. Enter the password that was established for the Administrator Account when creating the virtual machine.
  11. Click OK.
  12. Click Yes to connect even if there are certificate errors.
    A connection is established with the Windows virtual machine.
  13. Copy the PBS Professional installation package to the VM.
  14. Using the PBS Professional Installation and Upgrade Guide, install and configure the PBS Professional MOM.
  15. Configure the VM for your site's environment such as mounting file systems, connecting it to the authentication service, installing any applications, etc.
  16. Install cloud-init.
  17. Connect the VM to your PBS Professional server and submit a job to ensure it is working as expected.

Create an OS Image

Create an image of the virtual machine configured per your site's requirements.

Create a Linux OS Image

Create an image of the Linux virtual machine configured per your site's requirements.

You must have already create a virtual machine, installed the PBS MoM on the VM and configured the VM per your site's environment.

To create an OS image requires the Azure CLI. Refer to these instructions for installing the CLI How to install the Azure CLI. It is recommended to install the CLI on a Windows or Mac machine and then use the command prompt to execute the CLI commands.

Before you can create an OS image of the previously created VM, you must first SSH into the VM and deprovision it. Next you will use the Azure CLI to deallocate and generalize the VM and then create the image. Generalizing the virtual machine removes any SSH keys and DNS settings from the VM.

Follow Step 1 and Step 2 as documented at the URL How to create an image of a virtual machine or VHD to create an image of the VM.
Note: Before you can deallocate the virtual machine you may have to execute the following commands to set your subscription to be the active subscription.
az account list
az account set --subscription yourSubscriptionID
You can now delete the virtual machine so that you are no longer charged for it.

Create a Windows OS Image

Create an image of the Windows virtual machine configured per your site's requirements.

You must have already create a virtual machine, installed the PBS MoM on the VM and configured the VM per your site's environment.

The VM must first be generalized using Sysprep. For more information see Create a managed image of a generalized VM in Azure.

  1. Login in to your Microsoft Azure account.
  2. Using the search box, enter virtual machines.
    A list of search results is listed.
  3. Under Services, click Virtual machines.
  4. Select the Windows virtual machine created for cloud bursting by clicking its name.
  5. Click Connect.
  6. Click the RDP tab.
  7. Click Download RDP File.
  8. Open the file.
  9. Click Connect.
  10. Enter the password that was established for the Administrator Account when creating the virtual machine.
  11. Click OK.
  12. Click Yes to connect even if there are certificate errors.
    A connection is established with the Windows virtual machine.
  13. Open a Command Prompt window as an administrator.
  14. Using Windows Explorer, navigate to the directory C:\Windows\System32\Sysprep.
  15. Right-click sysprep.exe and select Run as Administrator.
  16. For System Cleanup Action, choose Enter System Out-of-Box Experience (OOBE).
  17. Enable the Generalize check box.
  18. For Shutdown Options, choose Shutdown.
  19. Click OK.
  20. Once the VM is shutdown, close the RDP session.
  21. Navigate to the browser window where the Azure portal is open and the VM details are displayed.
  22. Click Capture.
  23. For name, enter a name for the image.
    The name of the image should contain the string "windows" (case insensitive). For example, Windows Server 2012 R2 Datacenter.
  24. For Resource group, choose the previously created resource group.
  25. For Type the virtual machine name, enter the name of the VM.
  26. Click Create.
You can now delete the virtual machine so that you are no longer charged for it.

Create an Azure Cloud Bursting Scenario

Create an Azure bursting scenario so that PBS execution nodes can be burst in the cloud.

Open a browser window and login to your Microsoft Azure account. Open a second browser window and login to Control.

Before creating a cloud bursting scenario, read the following Azure article about scale sets What are virtual machine scale sets.

A startup script is provided during the creation of the bursting scenario. This script is ran after a cloud node is burst and is used to set up the system environment so that nodes burst in the cloud can communicate with the PBS Server. On Windows platforms, the startup script must be a PowerShell script. For more information see PowerShell Scripting. On Linux platforms, use a cloud-init script. For more information about writing cloud-init scripts, refer to the Cloudinit Documentation and Cloud Bursting Startup Script.

Note: To create a bursting scenario you must enter a resource group, however the resources necessary for creating the bursting scenario (network, subnet, network security group and the OS image) can all reside in a different resource group. However, the resource groups must be in the same geographic location for this to work.
  1. Navigate to the Control browser window.
  2. Click the Cloud tab.
  3. Click Bursting from the Infrastructure menu located on the left-hand side of the web page.
  4. Click Add Bursting Scenario.
  5. Enter information about the bursting scenario such as name, cloud provider, cloud account, and geographic location.
    1. For Name, enter a name for the cloud bursting scenario.
    2. For Description, enter a description.
    3. For Cloud Account, choose a previously created Azure cloud account from the list.
    4. For Region, select the same geographic location as was selected for the previously created bursting resource group.
  6. Click Next.

Enter information about the Azure resources necessary to burst in the cloud.

  1. For Domain name, provide the domain name of your organization for the cloud bursting network.
    altair.com, burst.altair.com
  2. For Hostname prefix, enter a prefix for the names of the burst nodes.
    If "node" is entered , the cloud bursting nodes will be available to PBS Professional as node1, node2, node3, etc.
  3. For Resource group name, place the cursor in the field and choose the resource group created for cloud bursting from the list.
    Tip: Enter the first couple of characters of the resource group name to filter the list.
  4. For Network name, place the cursor in the field and choose the virtual network created for cloud bursting from the list.
    Tip: Enter the first couple of characters of the resource name to filter the list.
  5. For Subnet name, place the cursor in the field and choose the subnet created for cloud bursting from the list.
    Tip: Enter the first couple of characters of the resource name to filter the list.
  6. For Network security group name, place the cursor in the field and choose the network security group created for cloud bursting from the list.
    Tip: Enter the first couple of characters of the resource name to filter the list.
  7. Choose one of the following options based on whether you chose to use the Azure managed disk feature when creating the virtual machine:
    • Enable Managed Storage if you enabled the managed disk feature.
    • Disable Managed Storage if you disabled the managed disk feature.
  8. If you disabled the managed disk feature:
    1. Navigate to the cloud provider browser window.
    2. Click Resource Groups from the menu located on the left-hand side of the web page.
    3. Select the Resource Group created for cloud bursting.
    4. In the list, locate the image that was created for cloud bursting.
      The Type is Image.
    5. Select the image.
    6. Copy the Linux Source BLOB URI.
  9. Navigate to the Control browser window.
  10. Choose one of the following options:
    • When the managed disk feature is enabled, place the cursor in the OS image field and choose the OS image created for cloud bursting from the list.
      Tip: Enter the first couple of characters of the resource name to filter the list.
    • When the managed disk feature is disabled, place the cursor in the OS image field and paste the Source BLOB URI copied from Azure.
      Note: If the OS image is contained in a Resource group that is different from the one entered for the bursting scenario, it must be entered as Resource Group Name/OS Image Name or Resource Group Name/URI.
  11. Enable Add public IP to VMs if you need to connect to the cloud bursting nodes from the internet.
    It is recommended to leave this disabled.
  12. For Maximum number of VMs inside a ScaleSet, specify the limit for your cloud bursting scenario.
    If you use InfiniBand, Azure limits the number of VMs on a scaleset to 100. Without InfiniBand, for a scaleset with managed disk and custom image, you can specify a higher limit.
  13. For Cloud-init script, click Browse, browse for the startup script file and select it.
    This script will run after a cloud node is burst.
  14. Add public SSH keys for any users that you want to have access to the burst nodes:
    1. Login to the PBS Professional Server.
    2. Copy the public SSH key for the user.
      Public key files are usually stored in /.ssh in the user's home directory.
    3. Navigate to the Control browser window.
    4. Click Add to add the public key.
    5. For Public SSH keys, paste the public SSH key.
    6. Repeat steps a through e to add additional public SSH keys.
    The public keys are copied to each burst node for secure connectivity.
  15. For Idle time before unbursting, enter the minimum time that a cloud node can be idle before it is unburst.

    It is expressed as an integer whose units are in seconds.

  16. For Tags, enter a key-value pair to add a label to the cloud node and press ENTER.
    A tag is a label that is assigned to a cloud node. Tags enable cloud nodes to be categorized in different ways, for example, by purpose, owner, or environment.
    The key-value pair must be entered as key:value. The key must be less than 36 characters and the value must be less than 43 characters. The length of both the key + value should be less than 80 characters. Valid values are alphanumeric, dash (-) and an underscore ( _ ).
    Once the tag is added, it will appear within its own bubble.

    Key-Value Tag
    Figure 4. Key-Value Tag
  17. Repeat the previous step to add more tags.

    Additional Tags
    Figure 5. Additional Tags
    Tip: To remove a tag click on the 'x' located within the tag bubble.
  18. Click Next.
  19. Select the instance types to enable for the bursting scenario by clicking the Enabled checkbox located to the far right of the instance type name.
    If an attempt is made to burst nodes with a disabled instance type, the node is not burst and the below message is displayed in the PBS Server logs (if bursting through PBS), the Cloud logs and through the Cloud component user interface.
    TYPE is not enabled

    Where TYPE is the instance type used when attempting to burst the node.

    Tip: Deselect an instance type by disabling the Enabled checkbox.
  20. Click Instantiate scenario.
Once the scenario created, it is recommended to Add a Token and Add Quotas and Alerts. When adding a token, an API key is generated that is required for bursting. Quotas define bursting limits such as the maximum number of cloud nodes to burst.