Configure Amazon Web Service Cloud Bursting

Create the necessary components in AWS that are required for cloud bursting and then create a Control cloud bursting scenario.

Before you can begin creating the AWS components necessary for cloud bursting, you must create and activate an AWS account. For more information see How do I create and activate a new Amazon Web Services account.

Create an Amazon Web Service User Account

Create an Amazon Web Service (AWS) user account so that you can later create a cloud account in Control.

You must already have signed up for an AWS account.

AWS documentation can be found at Creating an IAM User in Your AWS Account.

Create an AWS user account and give this account administrative permissions. Once this task is complete, you should have downloaded a CSV file containing the following:
  • Access key ID
  • Secret access key
This information is necessary to create a cloud account in Control.
  1. Login in the AWS console.
  2. Using the search box located under AWS services, enter IAM.
  3. Click the IAM search result.
    The Identity and Access Management dashboard is opened.
  4. In the navigation pane on the left-hand side of the web page, click Users.
  5. Click Add user.
    This user will have administrative rights to any machines hosted in the cloud.
  6. Enter the following information to add a user:
    1. For User name, enter a name for the user.
      The name can be anything meaningful to your organization, e.g., pc_clouduser.
    2. For Access type, enable Programmatic access.

      The user requires this type of access because Control needs to make API calls or use the AWS CLI. An access key ID and a secret access key are generated for the user.

  7. Click Next:Permissions.
  8. Optional: Click Add user to group.
    This button may already be selected.
  9. Click Create group.
  10. Enter the following information to create a group, add the user to the group, and choose a permission policy for the group.
    1. For Group name, enter a group name.
      The name can be anything meaningful to your organization, e.g., pc_cloudgroup.
    2. For Policy type, enable AdministratorAccess.

      This policy provides full access to AWS services and resources.

  11. Click Create group.
    You are returned to the Add user page and the new group is enabled indicating that the user is added to the new group.
  12. Click Next: Tags.
  13. Click Next: Review.
  14. Click Create user.
  15. Click Download.csv.
  16. Download and save this file in a secure location.
    This file contains an access key ID and a secret access key and is used later to add a cloud account to Control.
  17. Click Close.
    The new user account is displayed.

Add an Amazon Web Service Cloud Account

Add an existing AWS user account to Control so that you can create a cloud bursting scenario.

You must already created an AWS user account, given it administrative permissions and downloaded a CSV file containing an access key ID and a secret access key. The information in the CSV file is necessary to create a cloud account in Control. If you do not have this information see Create an Amazon Web Service User Account.
  1. Login to Control.
  2. Click the Cloud tab.
  3. Click Cloud from the Infrastructure menu located on the left-hand side of the web page.
  4. Click .
  5. Enter the following to add a cloud account:
    1. For Account name, enter any name for the cloud account.
      The name can be anything meaningful to your organization, e.g., aws_cloudaccount.
    2. For Access Key ID, copy and paste the value of Access key ID from the downloaded CSV file.
    3. For Secret Access Key, copy and paste the Secret access key value from the downloaded CSV file.
  6. Enable Use AWS China, to create a cloud account AWS China.
  7. Click Create account.

Multi-Availability Zone Management on AWS

Configure the bursting scenario so that cloud nodes can be burst in several Availability Zones.

Refer to the following AWS documentation if you are not familiar with AWS regions, Availability Zones, VPCs or subnets:
Bursting cloud nodes in multiple Availability Zones allows an HPC complex to distribute the load across a region and take advantage of AWS Spot Instances. Several prerequisites must be met before configuring the bursting scenario:
  • An AWS virtual private cloud (VPC) must be created.
  • A subnet for each Availability Zone must be created and each subnet must belong to the same VPC.
Once these prerequisites are met, then it is as simple as providing a comma-separated list of subnets when the bursting scenario is created.

List of Subnets
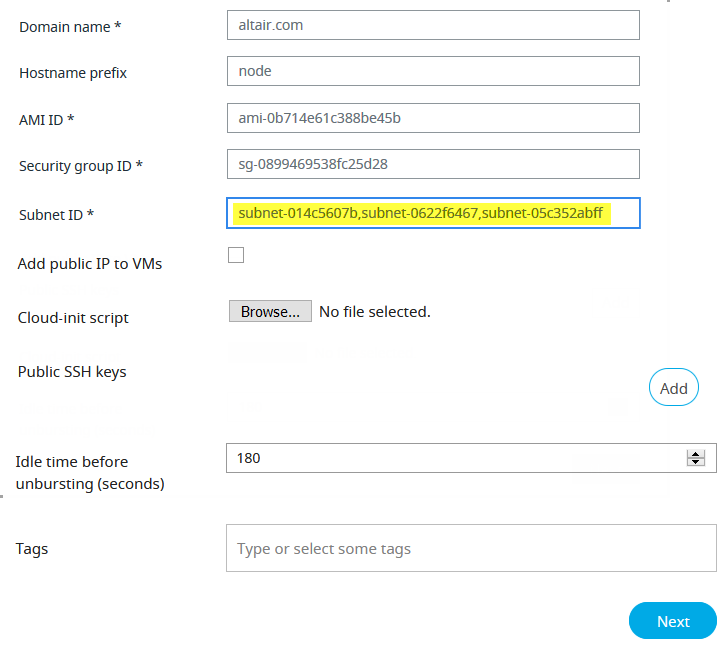
Figure 1. List of Subnets

Control attempts to burst cloud nodes in the first subnet in the list. If there is no availability in that subnet, then it will attempt to burst cloud nodes in the next subnet in the list and will continue until a subnet is found where the cloud nodes can be burst or until all subnets are exhausted (i.e. bursting fails). The cloud bursting hook attempts to burst all requested cloud nodes in a single subnet. Cloud nodes are not burst across subnets. This same process is followed each bursting cycle until there is availability for the cloud nodes.

Example

10 cloud nodes are requested for bursting.

  1. The cloud bursting hook attempts to burst all 10 nodes in subnet-014c5607b.
  2. If there is no availability in subnet-014c5607b, the hook attempts to burst all 10 cloud nodes in subnet-0622f6467.
  3. If there is no availability in subnet-0622f6467, the hook attempts to burst all 10 cloud nodes in subnet-05c352abff.
  4. If there is no availability in subnet-05c352abff, then cloud bursting fails.

Create a Virtual Private Cloud Network

Create a Virtual Private Cloud (VPC) so that you can later create a virtual machine for cloud bursting.

Login to your AWS Management Console and choose a region based on the geographical location of your users. All cloud resources that are created are placed in this region. For more information see Regions and Availability Zones. The menu for selecting a region is located at the upper right-hand corner of the AWS Console menu bar.

AWS Region
Figure 2. AWS Region
AWS documentation can be found at Getting Started with IPv4 for Amazon VPC and Working with VPCs and Subnets.

To configure the bursting scenario so that cloud nodes can be burst in several Availability Zones, create a subnet for each Availability Zone that you want to burst in. For more information see Multi-Availability Zone Management on AWS.

  1. Login in the AWS console.
  2. Click located in the upper left-hand corner of the web page.
  3. Using the search box located under AWS services, enter VPC.
  4. Click the VPC search result.
    The VPC dashboard is opened.
  5. Click Your VPCs from the menu located on the left-hand side of the web page.

Create a virtual private cloud.

  1. Click Create VPC.
  2. Enter the following to create a VPC:
    1. For Name, enter any name for the VPC.
      The name can be anything meaningful to your organization, e.g., bursting_vpc.
    2. For IPv4 CIDR block, provide an address range in CIDR notation.
    3. For IPv6 CIDR block, enable No IPv6 CIDR Block.
    4. For Tenancy, choose Default.
  3. Click Yes, Create.

Create subnets for the VPC:

  1. Click Subnets from the menu located on the left-hand side of the web page.
  2. Click Create Subnet.
    1. For Name tag, enter a name for the subnet.
      The name can be anything meaningful to your organization, e.g., bursting_subnet.
    2. For VPC, choose the VPC that was previously created (e.g. bursting_vpc).
    3. For Availability Zone, choose one of the following options:
      • Choose a unique availability zone for each subnet.
      • Choose No Preference to let Amazon choose an Availability Zone for you.
    4. For IPv4 CIDR block, provide an address range in CIDR notation.
  3. Click Create.
  4. Click Close.

Create an Internet Gateway

Create an internet gateway and attach it to the bursting VPC.

AWS documentation can be found at Internet Gateways.

An internet gateway must be created so that you can later SSH into the virtual machine that is used for cloud bursting.

  1. Login in the AWS console.
  2. Click located in the upper left-hand corner of the web page.
  3. Using the search box located under AWS services, enter VPC.
  4. Click the VPC search result.
    The VPC dashboard is opened.
  5. Click Internet Gateways from the menu located on the left-hand side of the web page.
  6. Click Create internet gateway.
  7. Enter the following to create an internet gateway:
    1. For Name tag, enter a name for the internet gateway.
      The name can be anything meaningful to your organization, e.g., bursting_gateway
  8. Click Create.
  9. Click Close.
  10. Select the internet gateway that was just created by enabling the check box next to the name of the gateway.
    Tip: You may need to deselect any other internet gateways that are displayed in the list. Amazon creates default resources for your selected region so a default internet gateway may already exist.
  11. Click Actions > Attach to VPC.
  12. Select the VPC that was created previously (e.g. bursting_vpc).
  13. Click Attach.

Update the VPC Route Table

Add a rule to the VPC route table that allows all internet access and associate the route table to the bursting subnet.

AWS documentation can be found at Route Tables.
  1. Login in the AWS console.
  2. Click located in the upper left-hand corner of the web page.
  3. Using the search box located under AWS services, enter VPC.
  4. Click the VPC search result.
    The VPC dashboard is opened.
  5. Click Route Tables from the menu located on the left-hand side of the web page.
    A list of route tables is displayed.
  6. Select the route table attached to your VPC (e.g. bursting_vpc) by enabling the check box next to the name of the route table.
    The VPC column in the route table list specifies the VPC to which the route table is attached.
  7. Click the Routes tab at the bottom of the web page.
  8. Click Edit routes.

    Add a Route
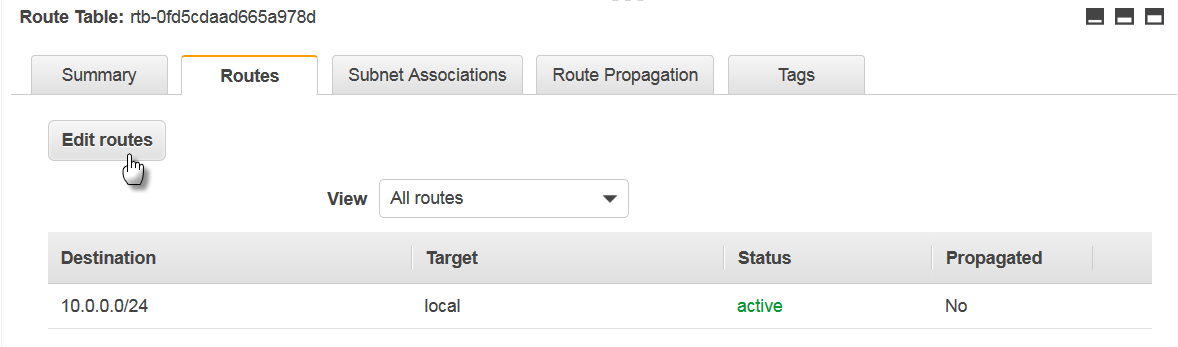
    Figure 3. Add a Route
  9. Click Add route.

Add a rule that allows all traffic access to the internet gateway:

  1. Enter the following to add a rule:
    1. For Destination, enter 0.0.0.0/0.
    2. For Target, select Internet Gateway and then the internet gateway that was created previously (e.g. bursting_gateway).
  2. Click Save routes.
  3. Click Close.

Associated the route table to the bursting subnet:

  1. Click the Subnet Associations tab.
  2. Click Edit subnet associations.
  3. Select the subnet created for cloud bursting from the list.
  4. Click Save.

Add Inbound Rules to the VPC Security Group

Add inbound rules to the VPC security group so that a connection can be established with an AWS VM using SSH or RDP.

  1. Login in the AWS console.
  2. Click located in the upper left-hand corner of the web page.
  3. Using the search box located under AWS services, enter VPC.
  4. Click the VPC search result.
    The VPC dashboard is opened.
  5. Click Security Groups from the Security menu located on the left-hand side of the web page.
  6. Select the security group associated to the VPC created for cloud bursting by enabling the check box next to its name.
    A default VPC security group is created when the VPC is created.
  7. Click the Inbound Rules tab at the bottom of the web page.
  8. Click Edit rules.
  9. Click Add Rule.
  10. Add security rules based on your site's requirements.
    • On Linux platforms, add an inbound rule to allow SSH traffic on port 22.
    • On Windows platforms, add an inbound rule to allow RDP traffic on port 3389.

    Recommended Security Rules
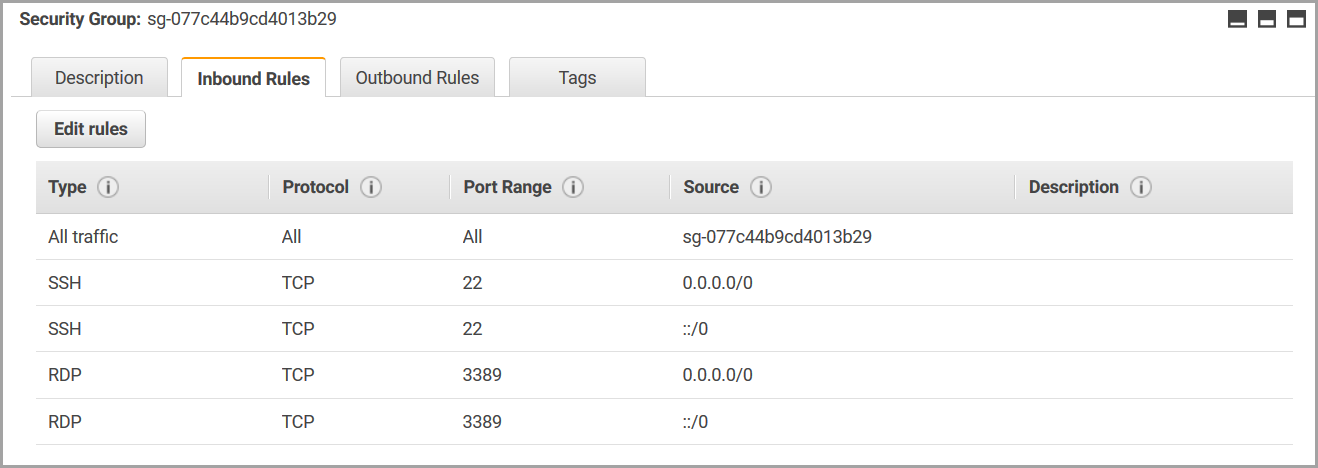
    Warning: 0.0.0.0/0 enables all IPv4 addresses to access your instance. ::/0 enables all IPv6 address to access your instance. This is acceptable for a short time in a test environment, but it's unsafe for production environments. In production, authorize only a specific IP address or range of addresses to access your instance.
    Figure 4. Security Rules
  11. Click Save rules.

Create a Virtual Machine

Create a virtual machine in AWS Elastic Compute Cloud (EC2).

  1. Login in the AWS console.
  2. Click located in the upper left-hand corner of the web page.
  3. Using the search box located under AWS services, enter EC2.
  4. Click the EC2 search result.
    The EC2 dashboard is opened.
  5. Click Instances from the menu located on the left-hand side of the web page.
  6. Click Launch Instance.
  7. Click AWS Marketplace from the menu located on the left-hand side of the web page.
  8. Using the search box:
    • On Linux platforms, enter CentOS 7 or RHEL and press ENTER.
    • On Windows platforms, enter Windows and press ENTER.
  9. Locate the appropriate Amazon Machine Image (AMI) and click Select.
    On Linux platforms, cloud bursting has been tested on CentOS 7.2 - 7.6.
    On Windows platforms, cloud bursting has been tested on Windows 10 and Windows Server 2012.
  10. Click Continue.
  11. Select an Instance Type appropriate for your site's workload based on:
    • the number of cores
    • the amount of memory
    • storage
    • network performance
    Consider the nature of the applications that you plan to deploy on the instance, the number of users that you expect to use the applications, and also how you expect the load to scale in the future. Remember to also factor in the CPU and memory resources that are necessary for the operating system.
  12. Click Next: Configure Instance Details.
  13. Enter the following to configure instance details:
    1. For Number of instances, specify 1.
    2. For Network, choose the VPC that you previously created (e.g. bursting_vpc).
      The bursting subnet is automatically populated.
    3. For Auto-assign Public IP, select Enable.
  14. Click Next: Add Storage.
  15. Specify the storage options as per your site's requirements.
    Tip: It is recommended to enable Delete on Termination to delete EBS volumes when the virtual machine is terminated.
  16. Click Next: Add Tags.
  17. Optional: You can add tags in key-value pairs for the VM per your site's requirements.
  18. Click Next: Configure Security Group.
  19. Enter the following to assign a security group to the VM:
    1. For Assign a security group, enable Select an existing security group.
    2. Select the security group that was automatically created for the cloud bursting VPC by enabling the check box next to its name.
  20. Click Review and Launch.
  21. Review the VM information of the VM and click Launch.
  22. Create a new public/private key pair for the VM by entering the following:
    1. Select Create a new key pair.
    2. Provide a name for the key pair.
    3. Click Download Key Pair.
    4. Download and save this file in a secure location.
      The information in this .pem file is used later to SSH into the VM.
  23. Click Launch Instances.
  24. Click View Instances located at the bottom of the web page.
    All virtual machines that have been created are displayed.
Your virtual machine is ready when the Instance State is equal to "running" and Status Checks are complete. The virtual machine can be accessed using its IPv4 Public IP.

Bursting Virtual Machine
Figure 5. Bursting Virtual Machine

Install the PBS MoM on the VM

Install the PBS Professional MoM on the virtual machine and configure the VM per your site's environment.

Install the PBS MoM on the Linux VM

Install the PBS Professional MoM on the Linux virtual machine and configure the VM per your site's environment.

On Linux platforms, the username for logging into the virtual machine is dependent on the Amazon Machine Image (AMI) that you used to create the virtual machine. For example, the user name for a CentOS AMI is "centos". For information about user names and instructions for connecting and copying files to the Linux virtual machine see Connecting to Your Linux Instance Using SSH.

You will need the .pem file downloaded while creating the VM to establish a connection.

A startup script is provided during the creation of the bursting scenario. This script is ran after a cloud node is burst and is used to set up the system environment so that nodes burst in the cloud can communicate with the PBS Server. A service specifically designed for cloud instance initialization is cloud-init and is utilized by Control when booting cloud nodes, therefore it must be installed on the VM. For more information about installing cloud-init, refer to the Cloudinit Documentation.

The PBS Professional installer package will need to be copied to the virtual machine. Use SCP to copy the tarball file from the PBS Server to the virtual machine. For more information, see Transferring Files to Linux Instances from Linux Using SCP .

  1. Login to your site's PBS Professional Server.
  2. SSH into the virtual machine as the user "centos" using the .pem file and the IPv4 Public IP assigned to the VM:
    ssh -i /path/my-key-pair.pem centos@IPV4PublicIP
    where /path/my-key-pair.pem is the path to the .pem file downloaded while creating the virtual machine and IPV4PublicIP is the public IP address of the virtual machine.

    Bursting Virtual Machine
    Figure 6. Bursting Virtual Machine
  3. Enter the command:
    sudo -i
  4. Copy the PBS Professional installation package to the VM.
  5. Using the PBS Professional Installation and Upgrade Guide, install and configure the PBS Professional MOM.
  6. Configure the VM for your site's environment such as mounting file systems, connecting it to the authentication service, installing any applications, etc.
  7. Install cloud-init.
  8. Connect the VM to your PBS Professional server and submit a job to ensure it is working as expected.

Installing the PBS MoM on the Windows VM

Install the PBS Professional MoM on the Windows virtual machine and configure the VM per your site's environment.

Use an RDP client to access the virtual machine. A connection can be established to the Windows virtual machine through the AWS EC2 console. See Connect to Your Windows Instance for more information.

You will need the .pem file downloaded while creating the VM to establish a connection.

The PBS Professional installer package will need to be copied to the virtual machine. Use RDP to map a local drive to gain access to the installer package. For more information, see Transfer Files to Windows Instances.

  1. Login in the AWS console.
  2. Click located in the upper left-hand corner of the web page.
  3. Using the search box located under AWS services, enter EC2.
  4. Click the EC2 search result.
    The EC2 dashboard is opened.
  5. Click Instances from the menu located on the left-hand side of the web page.
  6. Select the Windows virtual machine created for cloud bursting by enabling the check box next to its name.
  7. Click Connect.
  8. Click Get Password.
  9. Browse to the .pem file downloaded while creating the VM.
  10. Open the .pem file.
  11. Click Decrypt Password.
  12. Hover over the decrypted password.
    A copy to clipboard icon is displayed.
  13. Click .
  14. Click Download Remote Desktop File.
  15. Open the file.
  16. Click Connect.
  17. For Password, paste the password copied to the clipboard.
  18. Click OK.
  19. Click Yes to connect even if there are certificate errors.
    A connection is established with the Windows virtual machine.
  20. Copy the PBS Professional installation package to the VM.
  21. Using the PBS Professional Installation and Upgrade Guide, install and configure the PBS Professional MOM.
  22. Configure the VM for your site's environment such as mounting file systems, connecting it to the authentication service, installing any applications, etc.
  23. Install cloud-init.
  24. Connect the VM to your PBS Professional server and submit a job to ensure it is working as expected.

Create an OS Image

Create an image of the virtual machine configured per your site's requirements.

You must have already create a virtual machine, installed the PBS Professional MoM on the VM and configured the VM per your site's environment.

AWS documentation can be found at Create an AMI from an Amazon EC2 Instance.

  1. Login in the AWS console.
  2. Click located in the upper left-hand corner of the web page.
  3. Using the search box located under AWS services, enter EC2.
  4. Click the EC2 search result.
    The EC2 dashboard is opened.
  5. Click Instances from the menu located on the left-hand side of the web page.
  6. Select the virtual machine created for cloud bursting by enabling the check box next to its name.
  7. At the top, click Actions > Instance State > Stop.
  8. Click Yes, Stop.
    It may take some time for the virtual machine to be stopped.
    Important: Do not proceed until the Instance State is "stopped".
  9. Click Actions > Image > Create Image.
  10. For Image name, enter a name for the image.
    The name can be anything meaningful to your organization, e.g., bursting_image.
    Important: On Windows platforms, the name of the image should contain the string "windows" (case insensitive). For example, Windows_Server-2012-R2_RTM-English-64Bit-Base-2019.11.13.
  11. Click Create Image.
  12. Click the View pending image ami-xxxxxxxxxx link.
    The image is complete when its Status is "available".
You can now delete the virtual machine so that you are no longer charged for it.

Create an AWS Cloud Bursting Scenario

Create an AWS bursting scenario so that PBS Professional execution nodes can be burst in the cloud.

Open a browser window and login to your AWS Management Console. Open a second browser window and login to Control.

A startup script is provided during the creation of the bursting scenario. This script is ran after a cloud node is burst and is used to set up the system environment so that nodes burst in the cloud can communicate with the PBS Server. On Windows platforms, the startup script must be a PowerShell script. For more information see PowerShell Scripting. On Linux platforms, use a cloud-init script. For more information about writing cloud-init scripts, refer to the Cloudinit Documentation and Cloud Bursting Startup Script.

  1. Navigate to the Control browser window.
  2. Click the Cloud tab.
  3. Click Bursting from the Infrastructure menu located on the left-hand side of the web page.
  4. Click Add Bursting Scenario.
  5. Enter information about the bursting scenario such as name, cloud provider, cloud account, and geographic location.
    1. For Name, enter a name for the cloud bursting scenario.
    2. For Description, enter a description.
    3. For Cloud Account, choose a registered AWS account from the list.
    4. For Region, select a region from the list that matches the region selected in AWS.

      AWS Region
      Figure 7. AWS Region
  6. Click Next.
  7. For Domain name, provide the domain name of your organization for the cloud bursting network.
    altair.com, burst.altair.com
  8. For Hostname prefix, enter a prefix for the names of the burst nodes.
    If "node" is entered , the cloud bursting nodes will be available to PBS Professional as node1, node2, node3, etc.
  9. Navigate to the cloud provider browser window.
  10. Click located in the upper left-hand corner of the web page.
  11. Using the search box located under AWS services, enter EC2.
  12. Click the EC2 search result.
    The EC2 dashboard is opened.
  13. Click AMIs from the menu located on the left-hand side of the web page.
  14. Select the Amazon Machine Image (AMI) created for cloud bursting by enabling the check box next to its name.
  15. In the Details tab located at the bottom of the web page, hover over the AMI ID.
    A copy to clipboard icon is displayed.
  16. Click .
  17. Navigate to the Control browser window.
  18. For AMI ID, paste the AMI ID copied from AWS.
  19. Navigate to the cloud provider browser window.
  20. Click Security Groups from the NETWORK & SECURITY menu located on the left-hand side of the web page.
  21. Select the Security Group associated with the VPC and the VM by enabling the check box next to its Group ID.
  22. In the Description tab located at the bottom of the web page, hover over the Group ID.
    A copy to clipboard icon is displayed.
  23. Click .
  24. Navigate to the Control browser window.
  25. For Security group ID, paste the Group ID copied from AWS.
  26. Navigate to the cloud provider browser window.
  27. Click located in the upper left-hand corner of the web page.
  28. Using the search box located under AWS services, enter VPC.
  29. Click the VPC search result.
    The VPC dashboard is opened.
  30. Click Subnets from the menu located on the left-hand side of the web page.
  31. Select the subnet for the bursting VPC by enabling the check box next to its name.
  32. In the Description tab located at the bottom of the web page, hover over the Subnet ID.
    A copy to clipboard icon is displayed.
  33. Click .
  34. Navigate to the Control browser window.
  35. For Subnet ID, paste the Subnet ID copied from AWS.
    To configure the bursting scenario so that cloud nodes can be burst in several Availability Zones, providing a comma-separated list of subnet IDs.
  36. Enable Add public IP to VMs if you need to connect to the cloud bursting nodes from the internet.
    It is recommended to leave this disabled.
  37. For Cloud-init script, click Browse, browse for the startup script file and select it.
    This script will run after a cloud node is burst.
  38. Add public SSH keys for any users that you want to have access to the burst nodes:
    1. Login to the PBS Professional Server.
    2. Copy the public SSH key for the user.
      Public key files are usually stored in /.ssh in the user's home directory.
    3. Navigate to the Control browser window.
    4. Click Add to add the public key.
    5. For Public SSH keys, paste the public SSH key.
    6. Repeat steps a through e to add additional public SSH keys.
    The public keys are copied to each burst node for secure connectivity.
  39. For Idle time before unbursting, enter the minimum time that a cloud node can be idle before it is unburst.

    It is expressed as an integer whose units are in seconds.

  40. For Tags, enter a key-value pair to add a label to the cloud node and press ENTER.
    A tag is a label that is assigned to a cloud node. Tags enable cloud nodes to be categorized in different ways, for example, by purpose, owner, or environment.
    The key-value pair must be entered as key:value. The key must be less than 36 characters and the value must be less than 43 characters. The length of both the key + value should be less than 80 characters. Valid values are alphanumeric, dash (-) and an underscore ( _ ).
    Once the tag is added, it will appear within its own bubble.

    Key-Value Tag
    Figure 8. Key-Value Tag
  41. Repeat the previous step to add more tags.

    Additional Tags
    Figure 9. Additional Tags
    Tip: To remove a tag click on the 'x' located within the tag bubble.
  42. Click Next.
  43. Select the instance types to enable for the bursting scenario by clicking the Enabled checkbox located to the far right of the instance type name.
    If an attempt is made to burst nodes with a disabled instance type, the node is not burst and the below message is displayed in the PBS Server logs (if bursting through PBS), the Cloud logs and through the Cloud component user interface.
    TYPE is not enabled

    Where TYPE is the instance type used when attempting to burst the node.

    Tip: Deselect an instance type by disabling the Enabled checkbox.
  44. Click Instantiate scenario.
Once the scenario created, it is recommended to Add a Token and Add Quotas and Alerts. When adding a token, an API key is generated that is required for bursting. Quotas define bursting limits such as the maximum number of cloud nodes to burst.