Pages and Windows
The main display area of the user interface is called a page. Each page can contain up to 16 windows.
Any window on a page can display an HM model (HyperMesh), MBD model (MotionView), animation (HyperView), 2D plot (HyperGraph), 3D plot (HyperGraph 3D), text (TextView), or media file (MediaView).
All pages and windows are created and stored in a hierarchical list in the Session Browser. You can create unlimited pages in a session; however, only one page can be displayed at a time.
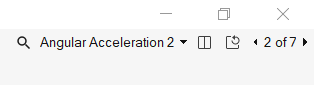
Figure 1.
Create and Modify Pages
Create pages or modify an existing page's properties, such as name, publish settings, and layout.
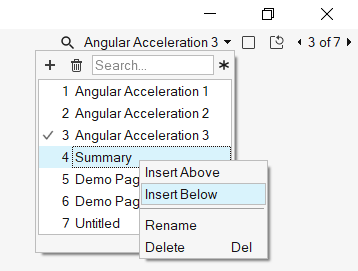
Figure 2.
Using the page title drop-down, you can insert pages at the desired location.
Change Page Layout
Change the layout of each page to suit your needs.
A typical layout might consist of a large window on the left displaying an animation with two smaller windows on the right tracking relevant data points on corresponding plots. There are 20 possible page arrangements.
The default layout is a single window; however a different default layout can be specified using the *SetDefaultPageLayout() statement in the preferences.mvw file.
-
Click
 (Page Layout) on the page navigation tools.
-
Select a layout from the list of options.
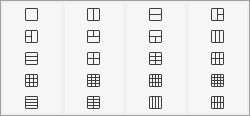
Figure 3. Page Layout Menu
Expand/Reduce Windows
On pages that contain more than one window, you can expand and reduce windows.
 - Expand the active window to full
screen.
- Expand the active window to full
screen.Expanded windows are reduced to their original size if you turn the page.
 - Reduce the expanded window to the normal page
layout.
- Reduce the expanded window to the normal page
layout.
Swap Windows
Exchange the active window's position with another window on the same page.
-
Left-click and hold the drag icon
 in
the top-right of the window's graphics area.
in
the top-right of the window's graphics area.
Copy/Paste Pages and Windows
- In the Session Browser, right-click on the page/window to copy and select Copy from the context menu.
-
Paste page/window.
Option Description Paste page Right-click and select Paste from the context menu. A new page, with the same name and contents as the copied page, is created.
Paste window Right-click on the window where you want to paste the copied window (the window can be on the same page or a different page), and select Paste from the context menu. The contents of the window are replaced with the contents of the copied window. The original contents of the window are discarded.
When a window is copied, the model retains its orientation when it is pasted into the new window and it is automatically scaled to fit the window. The animation is not re-loaded in the second window; rather, it is a linked copy of the original. Entity attributes such as color and transparency are shared between windows, but the models can be oriented independently.Restriction: This feature is only applicable in HyperView, HyperGraph and TextView.
Overlay Pages and Windows
- In the Session Browser, right-click on the page/window to copy and select Copy from the context menu.
-
Overlay two pages/windows.
Option Description Overlay two pages Right-click on another page with the same page layout, containing windows of corresponding types, and select Overlay from the context menu. Overlay two windows Right-click on another window of the same type and select Overlay from the context menu.
Synchronize Windows
The Synchronize Windows dialog allows you to manipulate the view matrix of multiple models in multiple windows at the same time and supports the synchronization of the axis range settings of multiple 2D plotting windows on the same page.
Click ![]() on the page navigation tools.
on the page navigation tools.
The number of available windows on the current page is represented by colored squares (which are arranged in the same page/window layout), and the active window is also displayed.
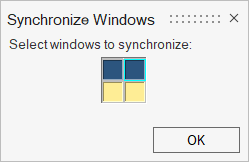
Figure 4. Synchronize Windows dialog with two animation windows and two plot windows, one animation window active
For animation windows, the default setting for synchronization is on; for 2D plot clients, the default setting is off.
If synchronization for some animation windows on the active page is turned on, it is turned on for all animation windows on all pages that you switch to, as long as the Synchronize Windows icon displays the green active symbol. If animation windows should not be included, you must turn them off individually.
For HyperGraph 2D, XY plot windows display the reverse behavior - the default setting is turned off. If you make a plot window active and start the tool, only the plot windows are enabled for selection, but they are not active by default. Plot windows must be turned on individually to participate in the synchronization. This must be done for all the plot windows on all pages where you want this feature to be active.
Note that for HyperGraph, the synchronization applies only to zooming and panning, and axis attributes. Other plot attributes, such as background color, foreground color, and so on, can not be synched.
- Zooming/panning
- Tics/grids
- Axis format
- Axis units
- Updates will apply to secondary axes as well, where applicable. If a selected window is model, text or video window, then it is ignored.
- Synchronize Windows for plots overrules the Axis panel's Fit Range option, located on the Scales and Tics tab.
- Only windows with the same number of axes will be synced.
- Changing the scaling and the units of an axis will be used in the synced axis of the other plots.
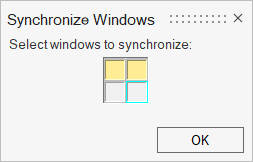
Figure 5. Synchronize Windows dialog with two animation clients and two plot clients, no plot client selected
Start Window Synchronization
-
From
the page navigation tools, click
 .
The Synchronize Windows dialog is displayed.Note: Only windows of the client type which can be synchronized with the active client are enabled for selection/de-selection. By default, all windows are displayed in the currentmodeling window background color, indicating that these windows are active for view synchronization. Windows that are selected for synchronization are dark blue, and non-selected windows are grey. Windows which can’t be synchronized with the current active window are yellow.
.
The Synchronize Windows dialog is displayed.Note: Only windows of the client type which can be synchronized with the active client are enabled for selection/de-selection. By default, all windows are displayed in the currentmodeling window background color, indicating that these windows are active for view synchronization. Windows that are selected for synchronization are dark blue, and non-selected windows are grey. Windows which can’t be synchronized with the current active window are yellow. -
Click one of the rectangles (which represents a page window) to exclude it from
the synchronization.
The window's background color changes to the same color as the dialog for all windows that are excluded.
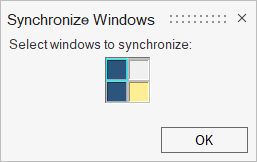 Figure 6. Synchronized Windows Dialog with one excluded window
Stop Window Synchronization
-
From the page navigation tools, click .
Note: No pop-up dialog is associated with this option.The synchronization is stopped across all windows/pages.