HVVH-9000: Manufacturing Solution Tab - HyperXtrude

In this tutorial, you will setup a model in HyperXtrude and identify problems during the HyperXtrude interactive operation.


FE Model Setup

  1. From the Manufacturing Solution tab, select the HyperXtrude/HyperModel > FE Model > Model Setup tab.
  2. See the FE Model Tab > Model Setup topic for more information on model setup.

Basic Import and Export

Identify any loss of data during HyperXtrude import and export operations.

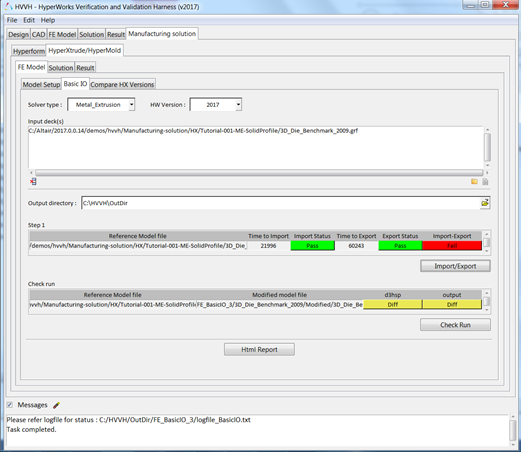
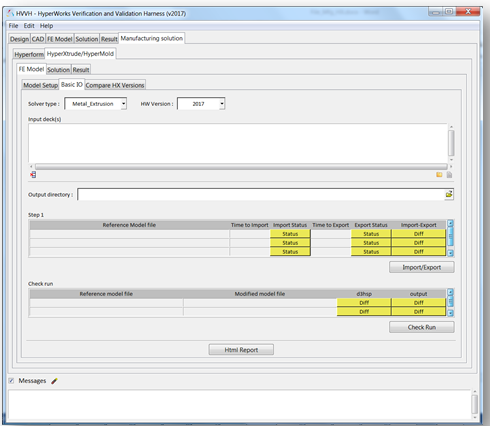
  1. From the Manufacturing solution tab, select the HyperXtrude/HyperModel > FE Model > Basic IO tab.


    Figure 1.
  2. From the Solver Type list, select Metal_Extrusion.
  3. From the HW Version list, select 2021.
  4. Under Input decks section, click the file browser icon, , or the add file icon, , to open the file 3D_Die_Benchmark_2009.grf, located in ..\tutorials\hvvh\Manufacturing-solution\HX\Tutorial-001-ME-SolidProfile.
  5. In the Output directory field, click to select an output directory.
  6. Click Import/Export.

    Step 1 displays the import and export details and status (pass or fail) of the reference model file (selected above).

    The last column displays information on the ASCII differences between the imported file and the HyperMesh exported file. Pass (no differences) or Fail is displayed.

    The original model and the HyperXtrude exported models are run with the Radioss solver and the OUT file blocks are compared as shown in the status.

    In the Messages window, the run details are displayed along with the log file location.


    Figure 2.
  7. Click HTML Report to open an HTML report.


    Figure 3.

Compare HyperXtrude Versions

Compare the analysis decks exported in different versions of HyperXtrude.

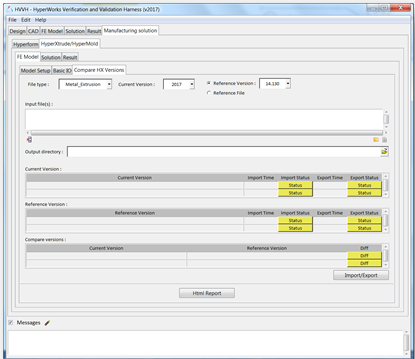
  1. From the Manufacturing solution tab, select the > HyperXtrude/HyperModel > FE Model > Compare HX Versions tab.


    Figure 4.
  2. From the Solver type list, select Metal_Extrusion.
  3. From the Current Version list, select 2021.
  4. From the Reference Version list, select 14.0.0.130.
  5. Under the Input file section, click the file browser icon, , or the add file icon, , to open the file 3D_Die_Benchmark_2009.grf, located in ..\tutorials\hvvh\Manufacturing-solution\HX\Tutorial-001-ME-SolidProfil3.
  6. In the Output directory field, click to select an output directory.
  7. Click Import/Export.

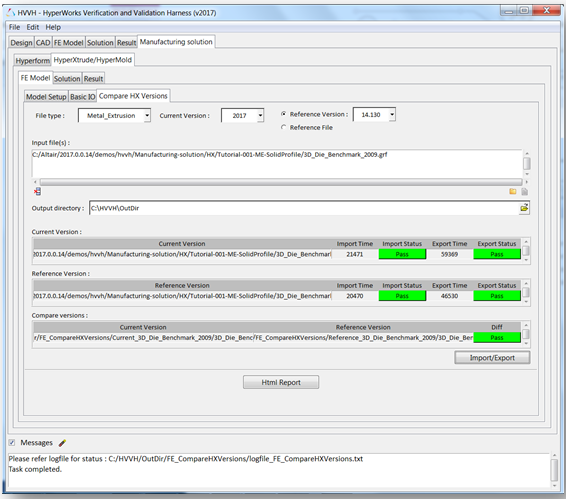
    The first table displays the import and export details and status (pass or fail) of the model file (selected above) in the current version.

    The second table displays the import and export time and status (pass or fail) of the model file (selected above) in the reference version.

    The last column displays information on the ASCII differences between the exported files in the current and reference versions of HyperMesh. Pass (no differences) or fail is displayed.

    In the Messages window, the run details are displayed along with the log file location.

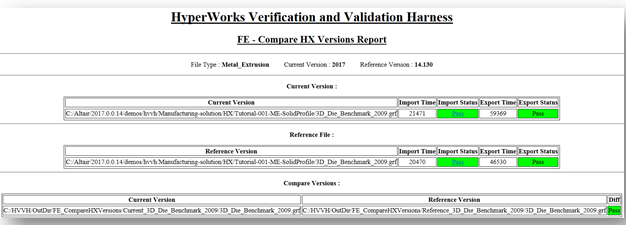
  8. Click HTML Report to open an HTML report.


    Figure 5.


    Figure 6.

Solver Check Run for HyperXtrude

In this step, you will perform a check run on a solver deck (HyperXtrude and tool deflection), and compare OUT files from a solver-written result file after the check run.

Three options are available for the solver check run:

  • Two OUT files generated from the solver run can be compared.
  • The current solver run OUT file can be compared with the reference OUT file.
  • Two OUT files generated from the same solver deck using two different solver versions can be compared.
  1. From the Manufacturing solution tab, select the > HyperXtrude/HyperModel > Solutions > Check run tab.
  2. See the topic Perform a Solver Check Run for more information on the tab's options.

Compare Results from Different Solver Versions

In this step, you will perform solver version result comparison for any given model's solver results. If the result files are not available, the solver run can be performed in the background and the results generated are used in the result comparison.

  1. From the Manufacturing solution tab, select the > HyperXtrude/HyperModel > Solutions > Solver version results comparison tab.
  2. See the Compare Solver Version Results topic for more information on the options available.
Compare HyperXtrude Solver Results Across HyperView Versions

  1. From the Manufacturing solution tab, select the HyperXtrude/HyperModel > Result > Solver result comparison HV versions tab.
  2. See the Compare HV Solver Version Results topic for more information on the options available.