In this tutorial, you will learn how to perform model setup in HyperMesh and identify problems during the interactive
HyperMesh operation.
FE Model Setup - First Use Case
In this step you will perform the FE Model setup using the Model Setup
tab.
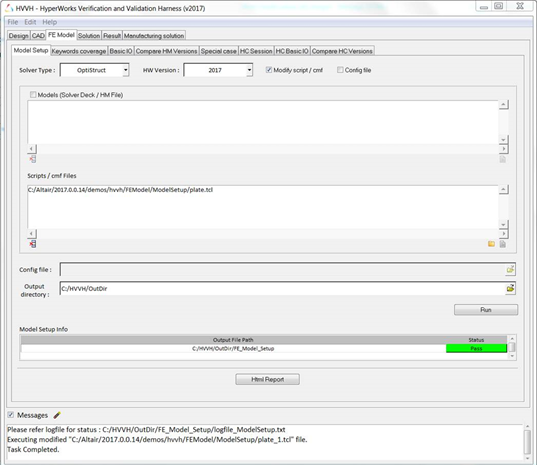
From the FE Model tab, select the Model
Setup tab.
Figure 1.
From the Solver Type list, select OptiStruct.
From the HW Version list, select 2021.
Click the Modify script/cmf checkbox.
Do not select the Config file or Models option.
Under the Script/cmf files section, click the file browser icon, , or the
add file icon, , to load the Plate.tcl file,
located in ..\tutorials\hvvh\FEModel\ModelSetup.
In the Output directory field, click to
select an output directory.
Click Run.
Figure 2.
The model file with the script is imported and a set of operations in
HyperMesh are executed. The status is
displayed under Model Setup info.
If the selected Tcl file is executed correctly and there are no problems with
the HyperMesh operations, the status displays
Pass.
In the Messages window, the run details and the log file
location are displayed.
Click HTML Report to open an HTML report which contains
details of the script executed in HyperMesh.
FE Model Setup - Second Use Case
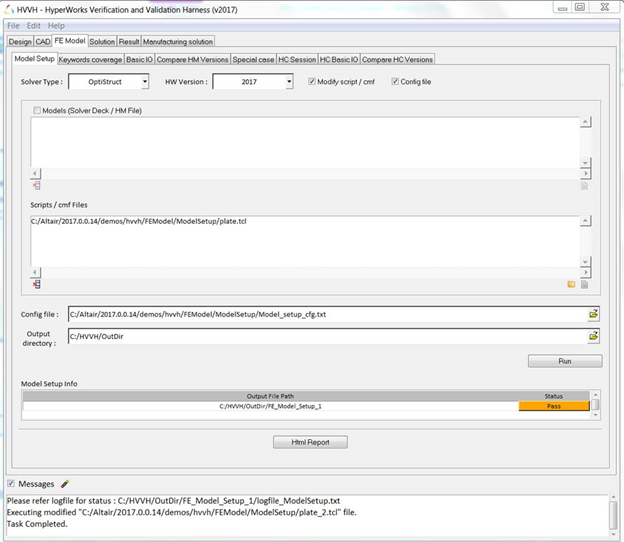
From the FE Model tab, select the Model
Setup tab.
From the Solver Type list, select OptiStruct.
From the HW Version list, select 2021.
Click the Modify script/cmf and Config
file check boxes.
Do not select the Models option.
Under the Script/cmf files section, click the file browser icon, , or the
add file icon, , to load the Plate.tcl file,
located in ..\tutorials\hvvh\FEModel\ModelSetup.
In the Config file field, click to load
the Model_setup_cfg.txt file, located in
..\tutorials\hvvh\FEModel\ModelSetup.
In the Output directory field, click to
select an output directory.
Click Run.
Figure 3.
The model file with the script is imported and a set of operations in
HyperMesh are executed. The status is
displayed under Model Setup info.
When you select the config file, the operation is interactive and HyperMesh starts, allowing you to see the model's
interactive operations.
If the selected Tcl file is executed correctly and there are no problems with
the HyperMesh operations, the status displays
Pass. If there are additional lines at the end of the command files that are
generated compared to the original script, it is highlighted in orange as a
warning.
In the Messages window, the run details and the log file
location are displayed.
Click HTML Report to open an HTML report which contains
details of the script executed in HyperMesh.
FE Model Setup - Third Use Case
From the FE Model tab, select the Model
Setup tab.
From the Solver Type list, select OptiStruct.
From the Current Version list, select 2021.
From the Reference Version list, select 2017.0.
Click the following check boxes: Modify
script/cmf,Config file, and
Ref Version.
Do not select the Models option.
Under the Script/cmf files section, click the file browser icon, , or the
add file icon, , to load the Plate.tcl file,
located in ..\tutorials\hvvh\FEModel\ModelSetup.
In the Config file field, click to load
the Model_setup_cfg.txt file, located in
..\tutorials\hvvh\FEModel\ModelSetup.
In the Output directory field, click to
select an output directory.
Click Run.
The model file with the script is imported and a set of operations in Current
HM Version and Reference HM Version are executed. The status is displayed
under Model Setup info.
When you select the config file, the operation is interactive and HyperMesh starts, allowing you to see the model's
interactive operations.
If the selected Tcl file is executed correctly and there are no problems with
the HyperMesh operations, the status displays
Pass. If additional lines are generated at the end of the command files
compared to the original script, it is highlighted in orange as a
warning.
In the Messages window, the run details and the log file
location are displayed.
Click HTML Report to open an HTML report. The report
contains details of the script executed in HyperMesh.
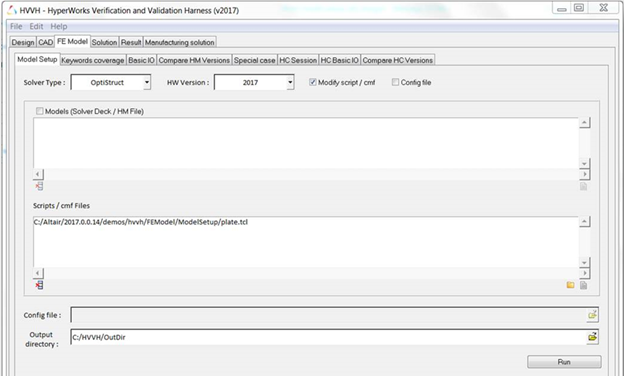
Setup an FE Model with the Process Manager Template
From the FE Model tab, select the Model
Setup tab.
From the Solver Type list, select OptiStruct.
From the HW Version list, select 2021.
Activate the Modify script/cmf and Config
file checkboxes.
Do not select the Models option.
Under the Script/cmf files section, click the file browser icon, ,or the
add file icon, , to load the Launch.tcl file,
located in ..\tutorials\hvvh\FEModel\ModelSetup\pmt.
Important: Edit the process template path in
Launch.tcl.
Under the Config file section, click to load
the Model_setup_cfg.txt file, located in
..\tutorials\hvvh\FEModel\ModelSetup\pmt\ModelSetup.txt.
In the Output directory field, click to
select an output directory.
Click Run.
Note: The Config file option should always be ON to execute the Process Manager
template, with quit = 1 in
ModelSetup1.txt. The default of
quit = 0 or no entry continues
without waiting for user input.
If the selected Tcl file is executed correctly and there are no problems with
the HyperMesh operations, the status displays
Pass. If there are additional lines are generated at the end of the command
file compared to the original script, it is highlighted in orange as a
warning.
Generate Keyword Coverage Summary
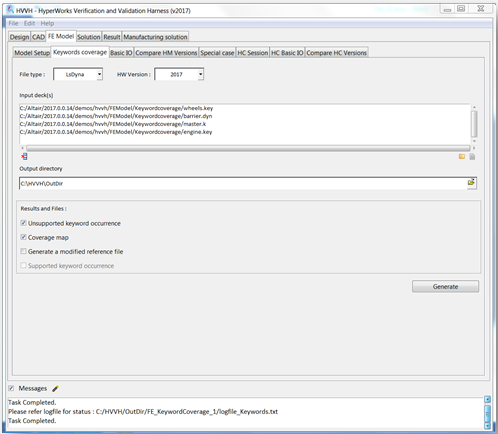
From the FE Model tab, select the Keywords
coverage tab.
Figure 4.
From the File Type list, select LS-DYNA.
From the HW Version list, select 2021.
Under the Input Deck(s) section, click the file browser icon, , or the
add file icon, , to load the following files:.
In the Output directory field, click to
select an output directory.
Click Generate.
From the imported solver decks, supported, unsupported, and partially
supported keywords are generated.
In the Messages window, the run details and the log file
location are displayed.
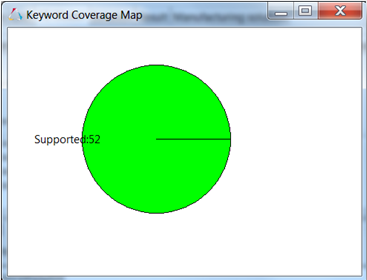
Click the pie chart to view details regarding the published files, as well as
to see details in a document of supported, unsupported, and partially supported
keywords based on the analysis decks.
All individual and combined files are listed in the document. Figure 5.
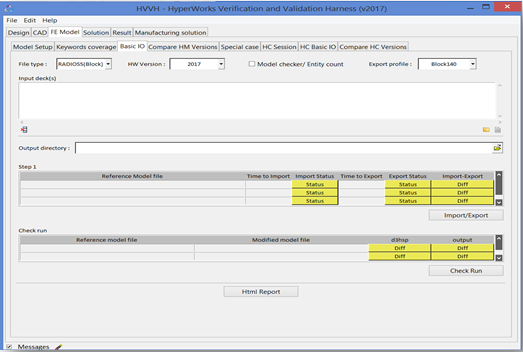
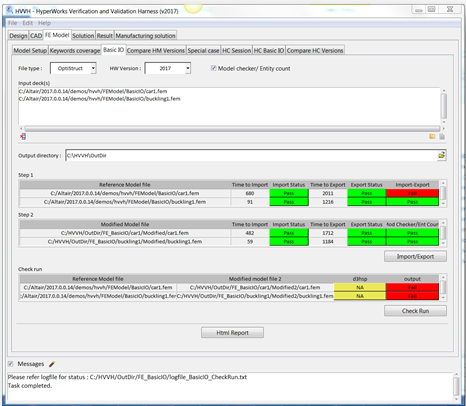
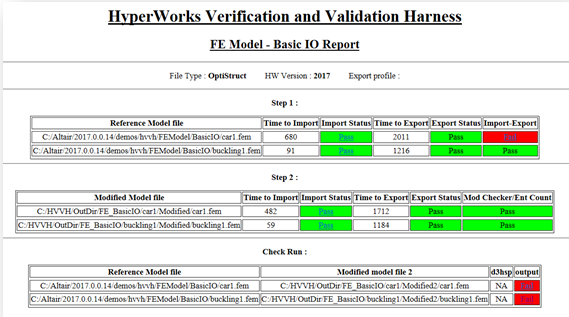
Basic Import and Export
Identify any loss of data during solver import and export.
From the FE Model tab, select the Basic
IO tab.
Figure 6.
From the File Type list, select OptiStruct.
From the HW Version list, select 2021.
Click the Model Checker/Entity count check box.
Use the default Export profile.
Under the Input deck(s) section, click the file browser icon, , or the
add file icon, , to load the following files:.
..\tutorials\hvvh\FEModel\BasicIO\buckling1.fem
..\tutorials\hvvh\FEModel\BasicIO\car1.fem
In the Output directory field, click to
select an output directory.
Click Import/Export.
Under Step 1, the import and export time and status (pass or fail) of the
reference model file (selected above) are displayed.
The last column displays information on the ASCII difference between the
imported file and the HyperMesh exported file.
If there are no differences, Pass is displayed (otherwise, Fail).
Step 2 displays the import and export time and status (pass or fail) of the
exported model file that is re-imported into HyperMesh (along with the import and export status
and time).
The last column displays information on the ASCII difference between the
model checker summary of the file in steps 1 and 2. Any loss of data is
identified.
Click Check run.
The original model and the HyperMesh exported
models are run with the Radioss solver. The OUT
file blocks are compared as shown in the status.
In the Messages window, the run details and the log file
location are displayed.
Click HTML Report to open an HTML Report.
Figure 7. Figure 8.
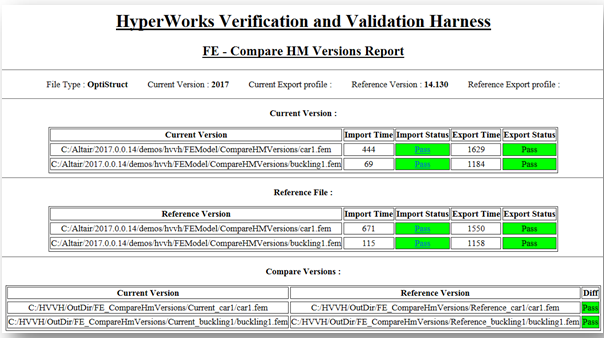
Compare HyperMesh Versions
From the FE Model tab, select the Compare HM
Versions tab.
From the File Type list, select OptiStruct.
From the Current Version list, select 2021.
From the Reference Version list, select
14.0.0.130.
Under the Input deck(s) section, click the file browser icon, , icon or
the add file icon, , to load the following files:
In the Output directory field, click to
select an output directory.
Click Import/Export.
The first table details the import and export time and status (pass or fail)
of the model file selected in the current version.
The second table details the import and export time and status (pass or fail)
of the model file selected in the reference version.
The last column displays information on the ASCII difference between the
exported files in the current and reference versions of HyperMesh. If there are no differences, Pass is
displayed (otherwise Fail).
In the Messages window, the run details and the log file
location are displayed.
Click HTML Report to open an HTML report.
Figure 9.
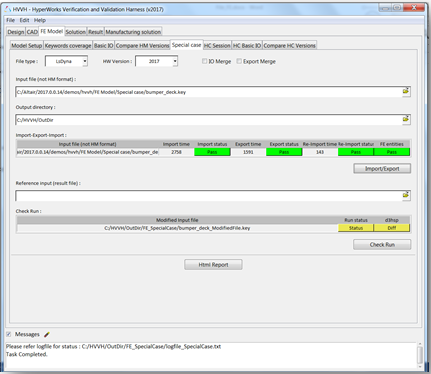
Special Case: Compare HyperMesh Exported Decks Based on FE
Entities
From the FE Model tab, select the Special
case tab.
Figure 10.
From the File Type list, select LS-DYNA.
From the HW Version list, select 2021.
Do not select the IO Merge or Export Merge options.
In the Input file field, click the file browser icon, , or the
add file icon, , to load the following file:
..\FE Model\Special case\bumper_deck.key.
In the Output directory field, click to
select an output directory.
Click Import/Export.
The first table details the import and export times and status (pass or fail)
of the model file in the HyperMesh version
selected.
The file is re-imported and the status is displayed under Re-import
status.
FE entities are compared with the original solver deck. Any changes in data
shows any loss of data, otherwise it is shown to pass.
In the Messages window, the run details and the log file
location are displayed.
Click HTML Report to open an HTML report.
Figure 11.
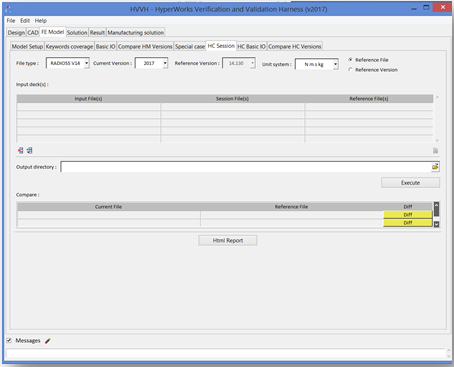
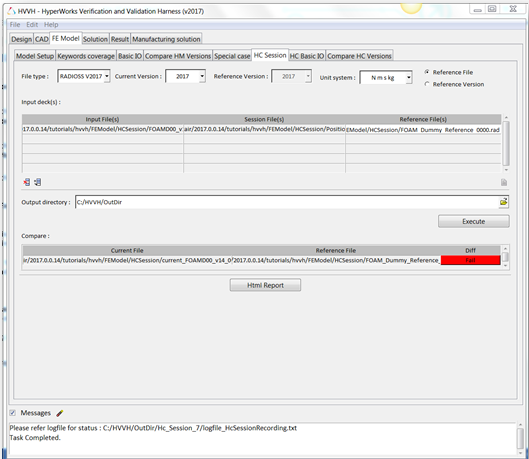
Check Interactive Operations in HyperCrash and Compare
Exported Files
From the FE Model tab, select the HC
Session tab.
Figure 12.
From the File type list, select Radioss
v2017.
From the Current Version list, select 2021.
Click Reference file.
Click the Input File field.
Click the add file icon, , to load the
FOAMD00_v14_0000.rad file, located in
...\tutorials\hvvh\FEModel\HCSession\.
Click the Session File field.
Click to load the Position.xml file,
located in ...\tutorials\hvvh\FEModel\HCSession\.
Click the Reference File field.
Click to load the
FOAM_Dummy_Reference_0000.rad file, located in
...\tutorials\hvvh\FEModel\HCSession\d.
In the Output directory field, click the file browser icon, , to
select an output directory.
Click Execute.
The input file is imported into HyperCrash. Using
the session file, a set of interactive operations are executed in HyperCrash and the file is exported.
In the Compare table, the Diff column displays information on the ASCII
difference between this exported file and the current and reference files
selected above. If there are no differences, it is displayed as Pass
(otherwise, Fail).
Figure 13.
In the Messages window, the run details and the log file
location are displayed.
Click HTML Report to open an HTML report.
Figure 14.
The difference between the exported files is not significant.
HyperCrash Basic Import and Export
From the FE Model tab, select the HC Basic
IO tab.
Figure 15.
From the File Type list, select Radioss
v2017.
From the HW version list, select 2021.
From the Unit System list, select kN-mm-ms-kg.
Click Model checker.
Under the Input deck(s) section, click the file browser icon, , or the
add file icon, , to load the model01_0000.rad
file, located in ..\tutorials\hvvh\FEModel\HCBasic IO\
file.
In the Output directory field, click to
select an output directory.
Click Import/Export.
Under Step 1, the import and export time and status details (pass or fail) of
the reference model file (selected above) are displayed.
The last column displays information on the ASCII difference between the
imported file and the HyperCrash exported file.
If there are no differences, Pass is displayed, otherwise Fail.
Step 2 displays the import and export time and status (pass or fail) of the
exported model file that is re-imported back into HyperCrash (along with the import and export status
and time).
The last column displays information on the ASCII difference between the
model checker summary file in steps 1 and 2. Any loss of data is
identified
Click Check run.
In the Messages window, the run details and the log file
location are displayed.
Click HTML Report to open an HTML report.
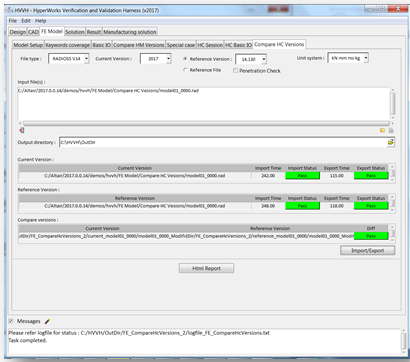
Compare HyperCrash Versions
From the FE Model tab, select the Compare HC
versions tab.
Figure 16.
From the File type list, select Radioss
v14.
From the Current version list, select 2021.
From the Reference Version list, select
14.0.0.130.
From the Unit System list, select kN-mm-ms-kg.
Under the Input File section, click the file browser icon, , or the
add file icon, , to load the model01_0000.rad file, located in
..\tutorials\hvvh\FEModel\CompareHCVersions\model01_0000.rad.
In the Output directory field, click to
select an output directory.
Click Import/Export.
The first table details the import and export time and status (pass or
fail) of the model file selected in the current version.
The second
table details the import and export time and status (pass or fail) of the
model file selected in the reference version.
The last column displays
information on the ASCII difference between the exported files in the
current and reference versions of HyperCrash. If
there are no differences, it is displayed as Pass, otherwise Fail.
In the
Messages window, the run details are displayed along
with the log file location.
 , or the
add file icon,
, or the
add file icon,  , to load the Plate.tcl file,
located in ..\tutorials\hvvh\FEModel\ModelSetup.
, to load the Plate.tcl file,
located in ..\tutorials\hvvh\FEModel\ModelSetup.