Simplify
Clean up problem areas in the geometry of a model before running an analysis.
Remove Imprints
Find and remove imprints from a model. An imprint is an edge or a point that appears on a surface that can be removed without changing the underlying integrity of the surface, such as scratches or trimmed points.
-
On the Geometry ribbon, select the tool.

By default, all of the imprints in the model are selected and highlighted red. The total number of imprints found is displayed above the Imprints tool. -
Remove imprints.
- To remove all selected imprints, click Apply
 on the guide bar.
 - To remove an individual imprint, click a selected imprint.
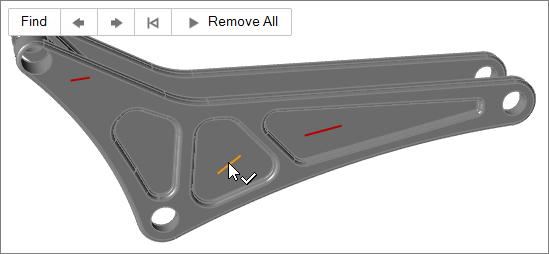
Figure 1. Removing Imprints - To remove all selected imprints, click Apply
- It is recommended that you remove imprints before applying other geometry simplification tools.
- To review each selected imprint located by the search, click
 and
and  on the guide bar.
 - Some geometry tools automatically detect relevant features when the tool is opened. You can disable this behavior in the Preferences under .
Remove Rounds and Fillets
Find and remove both round (convex) and fillet (concave) surfaces.
The Rounds tool allows you to select a round or fillet and find all that are larger, smaller, or similar (±5%) in size. It will also attempt to identify chains of rounds or fillets, although these chains may not be removed successfully all at once. In general, it is best to remove small fillets first, then larger fillets, then rounds. When you get to a point where you cannot remove any more, it is time to use other modeling tools and strategies to complete the geometry simplification.
-
On the Geometry ribbon, select the tool.

By default, all of the rounds/fillets in the model are selected and highlighted red. The total number of rounds/fillets found is displayed above the Rounds tool. - Optional:
Click
 to define settings used to find and select
rounds/fillets of a specific size.
to define settings used to find and select
rounds/fillets of a specific size.
-
Remove rounds/fillets.
- Remove all selected rounds/fillets by clicking
Apply
on the guide bar.
- Remove individual rounds/fillets by clicking a selected round/fillet.
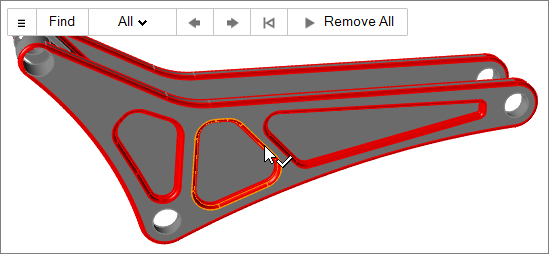
Figure 2. Removing Rounds and Fillets - Remove all selected rounds/fillets by clicking
Apply
- To review each selected round/fillet, click and on the guide bar.
- If there are several contiguous rounds or fillets, double-click one to select the entire chain. Selecting an adjacent round/fillet will add to the chain. When removing a round/fillet that is part of a chain, the entire chain will be removed.
- Some geometry tools automatically detect relevant features when the tool is opened. You can disable this behavior in the Preferences under .
Remove Holes and Pockets
Find and remove holes and pockets, and find raised areas such as lettering.
The Holes tool allows you to select holes or pockets and find all that are larger, smaller, or similar (±5%) in size. It will also attempt to identify chains of connected holes or pockets by searching upward, toward the outer face.
-
On the Geometry ribbon, select the tool.

By default, all of the holes in the model are selected and highlighted red. The total number of holes found is displayed above the Holes tool. - Optional:
On the guide bar, click to define settings used to find and select holes of
a specific size.
-
Remove holes.
- To remove all selected holes, click Apply
on the guide bar.
- To remove an individual hole, click a selected hole.
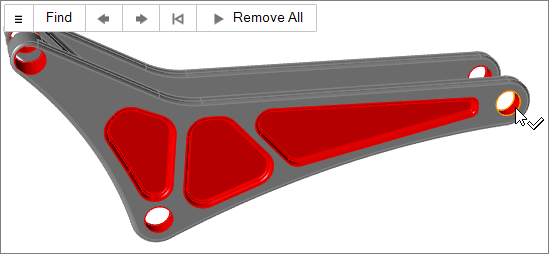
Figure 3. Removing Holes and Pockets - To remove all selected holes, click Apply
- To review each selected hole located by the search, click and on the guide bar.
Clicking a selected circle removes it, and the view automatically zooms in
on the next selected hole.
- If there are several contiguous holes or pockets, selecting an adjacent hole/pocket will add to the chain. When removing a hole or pocket that is part of a chain, the entire chain will be removed.
- Some geometry tools automatically detect relevant features when the tool is opened. You can disable this behavior in the Preferences under .
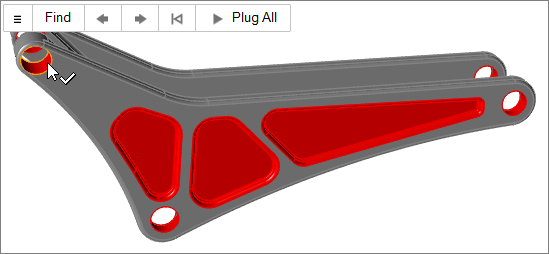
Plug Holes and Pockets
Find holes and pockets, and plug them by filling the area with a new part.
The Plug tool will attempt to identify chains of connected holes or pockets by searching upward, toward the outer face.
-
On the Geometry ribbon, select the tool.

By default, all of the holes and pockets in the model are selected and highlighted red. The total number of holes/pockets found is displayed above the Plug tool. - Optional:
On the guide bar, click to define settings used to find and select
holes/pockets of a specific size.
-
Remove holes.
- To plug all selected holes or pockets, click
Apply
on the guide bar.
- To plug an individual hole or pocket, click a selected hole or pocket.
- To plug all selected holes or pockets, click
Apply
- To review each selected hole or pocket located by the search, click and on the guide bar.
Clicking a selected hole/pocket plugs it, and the view automatically zooms
in on the next selected hole or pocket.
- If there are several contiguous holes or pockets, selecting an adjacent hole or pocket will add it to the chain. When plugging a hole or pocket that is part of a chain, the entire chain will be plugged with a single part.
- Some geometry tools automatically detect relevant features when the tool is opened. You can disable this behavior in the Preferences under .
Simplify Tool Keyboard Shortcuts & Mouse Controls
| To do this | Press |
|---|---|
| Select feature | Left Mouse Click |
| Deselect feature | Ctrl + Left Mouse Click |
| Deselect chain | Ctrl + Double Click |
| Exit tool | Esc |