Push/Pull
Push, pull, or revolve a face, sketch, line, or 2D edge to extrude it into a solid or surface, create or resize a hole, eliminate rounds, or modify wall thickness.
Push or Pull a Face, Line, or 2D Edge
Push or pull a face, sketch, line or 2D edge to extrude it into a solid or surface.
-
Open the Push/Pull tool in one of the following ways:
- Press P.
- Double-click a part.
- On the Geometry ribbon,
select the Push/Pull Faces tool.

-
Push or pull it in one of the following ways:
- Drag the selected object. To make it a new part, select the
 icon on the microdialog or hold the
Shift key while dragging.
icon on the microdialog or hold the
Shift key while dragging. - Enter a precise distance in the microdialog. A positive value extends, whereas a negative value contracts.
- Drag the gray pyramid on the ruler to position the start point for the measurement, then drag the white arrow or enter a value in the microdialog to position the end point.
- Drag the selected object. To make it a new part, select the
- Use snap points to align faces or subfaces so they are at the same level, or make one face flush with another. When pushing and pulling faces and subfaces, objects automatically snap to snap points such as end points, center points, quad points, and midpoints on other parts.
- 2D edges can only be pulled, not pushed. Hold Ctrl then drag to chain select and extrude multiple 2D entities at once.
- To place multiple solid bodies into separate parts, right-click on a part to open the context menu, then select Convert Bodies to Parts.
- By default, sketches are hidden after push/pulling or revolving a sketch. You can turn this behavior off in the Preferences under .
Push or Pull a Sketch on a Face
Push or pull a sketch on an existing face and create, modify, or replace the existing part.
- Open the Push/Pull Faces tool.
- Select a sketch on face in the modeling window.
-
Drag the selected sketch. To make it a new part, select the + icon on the
microdialog, then choose one of the following options in the pull-down
menu:

- New Part: Create a new part based on the pushed/pulled geometry.
- Add to Part: Add the pushed/pulled geometry to the existing part.
- Remove From Part: Remove the pushed/pulled geometry from the existing part.
- Replace Part: Replace the existing part with the push/pulled geometry.
Revolve a Face, Sketch, Line, or 2D Edge
Revolve a face, sketch, line, or 2D edge about an axis.
-
On the Geometry ribbon, select the
Revolve Faces tool.

-
Choose from the following options:
- Drag the face, line, or 2D edge.
- Drag the white arrow on the compass.
- Enter an angle in the microdialog.
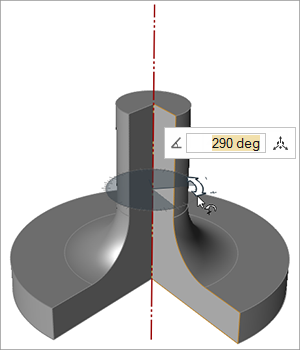
Figure 1. Revolving a Part
- To create a new part, hold down Shift while dragging.
- To reposition the axis of revolution using the Move
tool, click
 in the microdialog.
 - Drag the rotation arrow by its midpoint to snap to snap points. Clicking elsewhere on the rotation arrow will temporarily disable snapping.
- Selecting a face from a 2D sheet automatically revolves the face a full 360 degrees. Once you drag the face, the only way to get back to a full 360 degrees is to enter 360 in the microdialog.
Apply a Variable to a Parameter
Apply a variable to a parameter, or create a new variable on the fly from a tool microdialog.
You can apply existing variables and add new ones via the microdialog in various sketch and geometry tools.
-
In the tool’s microdialog, click the f(x) icon.

Figure 2. Example of a microdialog with a variable field
- You can also create a variable by entering a new name and expression in the
microdialog’s text field, for example:
Variable1=50 - In addition, you can also create a new variable based on an existing
variable, for example,
Variable2=Variable1*0.5.
Maintain Snap Reference
Create and maintain a snap reference to another part.
You can link a pushed, pulled, or revolved construction feature to a snap reference point. As you make changes in the History Browser, the part will be automatically updated based on the position of the snap reference.
- Open the Push/Pull Faces or Revolve Faces tool.
- Click-and-drag the sketch or face you want to push, pull, or revolve. As you drag, move the mouse cursor over a snap point on a different part to snap to that point.
-
Select the Maintain Snap Reference
 icon on the microdialog. The snap reference will be
maintained as long as this option is enabled.
icon on the microdialog. The snap reference will be
maintained as long as this option is enabled.
Resize a Hole
Pull a cylindrical face to resize a hole.
- Open the Push/Pull Faces tool.
- Push the subface of a closed sketch inward until the hole penetrates the opposite side of the part. Change the diameter of a hole by dragging the interior face of the hole.
Eliminate Rounds
Remove rounds by pulling them into a sharp corner.
When you extend a face that has rounds adjacent to it, the rounds are moved with the face. Sometimes, complex rounds and blends will prevent a face from moving because they cannot be reconstructed at the desired position if the face is moved. If you do not care about retaining the rounds, you can often free up a stuck face by extending the round to eliminate it.
- Open the Push/Pull Faces tool.
- Select a round.
- Pull outward until the round is converted into a sharp corner.
Keyboard Shortcuts & Mouse Controls
| To | Do this |
|---|---|
| Activate the Push/Pull tool | P or double-click |
| Temporarily disable snapping | Alt |
|
Add/remove entities to the selection. Chain select adjacent 2D entities. |
Ctrl |
| Make the object a new part | Shift |
| Exit tool | Right-click and mouse through the check mark to exit, or double-right-click. |