Fit PolyNURBS to the Generated Shape
Once optimization has been run, you can ft a PolyNURBS to the generated shape.
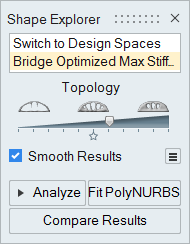
Click the Fit PolyNURBS button to fit a PolyNURBS to the generated shape. It is best to smooth the results before attempting to fit a PolyNURBS to the results. You can do this by turning on the Smooth Results option.
Click the ![]() icon to change the following options:
icon to change the following options:

- Crease Break Angle
- This is a threshold value. When fitting the PolyNURBS, any break angle above the value entered will have high sharpening applied to the edge.
- Element Density Factor
- Lowering the Element Density Factor will increase the size of the PolyNURBS cages, but will capture less detail. The default value is 1. In general, you want to use the lowest density factor possible that still captures the geometry.
- Auto Creasing
- When enabled, high sharpening will automatically be applied based on the Crease Break Angle entered above.
If the fit operation is successful, the result appears in the Model Browser with the name PolyNURBS Fit and you are placed in PolyNURBS editing mode. Exit the PolyNURBS tool to generate the PolyNURBS geometry, which can take up to a minute. This geometry can be exported to most CAD systems.