Ribbons
The ribbon allows you to quickly access tools and standard functions, and is located along the top of HyperWorks CFD. Click on an icon to open the related tool. Hovering over a group of icons may reveal additional tools.
HyperWorks CFD Ribbons
HyperWorks CFD ribbons are designed to help you quickly and easily access the tools you need to accomplish your tasks.
Tools on the ribbon are grouped logically and organized by tabs, which appear along the top of the ribbon. When you click on any of the tabs, the set of tools on the ribbon will change to reflect the working context.

Figure 1.
Layout of a Ribbon
Although ribbons provide a variety of tool sets that change depending on the application, ribbon layout remains the same. All ribbons are organized by tab, related tools are grouped together with separators appearing between groups, and each icon group is labeled.
The ribbon is comprised of two sections: Application-specific tabs and Tool groups.
Application-specific tabs are the group headings that appear across the top of the ribbon. When you click on an application-specific tab, the tools displayed on the ribbon will change to reflect the working context. Tab names vary depending on which application you are working in.
Tool groups are the icons you see on the ribbon itself. They are organized by task and may contain sub-groups of tools that are accessible by clicking on the down-arrow next to the name of the group.
Layout of a Tool Icon
In HyperWorks CFD, tool icons can have different states when you hover your mouse over them, allowing you to perform multiple tasks from a single tool icon. The blue highlighted areas are called pick targets. Satellite icons only appear on mouse-over and generally provide access to functions of lesser importance.
Multi-State Tool Icons
Figure 2.
- The first image (far left) shows the tool icon in its unselected state
- The second image highlights the piece of paper pick target, which allows you to create a new model
- The third image highlights the folder pick target, which allows you to open an existing model
- The last image (far right) highlights the disk pick target, which allows you to save your work
Satellite Tool Icons
Figure 3.
In the images above, the Measure tool on the left is not moused over. The image on the right shows the mouse-over state and displays a satellite icon. Satellite icons differ from multi-state icons in that the additional tools are not readily visible on a satellite icon. Also, the additional functionality they provide is generally with lesser used tasks.
Hover your mouse cursor over different parts of the tools you use most to discover additional functionality.
Secondary Ribbons
Secondary ribbons appear below the main ribbon and provide access to subsets of tools that are related to tools on the main ribbon. These tools are frequently used in conjunction with the main tool and only appear after you click on the tool icon on the main ribbon.
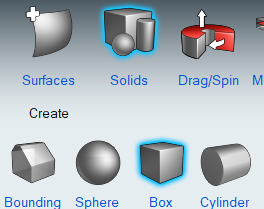
Figure 4.
Secondary ribbons extend the versatility of the main ribbon without cluttering the working interface. You can close secondary ribbons by clicking on the main tool again, or by clicking on a different tool on the main ribbon.
Ribbon Group Menus
Ribbon group menus provide access to tools that are generally used less frequently than those on the main or secondary ribbons.
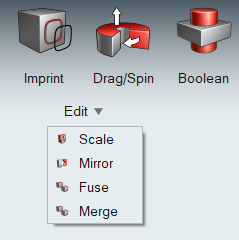
Figure 5.
Like secondary ribbons, ribbon group menus further extend the versatility of the main ribbon without cluttering the working interface. You can close the group ribbon menu by making a selection or pressing the Esc key.
Manage Custom Ribbons
HyperWorks CFD provides a means for creating and saving your own personalized ribbons. Custom ribbons can save you a lot of time by placing all of the tools you use most frequently together in a single location.