Run a Case Study Simulation
The supply of computing resources changes based on demand, and customers want the most cost effective usage of those computing resources. Simulations or case studies provide key metrics such as core utilization and job throughput for determining the most productive way configure an HPC.
Before you can begin running simulations, you must first create an HPC snapshot. Once the snapshot is imported, it can then be used for successive simulations. Some degree of validation is done when importing a snapshot and snapshots can be rejected if the snapshot contains options, attributes, or features that make the simulation behavior unpredictable. Review the following information for a list of reasons for a snapshot rejection.
Create a Case Study Simulation
Start a simulation by providing a name and a description.
-
Click
 located in the upper right-hand corner of the web page.
Import or Select an HPC Snapshot
Import a previously created HPC snapshot or select a snapshot that has previously been imported.
Before you can begin running simulations, you must first create an HPC snapshot. Once the snapshot is imported, it can then be used for successive simulations. Some degree of validation is done when importing a snapshot and snapshots can be rejected if the snapshot contains options, attributes, or features that make the simulation behavior unpredictable. Review the following information for a list of reasons for a snapshot rejection.
- Optional:
To run a simulation for an HPC snapshot that has not yet been imported:
-
Click
 or the Import a
Snapshot link.
or the Import a
Snapshot link.

Figure 1. Add a Snapshot -
Click
-
Otherwise, to run a simulation for an HPC snapshot that has already been
imported, select the HPC snapshot from the list.

Figure 2. Choose HPC SnapshotOnce the snapshot is selected, Workload dates, Node Classes, queues, limits, and PBS ProfessionalScheduling parameters associated with the snapshot are populated.
Choose a Workload Interval
Select a specific workload time interval. Jobs that ran during that time interval are included in the simulation.
- Click Workload from the PBS Professional menu located on the left-hand side of the web page.
-
Choose a workload interval by selecting a start and end date:
-
Select a start date by clicking
 to the right of Start Date.
- Choose a start date.
-
Select an end date by clicking to
the right of End Date.
- Choose an end date.
-
Select a start date by clicking
Change the HPC's Node Configuration
Change the HPC's system configuration by increasing or decreasing a grouping of execution nodes called Node Classes.
-
Scroll through the list until you find the grouping that you want to either
scale up or down.
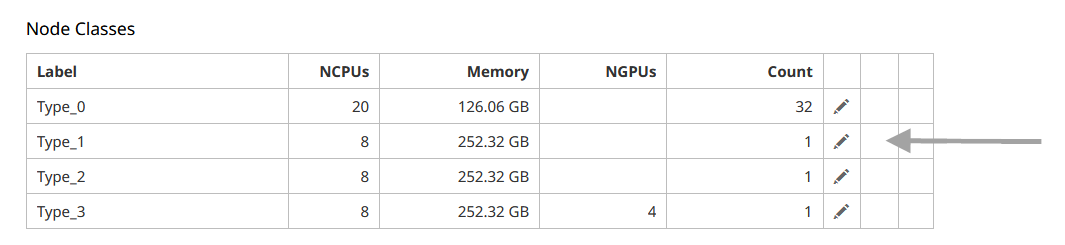 Figure 3. Available Node Classes
 -
Click
 to the right of the Node Class that you want to alter.
-
Click
 to save the changes.
Change the Queue Configuration
Modify the HPC cluster's execution queue configuration.
-
Click
 located to the right of the queue you
want to change.
located to the right of the queue you
want to change.

Figure 4. Queues -
Click to save the changes.
Change the Resource Usage Limits
Add, edit or delete resource usage limits for the simulation.
- Click Limits from the PBS Professional menu located on the left-hand side of the web page.
- Change the resource usage limits for the simulation by adding, editing or removing resource usage limits.
Change the Workload Manager Scheduling Parameters
Scheduling parameters can be modified for a simulation.
- Click Configuration from the PBS Professional menu located on the left-hand side of the web page.
-
Change any of the scheduling parameters:
-
Click located to the right of the
parameter.
- Change the value of the parameter.
-
Click to save the changes.
-
Click
Start the Simulation
Submit the simulation. Once the simulation is complete you can view the simulation results.