Use view locks to change the scope of display operations (hide, show all, reverse,
etc.) from global to local.
When the view is unlocked, all display operations are performed on a global level.
For instance, if you isolate and work with several components then perform a Show
All, the entire model is returned to the view. When the view is locked, the scope
changes from global to local. This means that all display operations are now
relative to the display state of the model when it is locked. Locking the view makes
it easier to work with sub-models and control your view with more precision.
Note:
Locking the view does not lock the orientation of the model. You can
still rotate, pan, zoom, etc.
You can still select entities in a
browser and manipulate their display state
while the view is locked. However, it doesn't change the scope of your
lock; any display operations performed in the modeling window are still respective to the state of
the model when it was initially locked. To update the locked view, you
have to unlock it, add or remove entities
from the display, then reactivate the view lock.
To switch between a locked and unlocked view, do one of the following:
Toggle the icon on the View
Controls toolbar.
Right-click in the modeling window and select
Lock Current View/Unlock
View from the context menu.
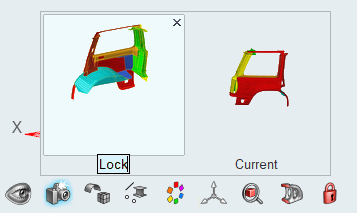
After locking, a custom View named Lock is created. If you wanted to
save the view for later, simply rename it. Figure 1.
In the following example, components are isolated, the view is locked, and Hide,
Reverse, and Show All operations are performed. After the view is unlocked, a Show
All is performed to return to the default global view of the model. Figure 2.
 icon on the View
Controls toolbar.
icon on the View
Controls toolbar.