Pedestrian Impact - HyperView
The Pedestrian Impact tool facilitates the post processing of pedestrian analysis.
This tool uses time-history and result files as input and conforms to the pedestrian safety regulations GTR, EuroNCAP and Homologation.
Pedestrian Impact automates the process with minimal user input, therefore reducing the deck generation lead time with less human error.
EuroNCAP
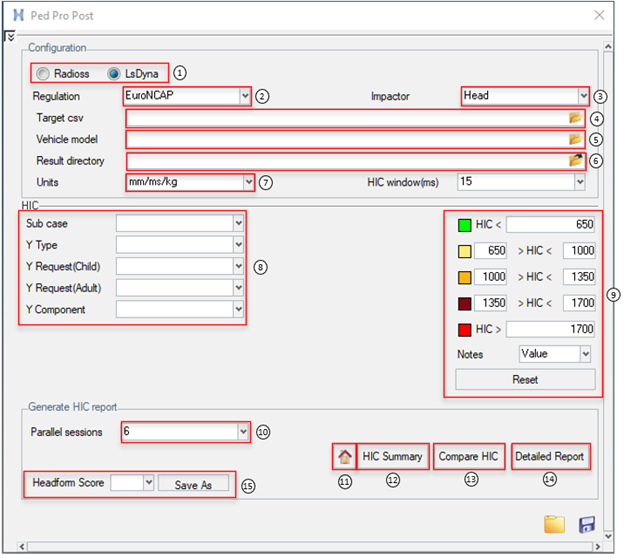
Figure 1.
- Select a solver. Supported solvers are Radioss and Ls-Dyna.
- Regulation: Select supported regulations.
- Impactor: Select Head, Upper Leg, or Lower Leg from the drop-down menu.
- Target csv: Select a HyperMesh created .csv file (upon using HyperMesh to Mark and Position Headform, HyperMesh will write out a .csv file).
- Vehicle model: Select either a solver input file or a result file that contains the vehicle model.
- Result directory: Select the root directory that contain all of the analysis directory as sub-directories.
- Units: Select the model units from drop-down menu.
- Type/Request/Component selection:
- Select Subcase
- Select Y Type
- Select Y Request, the ID used for the section cut in the model
- Select Y Component
- Threshold/Limit values and Colors selection.
- Based on the Impactor selection, you can define limit values and colors.
- Select/change colors by clicking on the color palette.
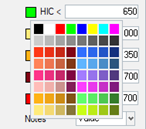
Figure 2. - Define limit/threshold values.

Figure 3. - For Head, you can choose either the HIC value or the Impact location name for HIC summary.
- Reset: Resets to official regulation limits.
- Select/change colors by clicking on the color palette.
- Based on the Impactor selection, you can define limit values and colors.
- Parallel Process: Select the number of batch process to launch. For example, if 200 impact locations are to be processed, the specified number of parallel process will be launched to reduce the processing time.
- Home button
 : Click Home to navigate back to the
summary page.
: Click Home to navigate back to the
summary page. - Summary:
- If Impactor = Head, HIC Summary
-
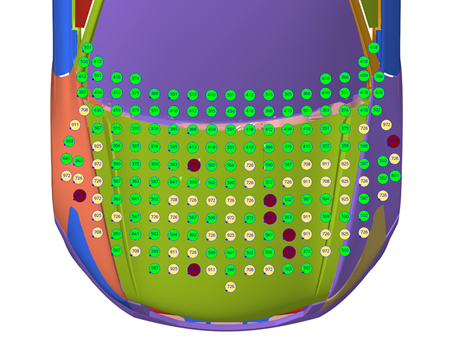
Figure 4. EuroNCAP HIC Summary - If Impactor = Lower Leg
-
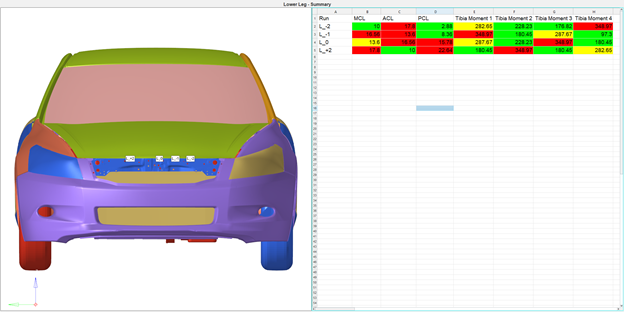
Figure 5. EuroNCAP Lower Leg Summary - If Impactor = Upper Leg
-
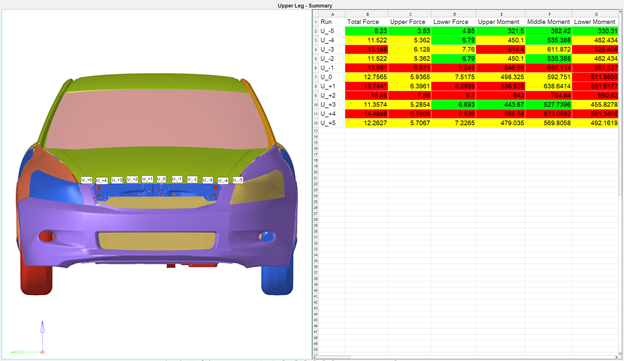
Figure 6. EuroNCAP Upper Leg Summary
- Detailed Report: Upon clicking Detailed Report, you will be
prompted to select the impact location to be processed using the Select target points
window.

Figure 7.- 13.1 Sorting of each column is possible by clicking on the column headings/titles.
- 13.2 You can pick and choose the impact locations to be processed.
- 13.3 Select all of the impact locations to be processed.
- 13.4 Click Close to initiate the Detailed Report Summary for the selected impact points.
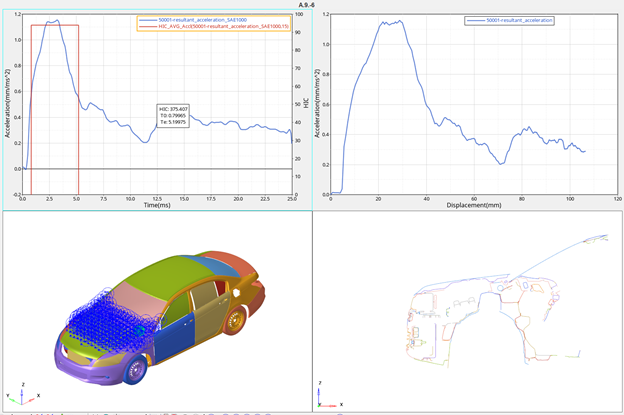
Figure 8. EuroNCAP Headform Detailed Report Summary for a Selected Location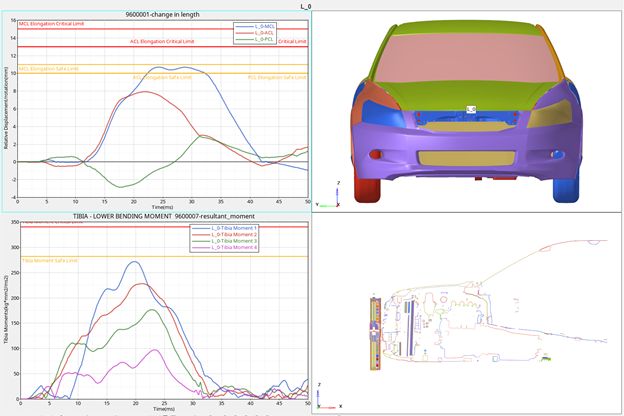
Figure 9. EuroNCAP Lower Legform Detailed Report Summary for a Selected Location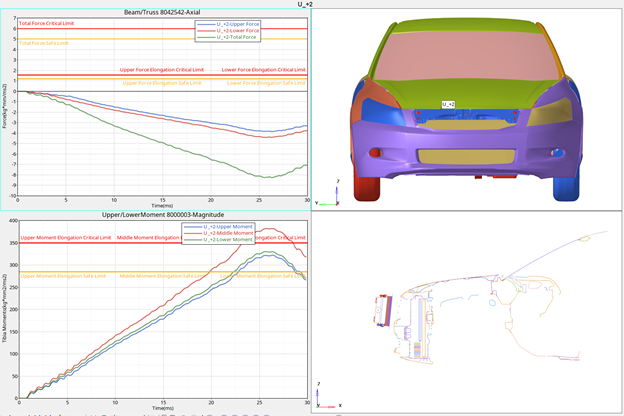
Figure 10. EuroNCAP Upper Legform Detailed Report Summary for a Selected Location - Compare: Upon clicking Compare, you will be prompted to select
the impact location to be processed through the Select compare options window
(14.1).
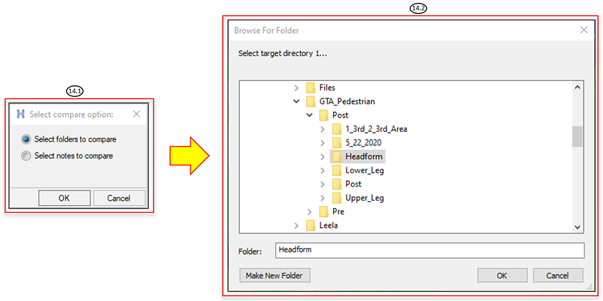
Figure 11.- 14.1 Select compare options:
- Select folders to compare: Select multiple analysis folders (14.2) to be compared.
- Select notes to compare: Select multiple notes at summary window to be compared.
- 14.1 Select compare options:
- Official Score Sheet: Select the folder and file name to save the official score sheet
per the impactor selection.
- If Impactor = Head and Headform Score = Color
-
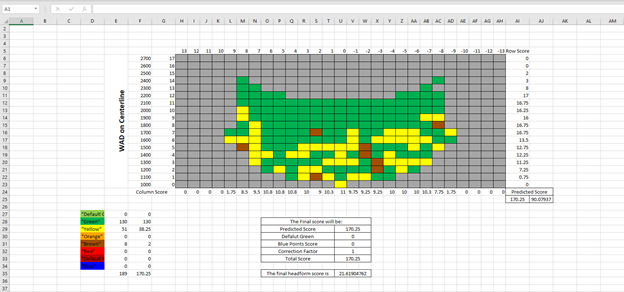
Figure 12. EuroNCAP Official Headform Score Sheet for Color - If Impactor = Head and Headform Score = Value
-
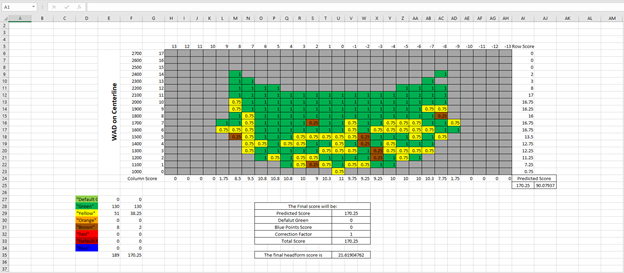
Figure 13. EuroNCAP Official Headform Score Sheet for Value - If Impactor = Head and Headform Score = HIC
-
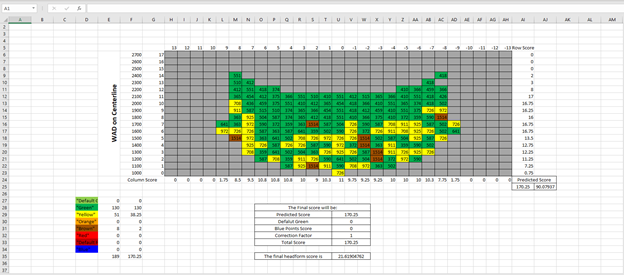
Figure 14. EuroNCAP Official Headform Score Sheet for HIC - If Impactor = Lower Leg
-
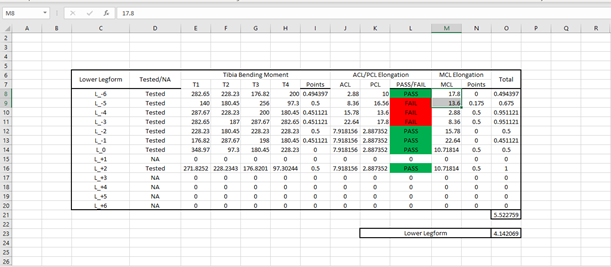
Figure 15. EuroNCAP Offical Lower Leg Score Sheet - If Impactor = Upper Leg
-

Figure 16. EuroNCAP Offical Upper Leg Score Sheet
GTR
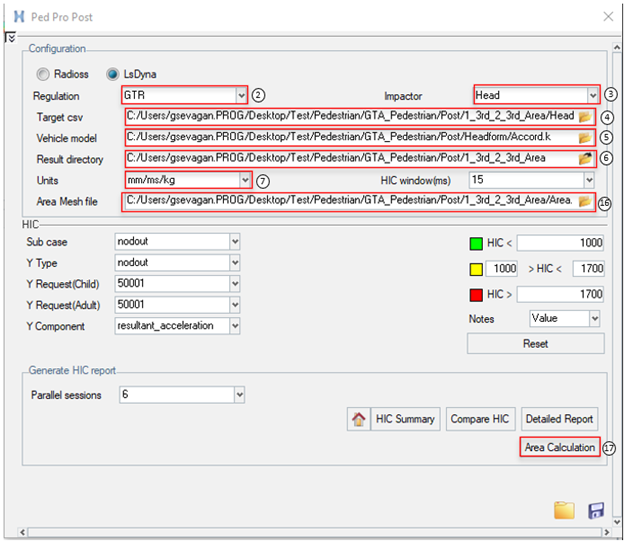
Figure 17.
2. Regulation: Select supported regulations.
3. Impactor: Select Head, Upper Leg, or Lower Leg from the drop-down menu.
4. Target csv: Select a HyperMesh created .csv file (upon using HyperMesh to Mark and Position Headform, HyperMesh will write out a .csv file).
5. Vehicle model: Select either a solver input file or a result file that contains the vehicle model.
6. Result directory: Select the root directory that contain all of the analysis directory as sub-directories.
7. Units: Select model units from drop-down menu.
16. Area Mesh file: Select HyperMesh created solver input Area file (upon using HyperMesh to Mark and Position Headform for GTR, HyperMesh will write out a file).
17. Click Area Calculation to execute GTR 1/3rd and 2/3rd area calculation.
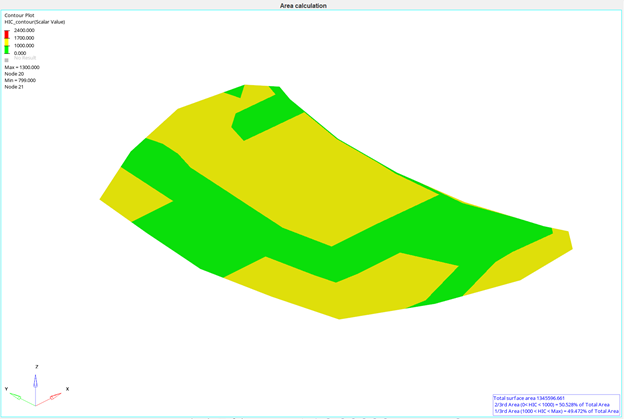
Figure 18. GTR 1/3rd and 2/3rd area calculation