Teamcenter - HyperMesh Integration
All BOM-related information, including part/assembly hierarchy, part attributes, and representation information is organized and displayed in the Part Browser.
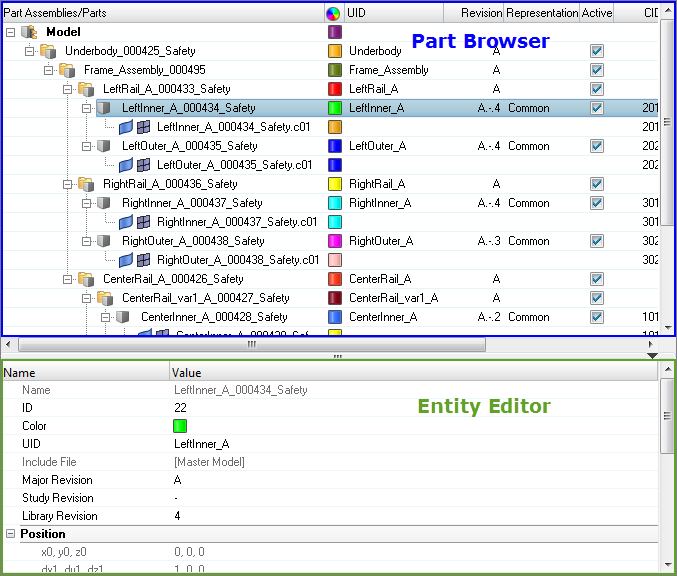
Figure 1.
Representation (HyperMesh session) attributes are now displayed independent of the PDM attributes. Attribute columns can be turned on/off in the Column Visibility dialog, which can be accessed by right-clicking in the Part Browser and selecting Column Visibility from the context menu.
InFigure 1, the session attributes (PID, MID, Material, Thickness) are blank because representations have yet to be created or loaded. The corresponding PDM attributes, from the imported PLMXML BOM file, show their values from Teamcenter.
Representation Options
| Option | Description |
|---|---|
| Create | Creates HyperMesh representation(s) via BatchMesher. |
| Save | Saves representations for selected part(s) based on the chosen alias and file type. |
| Add | Adds representations for selected part(s) based on the chosen alias and file
type or from the Part Library. When adding representations for multiple parts or
part assemblies from external sources, the Add
Representations dialog enables you to map and associate
representation files to multiple parts simultaneously.
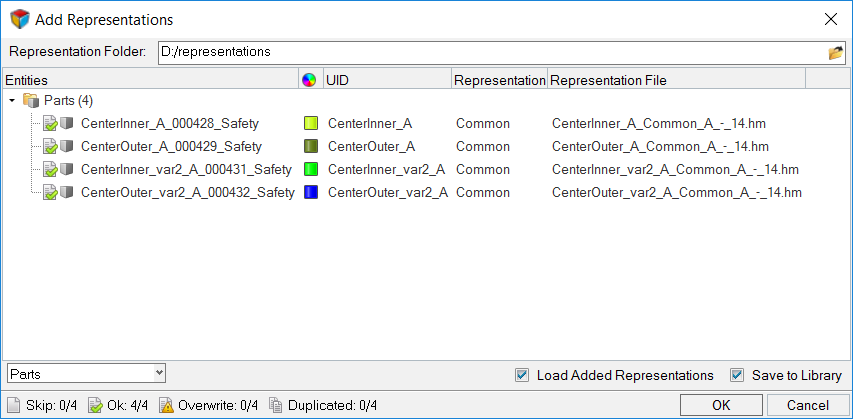 Figure 2. If appropriate metadata is available in the BOM, then the alias values will be preselected. After choosing a Representation Folder, representation files will be mapped according to the Teamcenter naming convention. You can then manually select or update any of the alias and representation file values. Indicators are displayed for each part to
indicate the status of that row.
You cannot click OK to add the representations when representations are duplicated. |
| Load | Load part representations from your current Teamcenter-HyperMesh session or from the Part Library. If any of the selected parts currently have a representation loaded in the session, you will be prompted whether or not to unload them before loading new representations. If representations are not unloaded first, incoming representations will be imported on top of the existing representations, and Load Settings will be used. |
| Unload | Unloads representations for selected part(s). |
| Delete | Deletes representations for selected part(s) from your current Teamcenter-HyperMesh session or from the Part Library. |
| Reload | Restores part representations to their original state. |
| Settings | Displays the current load settings, which are used when representations are imported. |
Setup the Teamcenter - HyperMesh Environment
The Teamcenter integration environment requires an additional layer, on top of the out-of-the-box Part Browser behavior.
When launching HyperMesh via Teamcenter, the environment will be set automatically. However, all of the integration features may be accessed by manually setting the environment.
To manually set the Teamcenter-HyperMesh environment:
Update Teamcenter
Update Teamcenter via Teamcenter-HyperMesh Integration
If HyperMesh was launched via the Teamcenter - HyperMesh Integration, you will be prompted to import updated data back to Teamcenter.

Figure 3.
Update Teamcenter via Manual PLMXML Import in Teamcenter
If the BOM was loaded manually, for example HyperMesh was not launched via the Teamcenter-HyperMesh Integration, then the updated PLMXML package can be manually imported into Teamcenter.
-
Select Import PLMXML to import the updates.

Figure 4.
Import BOMs
Import BOMs in HyperMesh via Teamcenter - HyperMesh Integration

Figure 5.
Import BOMs in HyperMesh via the HyperMesh Import - BOM Tab
-
Export the PLMXML package so that you can work on it over time by selecting the
Export PLMXML for Pre-Processor option.

Figure 6. -
The resulting PLMXML BOM file, along with its associated data files, will be
exported to the last data folder and can be imported directly into HyperMesh via the Import - BOM tab.
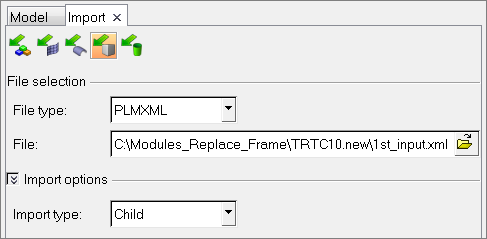
Figure 7.
The BOM is displayed in the Part Browser.
Import BOMs in HyperMesh via Teamcenter - HyperMesh Integration
Figure 8.
Import BOMs in HyperMesh via the HyperMesh Import - BOM Tab
-
Export the PLMXML package so that you can work on it over time by selecting the
Export PLMXML for Pre-Processor option.
Figure 9. -
The resulting PLMXML BOM file, along with its associated data files, will be
exported to the last data folder and can be imported directly into HyperMesh via the Import - BOM tab.
Figure 10.
The BOM is displayed in the Part Browser.
Export BOMs
Load CAD Representations
Load part representations from your current Teamcenter-HyperMesh or from the Part Library.
When CAD representations are loaded, components are created for the loaded CAD representations. Materials and properties, if available in the CAD file would also be created, and their values would be displayed in the Part Browser columns. Component naming conventions are not yet imposed, nor are the materials and properties created automatically at this time, therefore you can review information within the CAD files themselves prior to mesh representation creation. According to the Teamcenter-HyperMesh naming conventions, component naming and material and property handling will occur during the meshing process.
Load Representations from Current HyperMesh Session
-
In the Change Representation dialog, Load tab, select a
type of representation to load.
Representations that exist in the repository are shown in the Representations column, and their availability is indicated in the Available column.
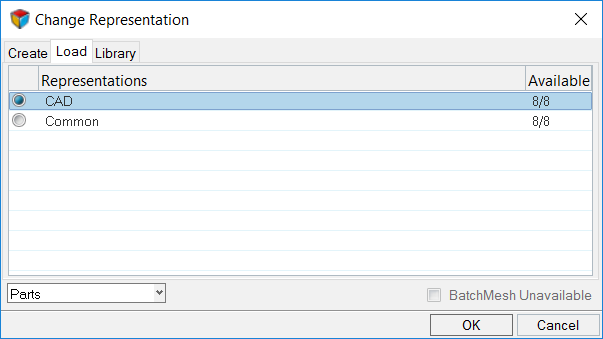
Figure 11.
Load Representations from the Part Library
After importing a BOM that has representations saved in the Part library, you can load the saved representations.
- In the Part Browser, right-click on a part/part assembly and select from the context menu.
- In the Change Representation dialog, Library tab, select representations and click OK.
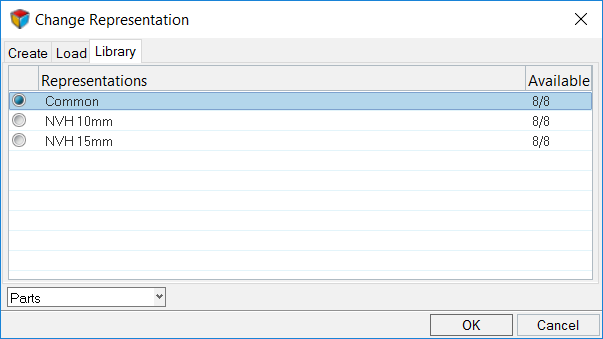
Figure 12.
Create Mesh Representations
-
In the Change Representation dialog, Create tab, select
the NVH_Standard_8 representation.
Each representation is uniquely identified by its alias and file type. For example, “NVH_Standard_8/HyperMesh” and “NVH_Standard_8/Nastran” representations.
The appropriate representation will automatically be selected, based on the available PLMXML metadata: discipline, mesh representation, and mesh density. If the appropriate metadata is unavailable, then you can select the desired representation type to create. In the Change Representation dialog, Create tab, only HyperMesh representations can be created.
Per the current Teamcenter-HyperMesh integration rules, only one representation per file type is allowed per part. This means that you can only have a single HyperMesh file type representation, Nastran file type representation, CAD representation, and so on for each part. For example, if you create a NVH_Standard_8/HyperMesh representation and then subsequently create a NVH_Coarse_15/HyperMesh representation, the NVH_Coarse_15/HyperMesh representation will become the only HyperMesh representation for the given part.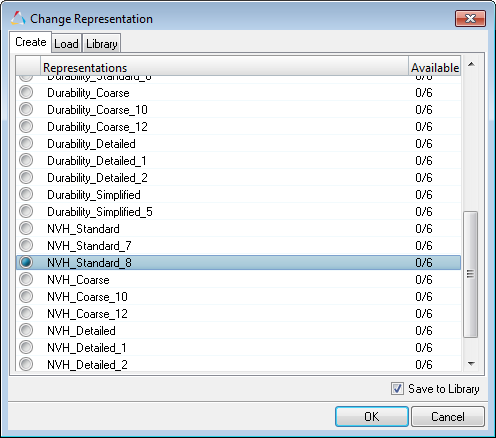
Figure 13.
BatchMesher is invoked, and meshes are created using the appropriate batch meshing parameter and criteria files.
The parameter and criteria file mappings are configurable based on the batchmesher_config.cfg file available in the installation.
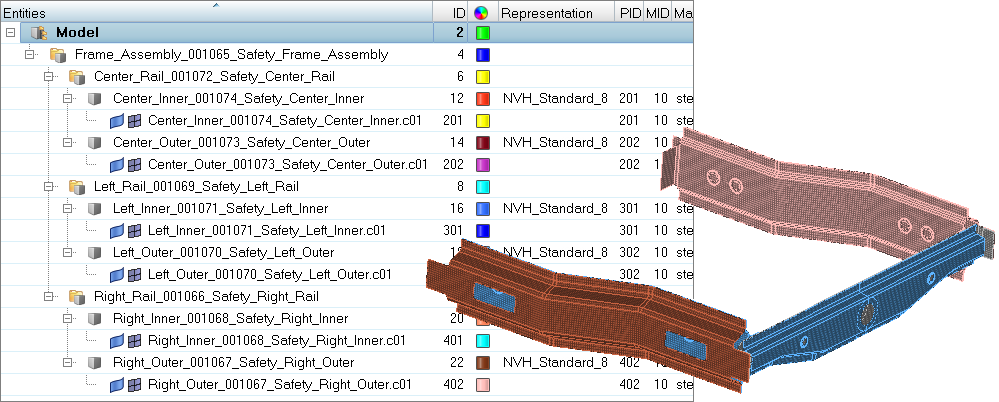
Figure 14.
Update Metadata from PDM
Sync Metadata to PDM
Sync PDM metadata (PDM PID, PDM Thickness, PDM Material, and PDM MID) based on a selected part or part's metadata (PID, Thickness, Material, MID).
*When a part has multiple properties, only the first property will display in the PID PDM field when you select Sync Metadata.
Save and Open HyperMesh Models
You can save the HyperMesh file at any time. The HyperMesh session stores all of the BOM-related information, including hierarchy, metadata, and representations. The original PLMXML BOM file is no longer required to load, view, or modify any of this information.
Save the Current HyperMesh Models
- From the menu bar, click .
- In the Save Model As dialog, save the model to your working directory.
Open HyperMesh Models
- From the menu bar, click .
- In the Open Model dialog, open the recently saved HyperMesh model.
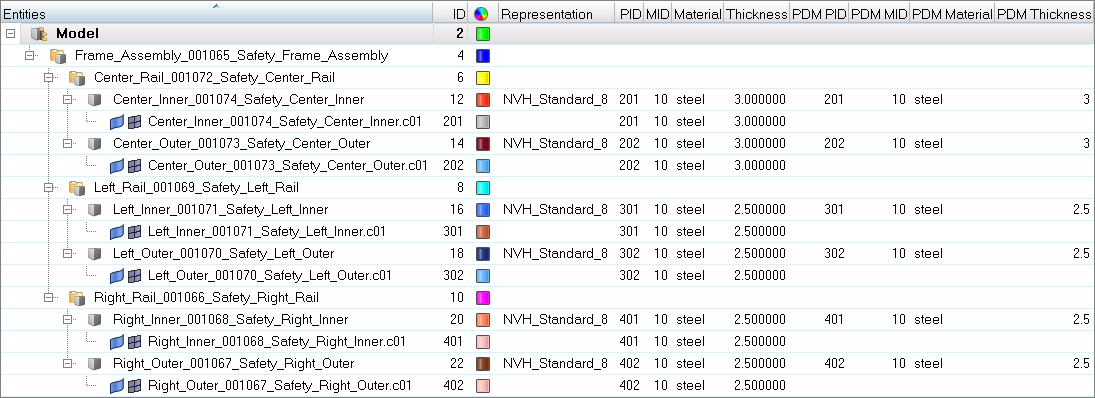
Figure 15.