Match Mesh, Line, or Surface Data
Move the handles into positions that change the shape of the model to match the mesh or geometry data. If you are going to match a mesh you need to make sure that the mesh does not get morphed when you are moving the handles.
This can be accomplished by constraining the nodes on the target mesh.
Constrain Nodes on the Target Mesh
Constrain all of the nodes in the target mesh to remain fixed during morphing operations.
Morph Interactively
Morph interactively by moving the handle and releasing the mouse button.
One of the most enjoyable ways to morph is interactively. As you drag a handle across the screen and you can watch the mesh move along with it. For large models it may be too slow to morph interactively in real time, but you can still morph interactively with any size model by setting HyperMorph to perform the morphing after you move the handle and release the mouse button.
You can also select other features to drag the handle along such as a line, a plane, or a surface. HyperMorph uses the position of the mouse on the screen to figure out where you want to move the handle. You can use this feature to position a handle anywhere you want line or surface data.
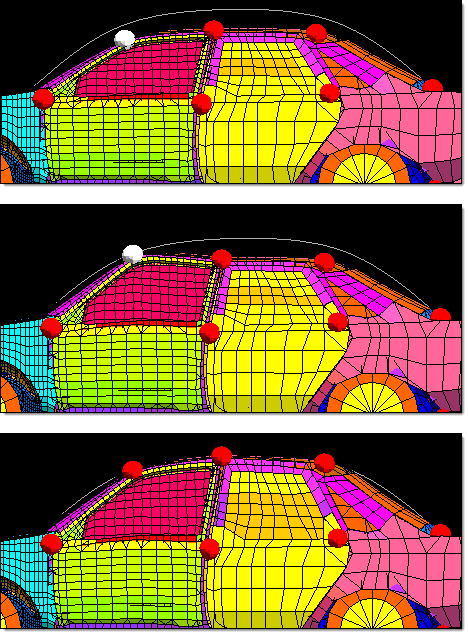
Figure 1. Morph to Profile Line. In the top frame, the global handles on either side of top of the windshield are selected. In the middle frame they are interactively moved upwards along a vector to a point matching with the profile line. In the bottom frame the process has been repeated for the other handles on the roof. The result is a morphed vehicle model that closely matches the profile line.
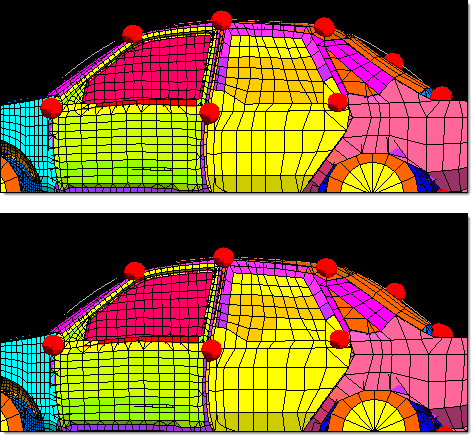
Figure 2. Morph to Profile Line. A handle is added to the center of the rear windshield and is moved to better match the profile line. Handles may always be added or deleted from a model without affecting the current morphed state of the model. However, any shapes saved as handle perturbations may not yield the same morphed shape after handles have been added or deleted. If you intend to add or delete handles in your model, save your shapes as node perturbations. HyperMorph will give you the option of converting existing shapes from handle perturbations to node perturbations automatically after you add, edit, or delete any morphing entities.
Match Target Mesh or Geometric Data
Match target mesh or geometric data by moving the handles to a specified node location.
- From the Tools page, click HyperMorph.
- Click Morph.
- Select the move handles subpanel.
- Change the upper middle selector from interactive to move to node.
- Select a handle.
- Select a node.
Create Nodes on the Fly
Create nodes on the fly on lines and surfaces.
- From the Tools page, click HyperMorph.
- Click Morph.
- Hold the mouse button down and drag the mouse over a line or surface until it is highlighted.
- Click on the line or surface where you want the node.