Free-Hand Node Move
| 1. | From the Menu Bar, select Mesh Editing > Move. |
| 2. | Using the radio button, select the Mouse Moving sub-window. |
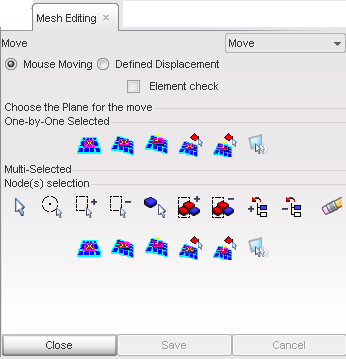
| 3. | Click the Element Check toggle to display the elements with their quality color while moving the nodes: |
| • | If the Element Check toggle is activated, the elements around the moving node become green (quality is good), orange (quality is acceptable), or red (quality is bad). |
| • | If the Element Check toggle is not activated, the elements are displayed in the part color. |
Two options are available to move nodes using the mouse
Move the nodes one-by-one:
| 1. | Under One-by-One Selected, click to move the node in the plane defined by the neighboring elements: to move the node in the plane defined by the neighboring elements: |
| • | In the graphic window, pick a node and hold the left mouse button. |
| • | Move the mouse to translate the node. |
| • | If necessary, pick another node and repeat the same steps. |
| • | When finished, click Yes in the Dialog menu bar. |
| • | To confirm, click Save to save the node displacements. |
or
To cancel, click Cancel.
or
| 2. | Under One-by-One Selected, click to move the node in the plane defined by the node to move and two other nodes: to move the node in the plane defined by the node to move and two other nodes: |
| • | In the graphic window, pick the node to be moved (the node is displayed in yellow). |
| • | Pick two other nodes (the nodes are displayed in red) to define a plane. |
| • | Pick the first selected node once more and hold down the left mouse button. |
| • | Move the mouse to translate the node. |
| • | If necessary, pick another node and move it in the same plane. |
| • | When finished, clickYes in the Dialog menu bar. |
| • | To confirm, click Save to save the node displacements. |
or
To cancel, click Cancel.
or
| 3. | Under One-by-One Selected, click  to move the node along the normal of a plane: to move the node along the normal of a plane: |
| • | In the graphic window, pick the node to be moved (the node is displayed in yellow). |
| • | Pick two other nodes (the nodes are displayed in red) to define a plane. |
| • | Pick the first selected node once more and hold down the left mouse button. |
| • | Move the mouse to translate the node. |
| • | If necessary, pick another node and move it along the same normal. |
| • | When finished, click Yes in the Dialog menu bar. |
| • | To confirm, click Save to save the node displacements. |
or
To cancel, click Cancel.
or
| 4. | Under One-by-One Selected, click  to move the node in the plane defined by the screen: to move the node in the plane defined by the screen: |
| • | In the graphic window, pick a node and hold down the left mouse button. |
| • | Move the mouse to translate the node. |
| • | If necessary, pick another node and repeat the same steps. |
| • | When finished, click Yes in the Dialog menu bar. |
| • | To confirm, click Save to save the node displacements. |
or
To cancel, click Cancel.
Move several nodes at the same time:
| 1. | In Multi-Selected, click to move nodes in the plane defined by the neighboring elements: |
| • | In the graphic window, pick all the nodes to be moved. |
| • | When finished with the selection, click Yes in the Dialog menu bar. |
| • | Pick the green node (first picked node) and hold down the left mouse button. |
| • | Move the mouse to translate the nodes. |
| • | When finished, click Yes in the Dialog menu bar. |
| • | If necessary, pick other nodes and repeat the same steps. |
| • | When finished, click Yes in the Dialog menu bar. |
| • | To confirm, click Save to save the node displacements. |
or
To cancel, click Cancel.
or
| 2. | In Multi-Selected, click to move nodes in a plane defined by three nodes: |
| • | In the graphic window, pick three nodes to define a plane. |
| • | Pick all the nodes to move. |
| • | When finished with the selection, click Yes in the Dialog menu bar. |
| • | Pick the first selected moving node (green node) once more and hold down the left mouse button. |
| • | Move the mouse to translate the nodes. |
| • | When finished, click Yes in the Dialog menu bar. |
| • | If necessary, pick other nodes and move them in the same plane. |
| • | When finished, click Yes in the Dialog menu bar. |
| • | To confirm, click Save to save the node displacements. |
or
To cancel, click Cancel.
or
| 3. | In Multi-Selected, click to move nodes along the normal of a plane: |
| • | In the graphic window, pick three nodes to define a plane. |
| • | Pick all the nodes to be moved. |
| • | When finished with the selection, click Yes in the Dialog menu bar. |
| • | Pick the first selected node (green node) once more and hold down the left mouse button. |
| • | Move the mouse to translate the nodes. |
| • | When finished, click Yes in the Dialog menu bar. |
| • | If necessary, pick other nodes and move them along the same normal. |
| • | When finished, click Yes in the Dialog menu bar. |
| • | To confirm, click Save to save the node displacements. |
or
To cancel, click Cancel.
or
| 4. | In Multi-Selected, click to move nodes in the plane defined by the screen: |
| • | In the graphic window, pick all the nodes to be moved. |
| • | When finished with the selection, click Yes in the Dialog menu bar. |
| • | Pick the green node (first picked node) and hold down the left mouse button. |
| • | Move the mouse to translate the nodes. |
| • | When finished, click Yes in the Dialog menu bar. |
| • | If needed, pick other nodes and repeat the same steps. |
| • | When finished, click Yes in the Dialog menu bar. |
| • | To confirm, click Save to save the node displacements. |
or
To cancel, click Cancel.
How Do I ...
Move nodes using defined displacement
Move nodes with translations
Move nodes with rotations
Move nodes with multi-movings
Move nodes with symmetries
Move nodes with scaling
Undo or Redo defined displacement


