In this step, you will add Python user subroutines to
the MotionView model.
Python can use many MotionSolve functions and inputs when certain syntax rules are
followed. When using a MotionSolve
function such as AKISPL or SYSFNC, the string
“py_” must be added to the beginning. For example,
“py_sysfnc (…” would be the correct usage of SYSFNC in Python. When defining a usersub function in Python, the name of the function and the inputs must match those
outlined in the MotionSolve online help pages exactly. When
accessing model data in Python through a function such as
SYSFNC, use the exact property name in quotations as the “id”
input. Model properties that are passed into Python in the
function definition can be accessed throughout the script, and do not need additional
defining to use. An example of these syntax rules being used is shown below:
def REQSUB(id, time, par, npar, iflag):
     [A, errflg] = py_sysfnc(“DX”,[par[0],par[1]])
return A
Use SPLINE_READ to Replace the Curve Entity
In this step you will implement the SPLINE_READ
subroutine.
This user-subroutine uses the SPLINE_READ function to return the
curve from the included pressure_curve.csv file.
SPLINE_READ is the usersub that corresponds to the curve entity
in MotionView. It uses data points in an external file to
create a curve, which can then be used by other entities.
Write the Python
script:
Open a new Python file.
Define a function with the name SPLINE_READ using
“def SPLINE_READ():", and give the inputs and
outputs id, file_name, and
block_name.
Import the Python CSV package by
including import csv after the function definition.
Open pressure_curve.csv in the function, and read the file
to your Python script as a variable.
Use the function “variable =
open(‘pressure_curve.csv’,’r’)”.
Define a new variable to change the format of this variable. Use
csv.reader() to read your variable file.
Define an empty list, “L”, to store the
pressure_curve data values. Iterate through the list
using “for item in curv:”. Append each item as a separate list
value with “L.append(item)”.
Remove the headers from the csv file by redefining the list from the second
value till the end of the list. This can be done with “L =
L[1:]”.
Define a counter variable to be used later.
Define two lists that are half the length of “L”, and set
them equal to zero.
Use “x = 16*[0.0]” twice; once with the x value and
once with the y value.
Create a while loop dependent on your counter variable being less than the
length of your list, minus one.
In each iteration of the loop, define your x and y data values for the index
“i” as a floating value of each half of your
“L” data sets. This should look like “x[i] =
float(L[i][0])” and “y[i] = float(L[i][1])”. Increase your counter
variable by 1.
Define a z variable with a floating value of 0.0, and close the csv file.
Note: Defining a z variable is necessary, as the next function you will use
requires an x, y, and z variable.
Use the put_splineMotionSolve function, and return the
“id”, as well as the lists containing the first and second
column of values and the z variable. This should be done with “errflg =
py_put_spline(id,x,y,z)” followed by “return
errflg”.
Save the file to your <working directory> as
nonlin_spline.py.
Your script should resemble the following
example:
def SPLINE_READ(id, file_name, block_name):
import csv
ifile= open('pressure_curve.csv','r') ## opens data file as
readable variable
curv = csv.reader(ifile) ## reads csv data, stores as
useable var.
L = [] ## creates empty list
for item in curv:
L.append(item) ## separates file values into list
L = L[1:] ## removes block names from list
i=0 ## creates counter
x = 16*[0.0]
y = 16*[0.0] ## splits list into x and y lists
while i < (len(L)-1):
x[i] = float(L[i][0]) ## changes values from str to float
y[i] = float(L[i][1])
i+=1 ## counter increment
z = 0.0 ## defines z value
ifile.close() ## closes data file
errflg = py_put_spline(id,x,y,z) ## var to create MotionSolve
spline
return errflg ## returns var
Implement the Python script:
In MotionView, click the (Curve) button.
Locate the Force_Pressure curve in the Project Browser.
From the Properties tab, check the box marked
User-defined.
From the Attributes tab, make sure Linear
extrapolation is checked.
Click on the User-Defined
tab, and use the (File browser) to select the
pressure_curve.csv file.
Change the Function Type in the drop-down menu from DLL to Python, and ensure the function
name is SPLINE_READ. You do not need to enter
anything for the Block name, as it is not needed in this tutorial.
Check the box marked Use local file and function
name. Use the
(File browser) to locate and select the
nonlin_spline.py file.
Figure 1. The curve panel using the SPLINE_READ usersub
Use REQSUB to Request an Output
In this step, you will use the REQSUB user-subroutine to return
values of the magnitude of displacement for the piston.
This subroutine will use Python to specify which
values to return.
Write the Python script:
Create a new Python file and define a function
named REQSUB with the appropriate inputs and outputs.
This is the syntax: “def REQSUB(id, time, par, npar, iflag)”.
Use the sysfnc utility to implement the
“DM” (displacement magnitude) function on the first and
second input parameters, and define a variable and an error flag by writing
“[D, errflg] = py_sysfnc(“DM”,[par[0],par[1]])”.
Return a list of eight values, where the second value is your variable, and the
rest are equal to 0.
This will be your result variable, and should look like “result =
[0,D,0,0,0,0,0,0]”.
Save this file to your <working directory> as
req_nonlin.py.
Your script should resemble the following example:
def REQSUB(id, time, par, npar, iflag):
[D, errflg] = py_sysfnc("DM",[par[0],par[1]]) ## sets "D" as piston
displacement mag
result = [0,D,0,0,0,0,0,0] ## lists results for output
return
return result ## sends list with results to motionsolve as
output
Implement the Python script.
In MotionView, click on the (Outputs) panel.
Locate the Output_Conrod_Length in the Project Browser.
From the Outputs panel, from the drop-down menu select User
defined.
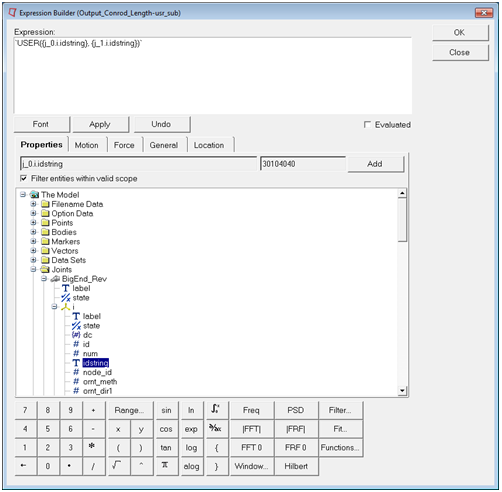
Click in the text field labeled Output, and then
click on the button to open the Expression
Builder. In the text field, add two sets of curly
brackets (“{},{}”).
From the Joints folder, click idstring. Click
inside the first set of brackets and click Add to
insert j_0.i.idstring.
Click inside the second set of brackets and add the next expression,
j_1.i.idstring.
Figure 2. Expression Builder dialog
Click OK.
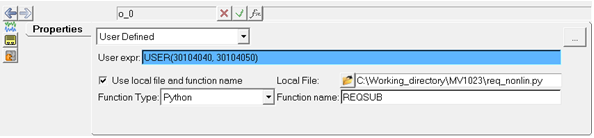
Check the Use local file and function name box,
and select Python
from the Function Type drop-down menu.
Use the (Local File) file browser to locate and
select the req_nonlin.py script, and make sure the
Function name text field reads REQSUB.
Figure 3. Outputs panel using REQSUB
Use GFOSUB to Replace the Force Entity
In this step, you will replace the Force Entity with a user defined Python script using GFOSUB.
The GFOSUB used here will take the curve data defined with
SPLINE_READ, and change depending on the Conrod angle according
to the curve.
Write the Python script:
Open a new Python file.
Define the function GFOSUB by typing “def GFOSUB(id,
time, par, npar, dflag, iflag):”.
Import "pi" from the Python“math” library using “from math import
pi”.
Use the “AZ” function for angle in the z direction with the
sysfnc command, to save it as a variable. To do this, type “[A, errflg]
= py_sysfnc(“AZ”,[par[1],par[2]])”.
Change the variable defined in Step 4 to degrees. As the
model extends from the origin into the negative y direction, you will need to
multiply by -1.
Note: The method used in this tutorial is “B =
((-1)*A*180)/pi”
.
Define another variable using the “akispl” utility, which
interpolates the force values from the curve. You will need input arguments of
your angle “B”, zero to specify a two dimensional curve, and
zero for the curve input and the order.
Note: This line is written as “[C, errflg] =
py_akispl(B,0,par[0],0)”.
Return a list three elements long, where the second element is the variable
defined with the Akima interpolation function. The data from interpolation is
stored in the first column, so use “return [0,C[0],0]”.
Save this file to your <working directory> as
gfo_nonlin.py.
Your script should resemble the following
example:
def GFOSUB(id, time, par, npar, dflag, iflag):
from math import pi
[A, errflg] = py_sysfnc("AZ",[par[1],par[2]]) ## retreives conrod
angle
B = ((-1)*A*180)/pi ## converts radians
to degrees
[C, errflg] = py_akispl(B,0,par[0],0) ## interpolates data to fit
curve
return [0,C[0],0] ## returns C data as force values
Implement the Python script.
In MotionView, click the (Force) icon.
Locate the Force_Gas_Pressure force in the Project Browser.
From the Connectivity tab, check the User-defined
properties box.
Figure 4.
From the User-Defined tab, edit the Force value with the
Expression Builder to include the curve
idstring, the ground marker idstring, and the crank marker
idstring.
Figure 5.
Click OK.
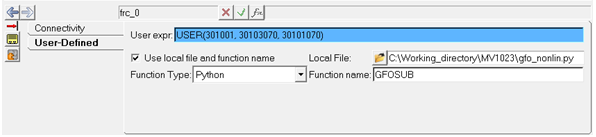
Check the Use local file and function name box,
and select Python
from the Function Type drop-down menu.
Use to select
gfo_nonlin.py from your <working
directory>.
Remember: Make sure the Function name is set to
GFOSUB. Figure 6.
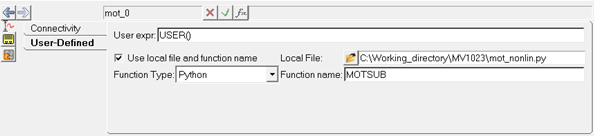
Use MOTSUB to Define a Motion
In this step you will use the MOTSUB user subroutine to define a
motion.
Write the Python script:
Open a new Python file.
Define the MOTSUB function, including the required inputs.
The correct syntax for this is “def MOTSUB(id, time, par, npar, iord,
iflag):”.
The MOTSUB user subroutine requires a function or
expression, and its first and second order derivatives. Create conditional
statements using the function order variable “iord” to define
the function and its first and second derivatives with “if iord==0:”,
“elif iord==1:” and “else:”.
The function and its derivatives should be defined with the same variable name.
The function used in this tutorial is “A = 10.0461*time”. This
makes the first derivative equal to “A = 10.0461”, and the
second derivative equal to “A = 0.0”
Return the function variable with “return A”.
Save this file to your <working directory> as
mot_nonlin.py.
Your script should look like the following example:
def MOTSUB(id, time, par, npar, iord, iflag):
if iord==0: ## function
A = 10.0461*time
elif iord==1: ## first derivative
A = 10.0461
else: ## second derivative
A = 0.0
return A ## returns function based on iord input
Implement the Python script.
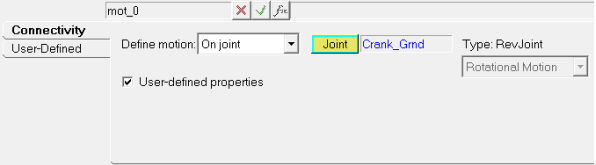
In the Project Browser, click on the
Motion_Crank motion.
In the Motions panel, check the User-defined
properties box.
Figure 7.
Click on the User-Defined tab.
Note: Since the function was defined in the Python script, the USER() text field does
not need to be modified.
Check the Use local file and function name
box.
From the Function Type drop-down menu, click Python.
Use the to open the
mot_nonlin_py file.
Figure 8.
Use DMPSUB to Add Custom Flexbody Damping
In this step you will add custom flexbody damping with the DMPSUB
usersub.
Write the Python script:
Open a new Python file.
Define the DMPSUB function with “def
DMPSUB():”, and give it these inputs: “id, time, par, npar,
freq, nmode, h”.
Define a list the length of “nmode” using “cratios =
nmode*[0.0]”.
“nmode” is the number of modes in the flexbody.
Create an “if” statement to iterate along the list of modes in
the flexbody. The “range()” function can be used here,
resulting in “for I in range(nmode):”.
In each iteration of the loop, set each index in your variable equal to 1 by
adding “cratios[i] = 1.0”.
At the end of your script, return the list variable with “return
cratios”.
Save your script as dmp_nonlin.py.
Your script should resemble the following
example:
def DMPSUB(id, time, par, npar, freq, nmode, h):
cratios = nmode*[0.0] ## makes preallocated list for markers
for i in range(nmode):
cratios[i] = 1.0 ## sets marker damping to 1
return cratios ## returns damping values
Implement the Python script.
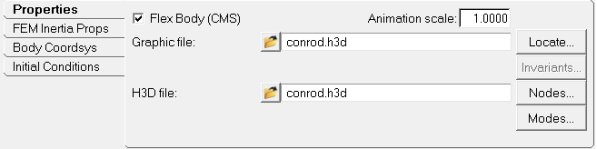
From the Project Browser, click the
Conrod body (the flexbody in the
model).
From the Properties tab, click the Modes...
button.
Figure 9.
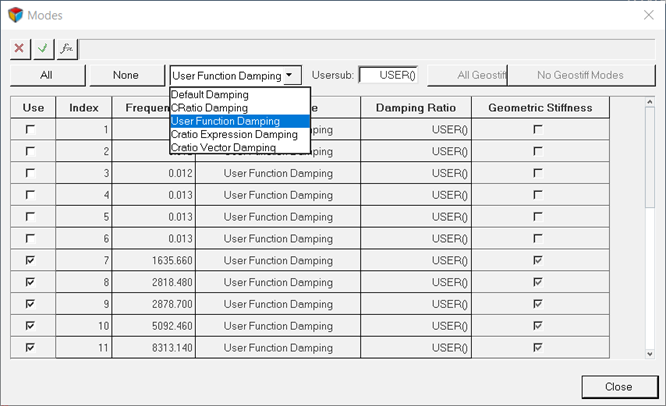
In the Modes dialog, select User
Function Damping from the drop-down menu. Enter
expression 'USER()' in the Usersub field.
Figure 10.
Because you defined the damping in the
dmp_nonlin.py script, you do not need to change
the USER() expression.
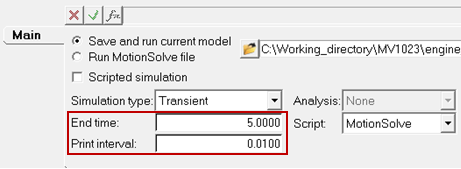
Click the (Run) button.
In the panel, change the End time to 5.0 and the
Print interval to 0.01.
Figure 11.
Export the MotionSolve file, in the menu bar
click File > Export > Solver Deck.
Note: Currently there is no GUI option available to specify the
DMPSUB file defining flexbody damping,
therefore the dmp_nonlin.py must be manually
added to the MotionSolve file (*.xml) by
adding these
statements:
 (Curve) button.
 (File browser) to select the
pressure_curve.csv file.
(File browser) to select the
pressure_curve.csv file.
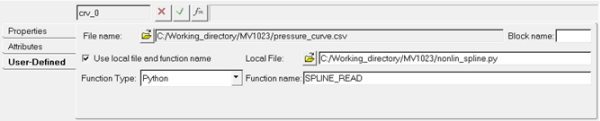 Figure 1. The curve panel using the SPLINE_READ usersub
 (Outputs) panel.
 button to open the Expression
Builder. In the text field, add two sets of curly
brackets (“{},{}”).
button to open the Expression
Builder. In the text field, add two sets of curly
brackets (“{},{}”).
 (Local File) file browser to locate and
select the req_nonlin.py script, and make sure the
Function name text field reads REQSUB.
(Local File) file browser to locate and
select the req_nonlin.py script, and make sure the
Function name text field reads REQSUB.
 (Force) icon.
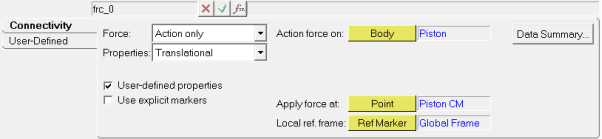 Figure 4.
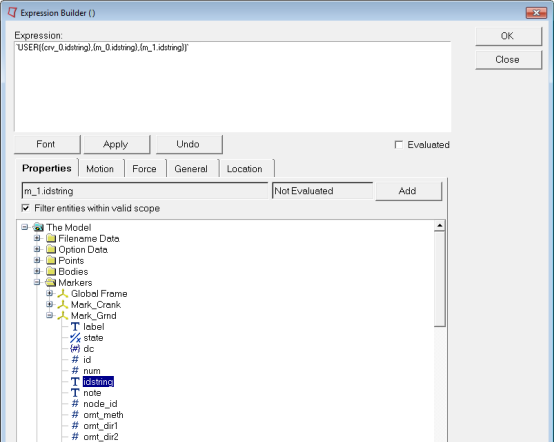
 (Run) button.