Store and Recall Custom Views
Save the current view of your model for future reference and recall saved views.
From the View Controls toolbar, click ![]() .
.
HyperMesh
Type a name and press Enter, or select a previously saved view.
- Quickly save a custom view by pressing Ctrl + number. For example, pressing Ctrl + 1 creates a custom view and assigns it the name Ctrl + 1. To then recall, press the corresponding number used to save the view. For example, if you pressed Ctrl + 1 to save the custom view, press 1 to quickly recall this view in the future.
- Right-click on a view to recapture, rename, delete, and control the display state of the view.
HyperGraph
Simply select one of the two user views to save or restore.
HyperView
Type a name and press Enter, or select a previously saved view.
In HyperView, views are saved as entities in the Results Browser. As such, they also can be created and edited in the browser and Entity Editor.
Orthographic and Perspective are traditional HyperView view modes, while the Lens type simulates a camera lens (and can be used if you have the camera angle coordinates). These various modes will apply the view volume/clipping region differently.
The Current view is a view which is always synchronized with the graphics window. It cannot be deleted or locked. All other user defined or image plane alignment generated views, are locked by default. You can however, “unlock” those views and modify them. When a view is unlocked, it is also synchronized with the graphics window.
Views - Orthographic
Standard
- Label
- The ID of the view.Restriction: This field is not editable for Current View.
- Lock
- Activate to lock the view.
- With Masking
- Activate to save the current mask state to the view.
View Projection
- Projection Type
- Select/change the projection type of the view (Orthographic, Perspective, or Lens).
Views - Perspective
Standard
- Label
- The ID of the view.Restriction: This field is not editable for Current View.
- Lock
- Activate to lock the view.
- With Masking
- Activate to save the current mask state to the view.
View Projection
- Projection Type
- Select/change the projection type of the view (Orthographic, Perspective, or Lens).
- Perspective Angle
- Click in the field and use the slider bar to adjust and set the angle of the perspective (from 5 to 45 degrees).
Views - Lens
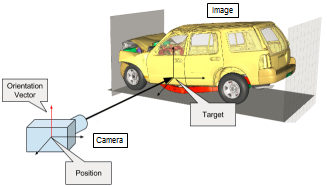
 Figure 1. Camera and Model Example |
 Figure 2. Camera Example |
Standard
- Label
- The ID of the view.Restriction: This field is not editable for Current View.
- Lock
- Activate to lock the view.
- With Masking
- Activate to save the current mask state to the view.
Camera
- Target
- The coordinates of the point on the 3D model where the camera is focused on. There is no default value, a user defined value should always be provided.
- Position
- The coordinates of where the camera is in 3D model space. There is no default value, a user defined value should always be provided.
- Orientation Method
- Define which direction the top of the camera is pointing towards:
- X-up
- X-down
- Y-up
- Y-down
- Z-up
- Z-down
- Vector (Default)
- Orientation Vector
- When an orientation method is chosen as any predefined method (XYZ axis and up or down), the orientation vector is automatically assigned with corresponding vectors. The default value is 0.33, 0.33, 0.33. When the orientation method is set to Vector, you can arbitrarily input a vector. This vector is an approximation of which direction the top of camera is pointing towards.
- Up Vector
- The actual direction the top of the camera is pointing towards. This value is calculated automatically based on the previous four entries. It is normalized, and is not editable.
View Projection
- Projection Type
- Select/change the projection type of the view (Orthographic, Perspective, or Lens).
- Focal Length (Zoom)
- The focal length of the camera lens in millimeters. This typically can be read from the camera lens. The default value is 25.0.
- Sensor Height (mm)
- The height of the camera sensor in millimeters. This typically can be found in the camera specifications. Some camera manufacturers specify a sensor width or diagonal, if that is the case the height needs to be calculated using the aspect ratio of the image/video. The default value is 15.6.
- Focal Point Offset (mm)
- Focal point is the intersection point between the principal direction of camera lens and the camera sensor plane. The Focal Point Offset is the difference from this point to center of camera sensor in millimeters. The default value is (0.0, 0.0). If the actual value is not known, the default value can be used.
Image Plane
- Image Plane ID
- The ID of the image plane for which cropping information is input.
- Top cropping
- Pixels cropped at the top.
- Bottom cropping
- Pixels cropped at the bottom.
- Left cropping
- Pixels cropped at the left.
- Right cropping
- Pixels cropped at the right.
- Adjusted sensor height (mm)
- This is calculated by HyperView as follows:
Adjusted sensor height =
video height * sensor height/(top + bottom + video
                  height)
where;
top: pixels cropped at the topbottom: pixels cropped at the bottomvideo height: vertical resolution in pixelsRestriction: This field is not editable. - Adjusted focal point
- This is calculated by HyperView as follows:
The x value of new focal point offset =
(left - right) / 2.0 / video height +
                  input focal point offset x
The y value of new focal point offset =
(bottom - top) / 2.0 / video height + input focal point offset
                y
Restriction: This field is not editable.