HM-4060: Work with Include Files
Many FEA solvers allow you to organize your input deck into separate files, and provide a mechanism to read all files linked to a single input deck. This capability is commonly known as "includes."
HyperMesh provides several options for importing such models, one of which preserves the include structure upon import. The Includeview in the Model Browser is available to manipulate these includes. The Includeview lets you create, review, edit, organize, and update the contents of any HyperMesh model into various include files. Every entity in HyperMesh then belongs to either the master model or one of its include files.
While HyperMesh supports include formulations for several other solvers, you will use LS-DYNA 970 input decks for the purpose of this tutorial.
- Import include files
- Review and manipulate includes
- Create includes and reorganize the database
- Locate entities in includes
- Import new data into includes
- Export options
This exercise uses the master.k file, which can be found in the hm.zip file. Copy the file(s) from this directory to your working directory.
Load the User Profile
In this step you will load the LS-DYNA user profile, import the LS-DYNA decks (master file and include files) defining the model, and preserve the organization of the data into the various include files.
-
Next to Import options, click
 .
.
-
Click Import.
HyperMesh imports the master.k deck and the wheels.key, frame.key, and engine.key include files, which are also present in the same directory. The truck model defined with a master deck and several include files were imported into HyperMesh while preserving the organization of the data between the various files.
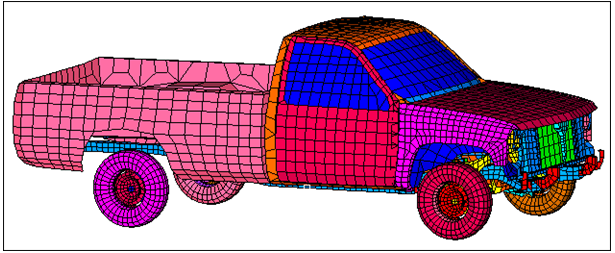
Figure 1.
Review the Model Organization
You can access the Include view (![]() ) in the Model Browser. In this view you can
create, review, edit, organize, and update the contents of a model into various include
files. From the right-click context menu you can access additional
Include view functions.
) in the Model Browser. In this view you can
create, review, edit, organize, and update the contents of a model into various include
files. From the right-click context menu you can access additional
Include view functions.
In this step, you will launch the Include view, review the structure of the model and its organization into the various includes, and experiment with some of the display and configuration options available.
-
In the Model Browser, click
 .
HyperMesh displays a tree-like organization of the database structure.Note:
.
HyperMesh displays a tree-like organization of the database structure.Note:The Master Model is at the top level of the include browser. Data, which does not have any references to an include file, is stored in the master model. Each include file is represented by
 along with its file name. Each include can
be expanded to reveal its contents. The contents of each include is
grouped into folders containing each type, next to which appears the
total number of entities of that type. Each of the folders can be
expanded to review the individual entities in that folder. The browser
can be configured to show only specific entities of interest.
along with its file name. Each include can
be expanded to reveal its contents. The contents of each include is
grouped into folders containing each type, next to which appears the
total number of entities of that type. Each of the folders can be
expanded to review the individual entities in that folder. The browser
can be configured to show only specific entities of interest. -
Expand the Component folder, which consists of six
component collectors.
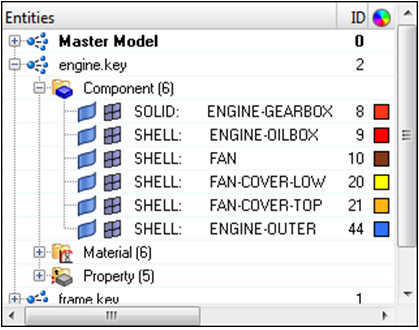
Figure 2. -
Visually review the components that each include contains by isolating the
include you wish to review using the Isolate only option
in the context menu.
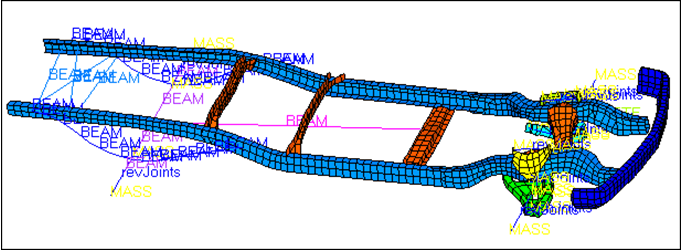
Figure 3.
Review Options
You can configure the columns within the Include View so that only the columns you are interested in are displayed. In this step you will learn how to configure the Include View in the Model Browser.
-
In the Model Browser, right-click and select
Collapse All from the context menu.
Note: There are columns for Export, Include Path, and Include Type.
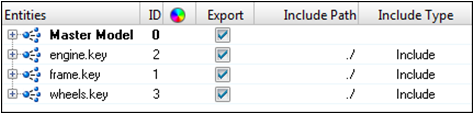
Figure 4. -
Expand the frame.key folder.
Note: The Export, Include Path and Include Type columns are only relevant for the include files and not for the individual entities within the file.
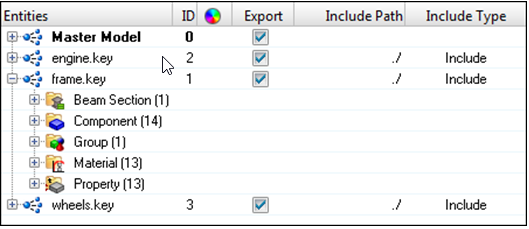
Figure 5. -
In the Browser Configuration dialog, select the
Columns tab.
Note: From the Columns tab you can define which columns are displayed in the Model Browser when you are in the Include View.
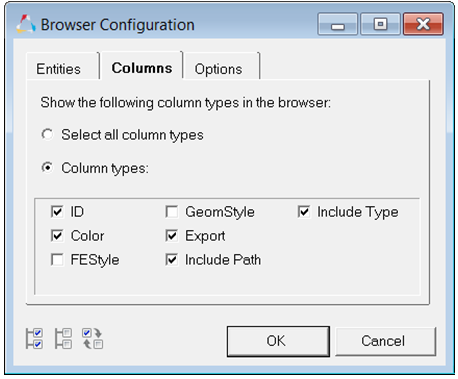
Figure 6.
Create New Includes
Whether you import includes or are simply starting from a ‘flat’ HyperMesh model, you can create new includes in your database using the Include View, and organize entities into them using the Organize panel. You can also select entities (using the standard Shift and Ctrl keys) from the Include View and drag them between two includes or between the master model and an include.
To determine which include a specific entity belongs to, you can use the Organize panel’s locate function.
In this section, create a new include for the doors and organize the corresponding collectors into it using the Organize panel. Finally, determine which include a certain material belongs to using the locate function.
-
In the Model Browser, Include View,
right-click on Master Model and select
Create
Include File from the context menu.
HyperMesh adds a new include under the master model with an editable name and displays it in bold, which signifies that it is the current include.Note: You can add includes under the master model or under includes themselves.
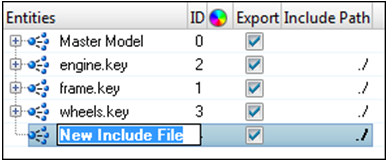
Figure 7. -
Hide all includes except door.key.
HyperMesh displays the elements organized in the include in the graphics area.
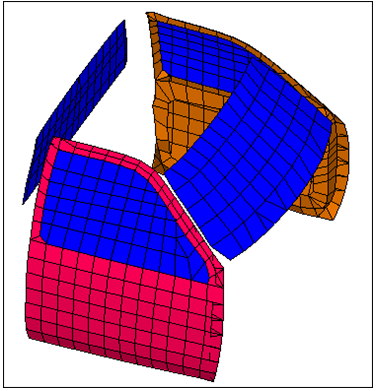
Figure 8. -
Select the material, MATL1_38.
HyperMesh updates the dest= field to show which include (or master) file this particular material belongs to. In this case, it belongs to the wheels.key include.
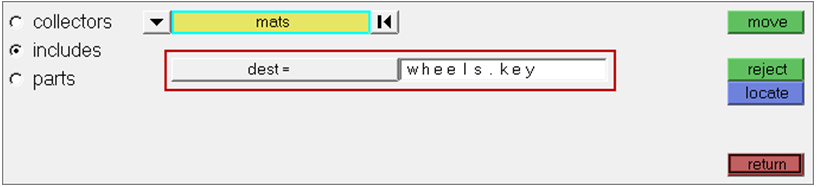
Figure 9.
Import Data and Export the Model
In this section, you will create a new include in the master model labeled barrier.dyn, and then import a barrier model into it. You will then review the include file options for each one of the includes in the model and modify them as needed. Lastly, you will export the model, while also preserving the includes.
By default, the Master Model is always the current file (displayed in bold in the Include view) and any new entities you create or import into HyperMesh will be automatically placed in it. You can use the Make Current option from the Include view context menu to make any include the current include. When you create a new include, this include will automatically become the current include.
You can use the Include File Options function in the Include view context menu to define export options for individual include files. Using this option, you can define whether the include file should get exported, when the export function is used, and where the file should be exported.
- Merge: merges all of the data in individual include files into a single master model during export. The exported file does not contain references to any include files.
- Preserve: exports all the data in individual include files separately to their corresponding files. The references to these includes in the master model file are also maintained.
-
Click Import.
HyperMesh imports the barrier.
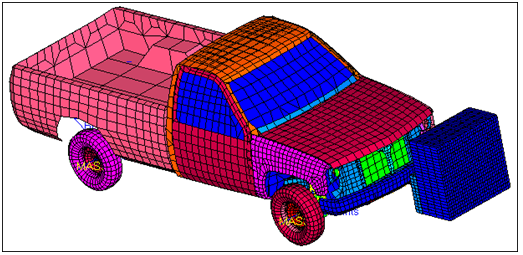
Figure 10. -
Right-click on engine.key and select Include
File Options from the context menu.
The Include File Options dialog opens and displays the following:
- File path: type in or browse for the directory in which the include is to be exported.
- Do not export: When this check box is selected, HyperMesh will not export include when you export
the model. When this check box is clear, HyperMesh exports the include when you export the
model. This check box is automatically selected when you read includes
into HyperMesh that have their permission
set to read only, as well as includes that are referenced by the master
include using absolute paths.The frame.key, wheels.key and engine.key includes are all referenced by the master.k include that you import5ed initially using relative paths (edit the master.k file to verify this), but their permissions were set to read only. To export these includes, clear the Do not export checkbox.
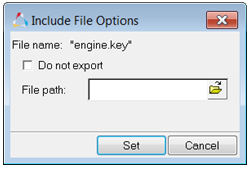
Figure 11.
-
In the File name field, type the location and name of the master model and
click OK.
HyperMesh exports the include files as individual files.Note: This option is equivalent to exporting the master model from the Export - Solver Deck tab (
 ) with the preserve includes checkbox selected.
When you want to export a single file, use the export subpanel and set
export option to merge includes.
) with the preserve includes checkbox selected.
When you want to export a single file, use the export subpanel and set
export option to merge includes.
Save Your Work
In this optional step you will save your work.