


|
Creating a Template
A Monarch Classic template is used to extract fields from a report. You can create the following template types:
-
Detail template: A detail template is used for extracting information from the lowest report level, usually referred to as the detail, transaction or itemized level. Fields extracted by the detail template are used to create each database record in the resulting database table.
-
Append template: An append template is used for extracting fields from each sort level in a report, usually referred to as a sort level, group level or append level. Fields extracted by each append template are appended (i.e., concatenated) to each record created by the detail template field.
-
Footer template: A footer template is used for extracting fields that appear after a detail line (use an append template to extract fields that appear before a detail line). Fields extracted by the footer template are appended to each record.
-
Page Header template: A page header template is used for extracting fields that appear at the top of each page. This area is referred to as the page header. Fields extracted by the page header are appended to each record.
-
Exclusion template: An exclusion template is used to specify lines or parts of lines that should NOT be captured by other template types.
Note: Only one detail template can be created.
Note: While multiple append templates can be created, the total number of all append and footer templates cannot exceed 20.
Note: While multiple footer templates can be created, the total number of all footer and append templates cannot exceed 20.
Note: Only one page header template can be created.
Though the following instructions outline the procedure for creating a detail template, you may use the same procedure to create an append, footer, page header, or exclusion template.
General steps to create a template
The following steps are required to define a detail template:
Step 1: Identify and select a template sample
-
Go to Report Design: select the Report tab, then select Report Design on the Report View ribbon.
-
Inspect the first few pages of the report to identify the detail level information. Note whether all detail fields fit on a single detail line or if they spread across multiple lines. Note: In most reports, all detail level fields fit on a single line. Occasionally, the detail fields may be arranged in blocks of two or more lines, sometimes with field labels interspersed. In the following illustration, all of the detail fields are arranged on a single line.
-
Select a line or group of lines that contain a single instance of the detail fields. Note: To select a single line, click in the line selection area to the left of the line. To select multiple lines, click down in the line selection area to the left of the first line, then drag down to the last line, then release.

Detail lines showing transactions.
Step 2: Assign a template role
The first time you create a template for a report, you must assign a role. You may change the template role at any time while creating or editing a template definition.
-
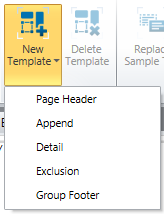
On the Report Design Ribbon, select New Template. You are asked to select a template role:
-
Select the appropriate template role from the role drop-down.
Step 3: Define a Trap
Each template requires a trap that identifies unique features of the template. The trap is used to capture all instances of a template throughout the report. In the case of a detail trap, the trap identifies common features shared by all detail lines, but not shared by other lines. A proper detail trap will capture only the detail lines while ignoring lines from headers and other sort levels.
For example, in the illustration above, all detail lines have a number in position 9 followed by two blank characters:

To capture these lines, you can set a trap that looks for a numeric character in position 9 followed by two blanks.
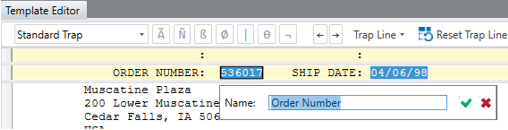
You create a trap by entering trap characters in the Trap box (immediately below the row of buttons in the Template Definition dialog):

The Sample Box and the Trap Box. The trap box has one numeric trap defined.
You can specify one or more trap characters on the trap line. Often, several different combinations will work equally well. It is generally a good idea to specify several trap characters to insure that you do not accidentally capture lines from other sort levels, but be careful. If you specify many trap characters, you run the risk that some lines will be missed by the trap. You can experiment with the trap definition until you find a combination that works.
Trapping a detail template that contains multiple lines. In some reports, the detail fields are arranged on more than one line. In this case, you need to indicate which of the sample lines to trap on. Generally, you will be able to trap on the first line by identifying features unique to that line. Occasionally, however, there will be no unique features that identify the first line. If it is impossible to use line 1, use the Trap Line drop-down to indicate another line that has unique features. (The Trap Line drop-down is located on the action bar at the top of the Template Editor.)
-
Click in the Trap box to position the cursor above a letter, number, space or punctuation character that you want to include in the trap, then type the character or click the trap button that represents the character. If necessary, use the cursor keys or the horizontal scroll bar at the bottom of the Report window to scroll the trap line and the template sample left or right.
-
Use the vertical scroll bar to scroll through the report. View enough of the report to satisfy yourself that the trap captured all instances of the detail lines. If the trap missed any lines, inspect those lines to determine what modifications you need to make to the trap in order to capture them. After making the modifications repeat step 2.
When trapping on a field label, you may type the label on the trap line immediately above the label. When you type letters, numbers or punctuation characters on the trap line, you indicate to Monarch Classic that these exact characters are present for each instance of the template. Note: Traps can be case-sensitive. You can toggle the default case setting via the Input Options dialog (see Trap Case Setting above for more information). If you change the default case setting to case-insensitive, then if you type a series of characters, e.g., "ship_date", to match a label, Monarch Classic will match this with "ship_date", "Ship_date" or "SHIP_DATE".
When trapping on a field value, use Monarch Classic's special trap characters to represent letters, numbers, and non-blank characters that may vary with each instance of the field. The trap characters act as wildcards to represent any letter, any number or any non-blank character (any letter, number or punctuation character).
Refer to the Template Editor for information about the tools and trap characters.
Monarch Classic indicates each captured line by highlighting the line in gray and placing closing guillemets in the line selection area to the left of the line.
After you are satisfied that the trap is working to capture all of the detail lines, but not lines from other levels, you are ready to highlight the fields that you want to extract.
Trap Case Setting
In previous versions of Monarch Classic, traps were always case-insensitive. Note that traps can be case-sensitive. This default is recorded in the registry under Settings\CaseSensitiveTraps. A value of 1 means new models will use case-sensitive traps, 0 means case-insensitive. The Input Options window now has a check box for choosing the desired behavior. Note that the behavior applies across all templates for a given model – it cannot be applied on a template-by-template basis.
The case-sensitivity option is saved in the model. Users who wish to make all new traps case-sensitive can check the Traps are case-sensitive check box in the Input Options window and press "Update" to save this as their default.
Step 4: Highlight and name fields
Monarch Classic includes an Auto-Define Fields button on the Report Design ribbon, which is a special button that automatically highlights fields in your template. It uses Monarch Classic's built-in parsing and data recognition capabilities to determine where fields begin and end.
Note: Though you can use this capability as a jump start when highlighting fields in your templates, you should not rely upon this feature exclusively, as Monarch Classic cannot predict which fields you might want to extract and which you want to leave out, nor can it deal with the subtleties of report design that allow fields to wrap onto multiple lines or to about one another.
This procedure teaches you how to manually highlight fields.
To highlight fields:
Using the sample line as an example, highlight each field you want to extract. Each field highlight should be long enough to allow for long field values but not so long that you extend the highlight into another field's data. For numeric fields, which are right aligned, the highlight should extend to the left to account for the largest number that is likely to exist in the field.
-
Using the mouse. Click down in the Sample box at the left extent of the field, then drag right to highlight the field. Repeat for each field you want to extract. For numeric fields, which are right aligned, you may start at the right edge and drag left to highlight the field.
-
Using the keyboard. The keyboard provides a more precise method of highlighting fields, since you can easily adjust the field length by a single character at-a-time. Click in the Sample box to display the insertion cursor. Use the arrow keys to move the cursor to the first character in the field, then press Insert and use the right arrow to highlight the field. Press Enter to complete the field definition. Repeat for each field you want to extract.
Although you could use the vertical scroll bar to scroll through the report to ensure that you have defined your fields properly, this method becomes tedious when you are working with large reports. Therefore, Monarch Classic provides a field verification feature that reads the entire report and verifies that your fields are properly defined.
To name fields:
-
Using the Field Properties Dialog:
You can name each field via the Field Properties window or from Field List window in Table Design. By naming fields within the context of the report, you may find it easier to determine appropriate field names.
-
Position the cursor on top of the first field highlight, then select Edit Field on the Template Editor action bar. You can also right-click on the field and select Edit Field from the context menu.
-
Type an appropriate name for the field in the Name box, then press enter or choose OK to accept the new field name.
-
Repeat steps 1 and 2 for each field.
The Field Properties window displays the sample field value for the selected field along with the current field name. If you have not yet named the field, it is automatically given a temporary name using the prefix "eg_" and the sample data from the first record encountered.
Field names may be up to 62 characters in length and may contain uppercase and lowercase characters, spaces, and punctuation except for period (.), exclamation point (!), accent grave (`) and brackets ([]). Names may begin with any character, except for an underscore or space. If a name is entered with leading spaces, the name is accepted but the leading spaces are ignored.
Note: If you elect to enforce DBF field naming rules, field names must adhere to the dBASE III field naming conventions. Names may be up to ten characters long and may contain any letter or number and the underscore character (_). The first character must be a letter. Spaces and punctuation are not allowed.
-
-
Using the Context Menu
Follow these steps to name or rename a field via the context menu:
-
Right-click on a field and select Rename:
-
Enter a new name.
-
Press Enter (or click the green check button). This will close the name edit control and update the Field Properties.
The Field Name Editor dialog box displays:
-
Step 5: Name and accept the template
When you are satisfied with the trap and field definitions, you can name the template and apply it to the report.
-
Type a name for the template in the Template Name box at the top of the Report Design ribbon (by default, Monarch Classic assigns the current template role as the template name).
-
Click the OK button, otherwise choose Cancel to discard the template definition.
Template names must adhere to Monarch Classic's long naming conventions.
Step 6: Verify the template
Once the template has been created, you can verify it to ensure there are no errors or issues.
-
Select the Run Report Verify tool from the Report Design ribbon.
-
Verify scans the entire report and examines the field boundaries. If any characters are found immediately adjacent to a field boundary, Monarch Classic will highlight the field to alert you that the field may be too short to accommodate a field value or that the field may be defined at the wrong location.
Step 7: Preview your data
Once templates have been created, you can also preview the data to ensure that the data has been extracted as you expect.
Select the Data Preview tab on the Template Editor. Monarch Classic extracts a subset of the data and displays it on the Data Preview table.
If multiple templates are available, Monarch Classic highlights the columns extracted by the currently-selected template.