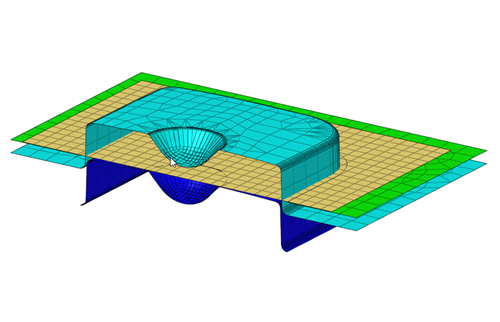
This tutorial shows you how to set up a composite forming analysis from the User Process, and post process the results in HyperView.
Benefits of the User Process
| • | Create unique forming processes and save them as templates that you can re-apply with minimal or no input. |
| • | Include any number of tools. |
| • | Change the orientation of the tools. |
| • | Tool kinematics are unrestricted to conventional forming types such as Single- or Double-Action Draw. |
| • | The model setup is captured in the Auto Process and loaded into the User Process from the model definition. |
| 1. | Create a working directory. |
| 2. | Copy the file, forming_userprocess.hf, into your working directory. |
Note: The model files for this tutorial are located in the file mfs-1.zip in the subdirectory \hf\Incremental\. See Accessing Model Files.
| 3. | From the File menu, select Open. |
| 4. | Browse to the file, forming_userprocess.hf, and click Open. |
|
| 1. | From the tree in the User Process browser, right-click Process Type, and then select Forming > Single Action. |
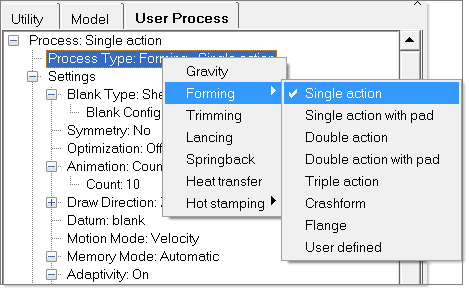
The options for a single-action process appear. In the tree, Under Settings, adjust the settings as follows:
| 2. | Right-click Blank Type, and then select Composite. |
| 3. | Under Blank Type, right-click Blank Config, and then select Sandwich. |
| 4. | Right-click Symmetry, and then select no. |
| 5. | Under Animation: Count, click Count 10, click the value 10, change the value to 15, and then press Enter. |
| 6. | For Draw direction, keep the default: Z. |
| 7. | For Motion Mode, keep the default: Velocity. |
| 8. | For Memory Mode, keep the default: Automatic. |
| 9. | Right-click Adaptivity, and then select On. |
|
| 1. | Under Blanks, right-click Blank, and then select Add Ply. Repeat until you have four plies. |
| 2. | For Ply 1, Ply 2, Ply 3, and Ply 4, click Thickness: 1.0, click the value 1.0, change the value to 0.5, and then press Enter. |
| 3. | For Ply 2 and Ply 4, click Angle: 0.0, click the value 0.0, change the value to 45, and then press Enter. |
| 4. | From the top of the tree, right-click Process: Single Action, and then select Run. |
|
Return to Incremental Tutorials


