Manufacturing Solutions

HF-3080: Hot Stamping Analysis

HF-3080: Hot Stamping Analysis

Previous topic Next topic Expand/collapse all hidden text  

HF-3080: Hot Stamping Analysis

Previous topic Next topic JavaScript is required for expanding text JavaScript is required for the print function  

This tutorial shows you how to set up an arbitrary stamping analysis with the User Process. The steps are similar to those for a single-action-draw analysis, but with the involvement of temperature for forming sheet metal.


Benefits of the of User Process

Create unique forming processes and save them as templates that you can re-apply with minimal or no input.
Include any number of tools.
Change the orientation of the tools.
Tool kinematics are unrestricted to conventional forming types such as Single- or Double-Action Draw.
The model setup is captured in the Auto Process and loaded into the User Process from the model definition.


hmtoggle_plus1greyExercise 1: Performing a Thermal Forming Analysis with the User Process
1.Copy the file, hot_forming.hf, into your working directory.

Note: The model files for this tutorial are located in the file mfs-1.zip in the subdirectory \hf\Incremental\. See Accessing Model Files.

2.From the File menu, click Open.
3.Browse to the file, hot_forming.hf, and click Open.

HF_3004_01a

After opening the model for the first time, the User Process groups all of the components into the Blanks category. The following steps show you how to move the components into the the correct categories.

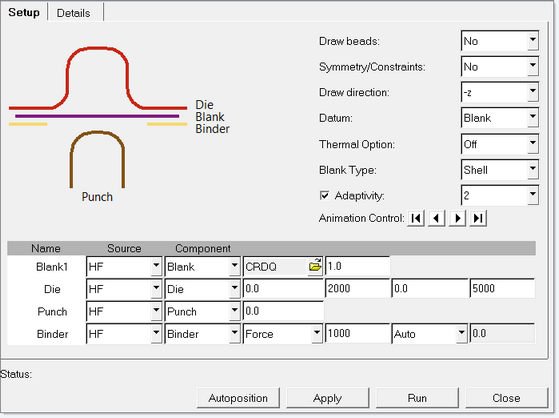
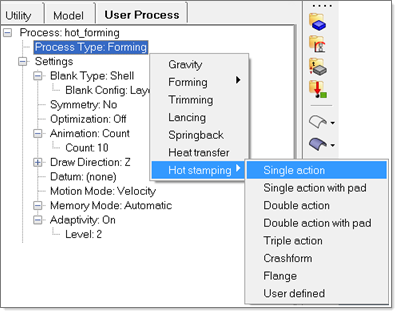
On the tree of the User Process, right-click ProcessType: Forming, and then select Hot stamping > single action:
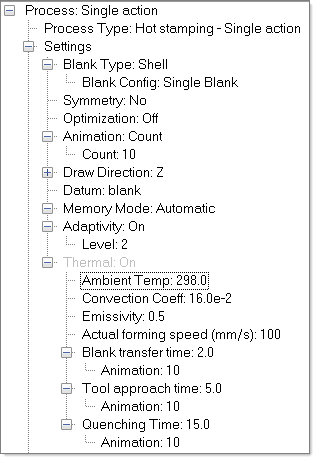
hot_stamping_single_action

1.On the tree under Thermal, select Actual forming speed {mm/s}, click the current value, and then enter the value 100. Note that temperature is in degrees Kelvin. Keep the default values for the remaining thermal coefficients.
2.For Blank transfer time, enter 2.0.
3.For Tool approach time, enter 5.0.
4.For Quenching Time, enter 15.0.

HF_3004_05


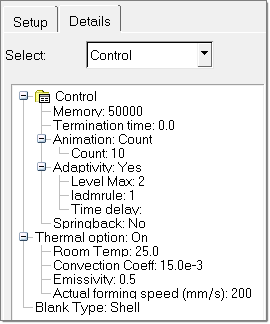
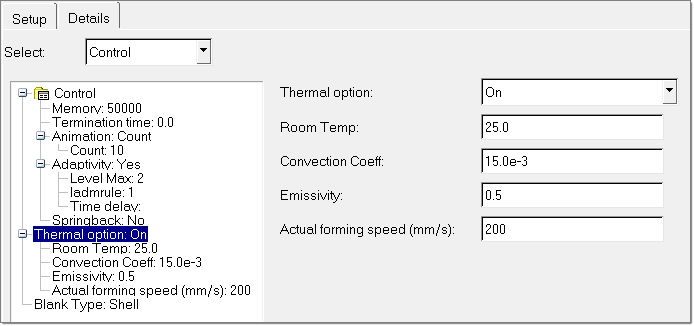
On the tree, select Initial Temp, click the current value, and then enter 1073, which is the usual initial temperature for hot stamping.

Because you are using the standard action draw template, the defaults for the Tools parameters can be kept as they are, with the exception of the Temp value.

1.On the tree, under Die, select Temp, click the current value, and then enter 373.
2.Do the same for the remaining Tool components.
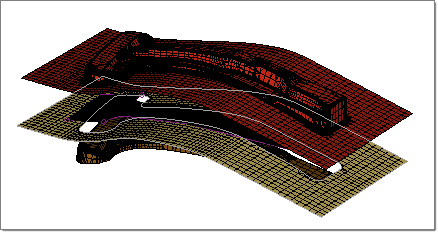
 

1.Right-click in the white space of the User Process. From the context menu that appears, select Autoposition.

The status of the auto positioning operation is displayed in the left, bottom corner of the window. Done indicates that tools have been successfully positioned with respect to the blank.
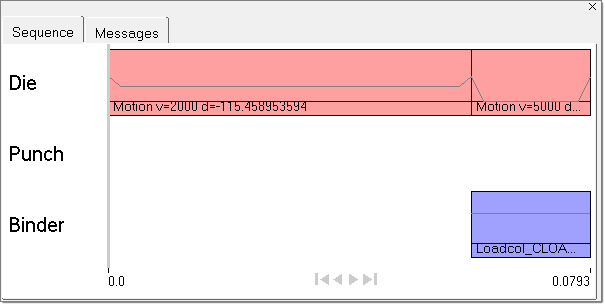
2.To review the process sequence, click View > Process Sequence.
The Sequence tab displays the tool kinematics sequence.
The Messages tab displays the errors in the setup, if any.

HF_3004_09

3.After viewing the sequence, in the User Process browser, right-click and select Create Input.
4.Right-click again, and select Run.
5.Enter a desired name in the file browser, and then click Save. The run begins.


hmtoggle_plus1greyExercise 2: Performing a Thermal Forming Analysis with the Auto Process

Another method of stepping through a thermal process is to use the Auto Process feature available in the Incremental_RADIOSS user profile.


1.To save the existing file in the session, select File > Save As.
2.Click the New Model icon fileNewModel-24. The existing model is cleared from the session. Note that the parameters in the tree are cleared.
3.Browse to the file hot_forming.hf. Double-click the file to load it into the session.
4.Above the graphics area, click Single Action Draw autoProcessSad-24. The Auto Process panel appears:

hot_stamping_setup

5.For Thermal Option, select On.
6.On the first row in the table, click Blank1, The row becomes activated.
7.For Initial temperature, enter the value 1073.
8.To change the CRDQ material assigned to the Blank, browse to the Material Database, and then select Boronsteel-Kelvin.
9.Click the Die row to activate it. For Temperature, enter 373. Do the same for the Punch and Binder.

HF_3004_12

10.Click the Details tab.

HF_3004_13

11.Click Thermal option: On to see the list of thermal options.

HF_3004_14

12.For Room Temp, enter 298.
13.For Actual forming speed {mm/s}: enter 200.
14.To return to the main dialog, click the Setup tab.
15.Click Run, navigate to the directory where you want to save the results, enter a file name, and then click Save.

The solver runs the simulation.


Return to Incremental Tutorials