In this tutorial you will learn to set up and use the HyperXtrude Project Browser. The Project browser is attached to all of the wizards in the HyperXtrude user profile. This tutorial examines the Extrusion Wizard in the HyperXtrude Metal Extrusion user profile to demonstrate the use of the Project browser.
In the first two sections, setting up the Project browser and editing the existing settings are explained. Once the Project browser is in place, there are several methods to load a model and start using the wizard. These methods are illustrated in Steps 3 to 6.
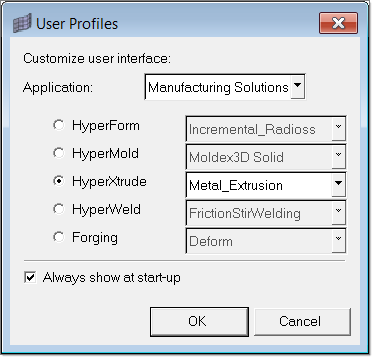
| 1. | Select Start Menu > All Programs > Altair HyperWorks > Manufacturing Solutions > HyperXtrude to launch the HyperXtrude user interface. The User Profiles dialog appears with Manufacturing Solutions as the default application. |
| 2. | Select HyperXtrude and Metal Extrusion. |
|
| 1. | On the Utility menu, click Extrusion Wizard. On the first use, it will open the HX Configuration Settings dialog. Here, you can configure the Project browser and the HX Job Manager, and set up User Material database. |
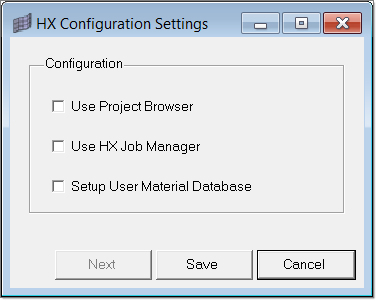
| 2. | Select all the three options if you would like to set up all three categories now, or you can choose to set up only the Project browser and set up the other two when needed. To complete this tutorial, you should select all three options. |
| 4. | Click on the folder open  icon next to Project Root Folder, and browse to choose a folder (ex: C:/users/HX-Runs) that will be used as the project root folder. This is the location where all your project files will be stored. In this folder, you can have only sub-folders and the root should not contain other files. icon next to Project Root Folder, and browse to choose a folder (ex: C:/users/HX-Runs) that will be used as the project root folder. This is the location where all your project files will be stored. In this folder, you can have only sub-folders and the root should not contain other files. |
| 5. | Click on the folder open icon next to HX Job Manager EXE Path, and select the folder (ex: C:/Altair/hx_job_manager/bin) that contains the binary file of the HX Job Manager. This is required if you would like to use HX Job Manager to launch the runs. If you do not have the HX Job Manager and you do not intend to use it; you can leave it to the default path. |
| 6. | Click on the folder open icon next to User Material Folder and browse to choose a folder (ex: C:/users/HX-MTL-DB) that will be used to store user material database. This user material database allows you to have your own material database in addition to what comes with HyperXtrude. This folder should contain your material files. Even if you do not have such materials, point to an empty folder and this can be used for the database in future. |
|
| 1. | On the Utility menu, click Extrusion Wizard. All of the folders in the selected project folder are displayed. |
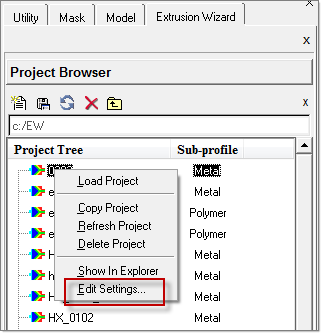
| 2. | Right-click on any folder name and click Edit Settings. |
| 3. | Edit the settings as explained in Step 1. |
|
| 1. | On the Utility menu, click Extrusion Wizard. This shows all the folders which are in selected project root folder. |
| 2. | To display the context sensitive menu, right-click in the Project Tree window. Or, select any subfolder and right-click on it. |
| 3. | Click New Project, enter the name (ex: HX_Example) for the new project and press ENTER. This will create the new project. |
| 4. | Right-click on the new project name twice to select it and open the context sensitive menu. Choose Select model file. |
| 5. | Browse to select the model and click Open. |
The project is loaded into the Extrusion Wizard.
|
| 1. | Load the model HX_0101.hm. |
Note: The model files for this tutorial are located in the file mfs-1.zip in the subdirectory \hx\MetalExtrusion\HX-0101. See Accessing Model Files.
| 2. | Click the Extrusion Wizard button again. Depending on the location of the model you have loaded, one of the following dialogs will be displayed. |
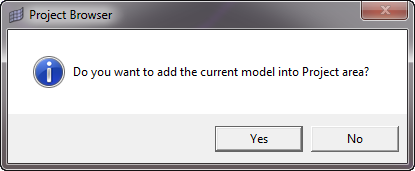
| 3. | When prompted with a message for adding the model to project area, click on No in the message. This will allow you to use the wizard without loading the model into project area. |
|
| 1. | As soon as you open the the HyperXtrude user profile, do not load a model via the File > Open method, but work directly through the Project browser. Click Extrusion Wizard. |
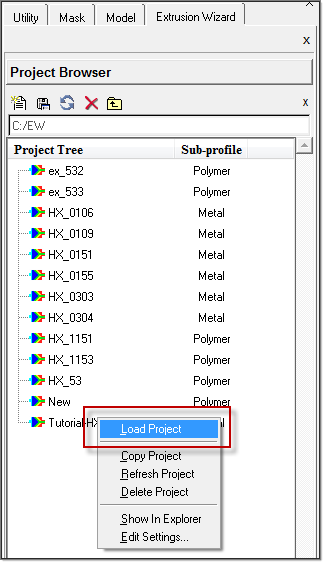
| 2. | In the Project panel, right-click on a project you would like to load and click Load Project. As shown in the image below, select the recently added project HX_Example. |
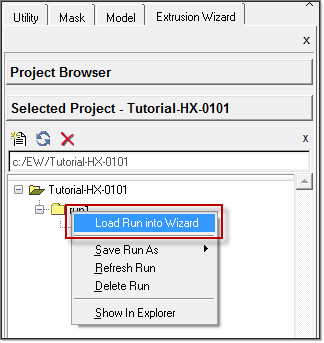
| 3. | This project will be loaded and the Run Selection panel activates. In this example, you have only one run in the project area. Select the run and right-click on it. In the menu that appears, select the option Load Run into Wizard. |
|
This example is slightly different from the one shown in Step 5. In the previous section, a model was loaded in the project area and the analysis was started. Here, you add a new project from the Project browser.
| 1. | As soon as you open the the HyperXtrude user profile, do not load a model via the File > Open method, but work directly through the Project browser. Click Extrusion Wizard. |
| 2. | In the Project panel, click on the New Project icon. |
| 3. | In the field, enter HX_Test and press ENTER. |
| 4. | The HX_Test folder does not contain a model, whereas HX_Example created in Step 5 already contains a model from the previous step. |
| • | Right-clicking on HX_Test (any project that does not include model file) prompts you with the Select model file option, along with other the options displayed as shown in the picture. |
| • | Right-clicking on HX_Example (any project that contains a model already) prompts you with the Load Project option. |
| 5. | If you select HX_Test >> Select model file, follow the steps as illustrated under Step 4. |
| 6. | If you select HX_Example >> Load Project, you have two options. |
| • | Right-click on run1 and load it into the wizard as explained in Step 6. |
| • | Right-click on HX_Example and choose New Run. |
| 7. | If you choose the second option - New Run, run2 will be created. Right-click on run2 and select the model file. The selected model file is entered into the new run folder and is loaded to the wizard for you to proceed with the process steps. |
| 8. | Select the model HX_0102.hm from the location <install_directory>\tutorials\mfs\hx\MetalExtrusion\HX-0102. This will copy the selected model file into the new run folder and load the same wizard for you to proceed with the process steps. |
|
Return to Metal Extrusion Tutorials


