In this task you will drape the uni-directional plies.
In the Model Browser, select the plies folder.
Right-click and select Drape > Kinematic Drape from the context menu.
On the Drape Calculation tab, specify the Seed Point (id=5366). This is the
location the ply first touches the mold.
Leave method set to Quadrants. This method simulates a ply which is placed on
the mold at the seed point, and is then pressed to the mold uniformly in all
directions. Alternatively, Linear can be used. This method simulates a ply which
is placed on the mold at the seed point, is then pressed to the mold along the
fiber direction in a narrow strip, and is finally pressed to the mold uniformly
from the fiber strip in the matrix direction.
Click Apply.
Note: The second ply will throw a message in the bottom left of the screen,
indicating that maximum shear was exceeded. This indicates that the fiber
locking angle of the fabric was reached. By default, drape angles for any
elements in this condition will be set to reflect a locked angle and no
further action is required. Alternatively, the ply(s) can be draped again
using a larger Max. shear angle in the Advanced options menu.
Review Results
From the Review tab, visualize the Draping Mesh for the first ply, which
idealizes the warp direction of the fabric.
From the Review tab, visualize the Draping Mesh to verify identical draping
mesh as in the first UD ply.
Turn on Composite Layers with Fiber Direction by clicking
on the Visualization toolbar. This visualizes fiber directions for both
uni-directional plies.
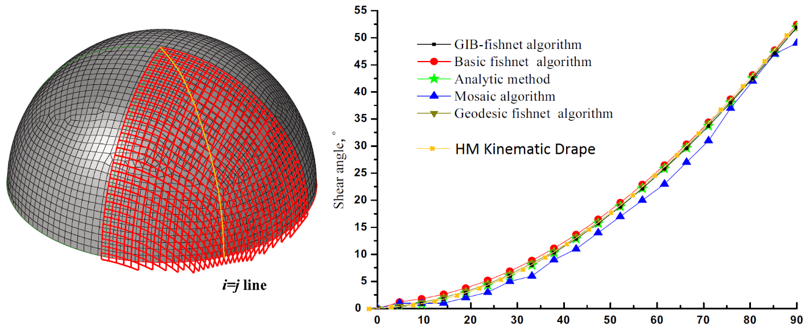
The dome draping results are compared to [10] in the following image. Figure 1.
 on the Visualization toolbar. This visualizes fiber directions for both
uni-directional plies.
The dome draping results are compared to [10] in the following image.
on the Visualization toolbar. This visualizes fiber directions for both
uni-directional plies.
The dome draping results are compared to [10] in the following image.