Animate and Record Results
Use the Animation Toolbar that appears at the bottom of the modeling window to animate and record results.
Animate Results
Animate the results of a forming simulation.
After running an analysis, click the Show Analysis Results
icon. The Analysis Explorer appears to the right of the model and the animation toolbar
appears at the bottom of the modeling window.
-
To review the analysis, on the animation toolbar, click the play
 button.

-
To pause the animation, click the pause
 button.
- Optional:
To change the animation settings, click the settings
 button.

-
Configure the animation settings as required:
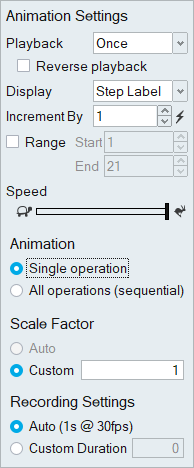
- Playback: Select whether to play the animation on a continuous Loop, Once, or Bounce (between forwards and backwards). Select the check box to Reverse Playback.
- Display: Set the units for the slider Step Label, Time, or Frame. Step Label is the default and describes information about the current step, including distance to closed position.
- Increment By: Increase the value in the counter to skip frames during playback. The reset button restores the default value of 1.
- Range: Select to enter Start and End frames for the animation.
- Speed: Drag the slider to change the speed of the animation. Drag to the right to increase speed and left to decrease it.
- Animation: Choose between animating a single operation or animating all operations in sequence.
- Scale Factor: Enter a custom value to change the scale of the animation. Generally the scale of a displacement is too small to see clearly, so auto scaling is enabled by default.
- Recording Settings: The default Auto setting gives you an estimate of the duration of the recording at 30 frames per second. If your video plays back faster than you want, select Custom Duration to change the length of the video; this will adjust the frame rate to try to achieve the specified duration. The Custom Duration has a minimum value of 1 second, and maximum value of 30 seconds.
Tip:
- To view a particular point during the analysis, drag the slider on the animation toolbar.
- To display the time history plot of the results, click a part on the model.
Animation Shortcuts
| To | Do this |
|---|---|
| Play and pause | If the Play button is active, press the Spacebar. |
| Increment the slider |
Use the arrow keys to move frame-by-frame through the animation, or position the cursor over the slider and use the scroll wheel. |
| Exit tool | Right-click and mouse through the check mark to exit, or double-right-click. |
Record Results
Capture the results of a forming simulation in .mp4 video format.
Run an analysis. When complete, a check icon  appears in the Run Status window. Double-click the run. The
Analysis Explorer appears to the right of the model and the animation toolbar appears at
the bottom of the modeling window.
appears in the Run Status window. Double-click the run. The
Analysis Explorer appears to the right of the model and the animation toolbar appears at
the bottom of the modeling window.
- Optional:
To change the animation settings, on the animation toolbar, click .
- Optional:
To begin recording the results, click the record button
 .
.
-
The icon changes to red to indicate that the software is recording. Click the
icon again to stop recording.
Tip:
- The default behavior is continuous recording, but the recording stops automatically if the playback option is set to Once rather than Loop.
- To avoid capturing the workflow help in the recording, select , and in the Workspace category, clear the check box Show workflow help.
- To avoid recording the mouse cursor, on the animation toolbar, click the
step button
 and press the Tab key to move the focus to the
record button . Then press the Spacebar to start or stop the
recording.
and press the Tab key to move the focus to the
record button . Then press the Spacebar to start or stop the
recording. - Note that the video recorder captures everything in the region of the modeling window. Avoid obscuring or minimizing that window during the recording process.