Data I/O
Import and export composite data.
- By CAD program - CATIA and FiberSim composite definitions are available
- By spreadsheet - several methods of import and export are available depending on the application
CAD I/O
Import CAD model data.
Import Steps
- Import CAD model with composite data.
- Plies imported from CAD contain typical attributes: orientation, thickness, and material.
- Ply geometry from CAD is defined by geometry lines, surfaces, solids, or drape tables of discrete geometry.
- Rosettes from CAD area assigned as the Ply system. This serves as an alternative way to set material orientation. The ply system x-axis serves as the reference direction for the ply orientation.
- Conversion from ply geometry shape to HyperMesh finite element shape (ply realization). Ply realization is accessed from the Model Browser in the context menu of Ply entities. For more information, see Ply Entities.
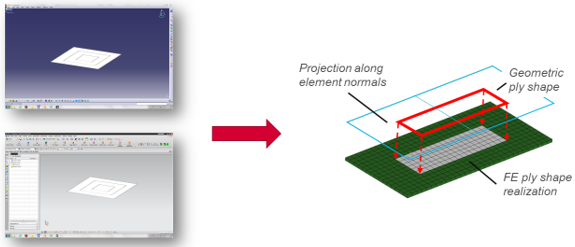
Figure 1.
CATIA CPD Import
- Laminates
- Plies (shape defined by lines or solids)
- Local systems (CATIA Rosettes)
- Materials (Name reference only)
For more information, see CATIA Import.
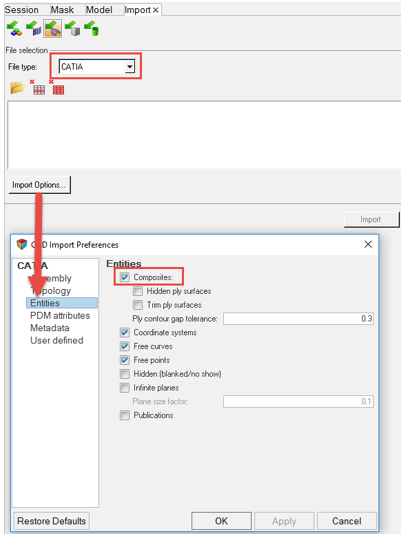
Figure 2.
FiberSim Import
- Laminates
- Plies (shape defined by tables)
- Local systems (Rosettes)
- Materials
For more information, see FiberSim Import.
CAD Export
- FiberSim - At any time, ply-based model data can be exported to FiberSim by selecting .
- Ply geometry:
- Ply shapes – Can be exported from the Aerospace Ply Smoothing dialog.
- Flattened shapes – If plies have been draped with either Kinematic Draping or Drape Estimator, step files for the flattened geometry can be exported.
Spreadsheet I/O
Import and export from spreadsheets.
Import Methods
- Plies and laminates from laminate entities in the Composite Browser:
- Import – create and update plies and laminates
- Export – provide spreadsheet of ply data
- Zone-based layers from Entity Editor:
- Import – populate and append layers to existing property
- Export – provide list of layers
- PCOMP from .csv file:
- Import – generate n zone-based properties
Ply-Based Laminate
On import, this functionality creates and updates ply entities and laminate entities. On export, a spreadsheet of ply data is written.
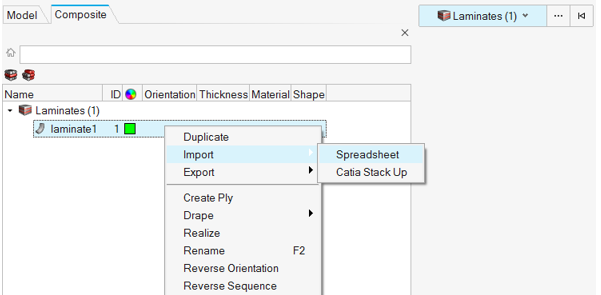
Figure 3.
| Ply Name | Ply ID | Card Image | Mat Name | Thickness | Orientation | Output Results | TMANU | DRAPE_ID | ESID |
|---|---|---|---|---|---|---|---|---|---|
| ply1 | 1 | PLY | carbonepxy | 0.01 | -45 | yes | 0 | 1 | |
| ply2 | 2 | PLY | carbonepxy | 0.01 | 0 | yes | 0 | 2 | |
| ply3 | 3 | PLY | carbonepxy | 0.01 | 45 | yes | 0 | 3 | |
| ply4 | 4 | PLY | carbonepxy | 0.01 | 90 | yes | 0 | 4 |
| PlyGroup | Sequence | Ply | CutPieceGroup | CutPiece | Material | Direction | Rosette | Surface | Draping | Ply ID |
|---|---|---|---|---|---|---|---|---|---|---|
| laminate | 1 | ply1 | carbonepxy | -45 | 0 | F | ||||
| laminate | 2 | ply2 | carbonepxy | 0 | 0 | F | ||||
| laminate | 3 | ply3 | carbonepxy | 45 | 0 | F | ||||
| laminate | 4 | ply4 | carbonepxy | 90 | 0 | F |
Zone-Based Property
On import this functionality populates the zone property layers list. On export, a spreadsheet of layer data is written. This functionality is available from the Entity Editor.
- Create a new property.
- Set the card image to the appropriate zone-based property for the user profile.
- Select the property in the Model Browser so that it opens in the Entity Editor.
- Right-click the appropriate Layers/Number_of_Plies line to access the context menu.
- Select Import from file.
- Select the zone property in the Model Browser so that it opens in the Entity Editor.
- Right-click the appropriate Layers/Number_of_Plies line to access the context menu.
- Select Export to file.
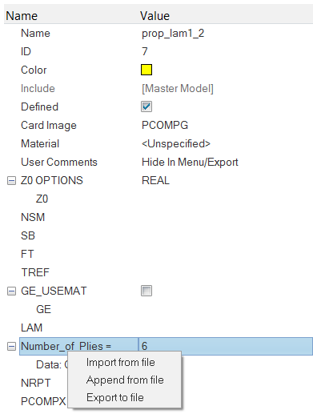
Figure 4.
| GPLYID | MID | T | THETA | SOUT |
|---|---|---|---|---|
| 1 | 1 | 0.01 | -45 | YES |
| 2 | 1 | 0.01 | 0 | YES |
| 4 | 1 | 0.01 | 90 | YES |
| 5 | 1 | 0.01 | 90 | YES |
| 6 | 1 | 0.01 | 0 | YES |
| 7 | 1 | 0.01 | -45 | YES |
PCOMP from .CSV
In the OptiStruct and Nastran profiles, multiple PCOMPs can be generated from a single spreadsheet using the Aerospace PCOMP From CSV tool. The tool can be accessed from Engineering Solutions Aerospace profile by clicking .
For more information, see Aerospace PCOMP from CSV.