Compare Time History
The Compare Time History diagnostic tool consists of two pages. On the first page, the input data files, such as plot, result, and FE files, are selected. Page two contains the data needed to compare the reference files and comparison files.
Input Data Files
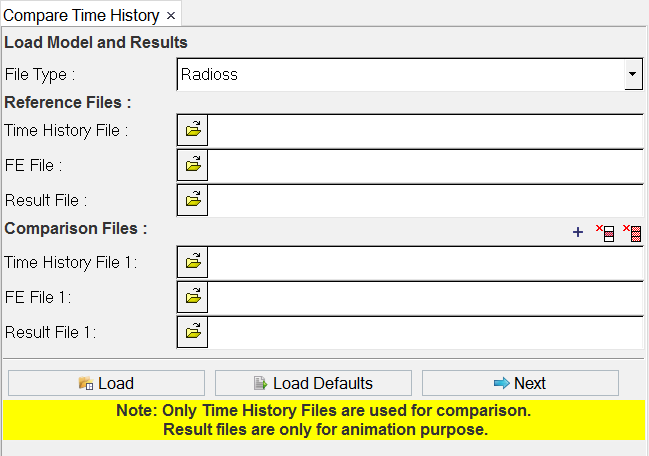
Figure 1.
- Load Model and Results
- The diagnostic tool supports two solvers, Radioss and LS-DYNA. From the File Type drop-down list, select the type of solver files to be compared.
- Reference Files
- From this section, select the plot file (Time History File), FE (model) File and Result File. The plot file is mandatory.
- Comparison Files
- From this section, select the plot file (Time History File) and Result File. The plot file is mandatory.

- Click the add button to add more than one set of comparison files (time history and result files).

- To delete a single set of comparison files, activate the check box for the set of files you want to remove and click the single delete button.
-
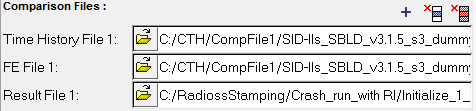
Figure 2. 
- To delete all comparison file entries from the GUI, activate the check boxes for all comparison file sets and click the delete all button.

- After selecting the input files, click Load. A page is added to the session and three windows are created on the same page.
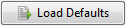
- Click Load Defaults to select the model compare default (*.def) files.
- A sample def file is shown below:
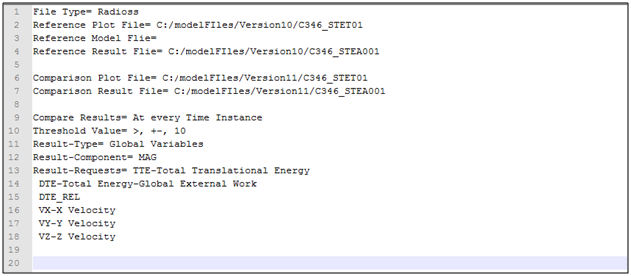
Figure 3. - Next
- Click Next to go to the page tool of the Compare Time History tool.
- Close
- Click Close to close the tool.
Compare Data

Figure 4.
- Result Type
- From the Result Type drop-down list, select the Y-Types available for the reference file specified on page one.
- Result Request
- From the list provided, select single or multiple Y-Requests for comparison.
- Click
 to select all of the elements listed.
 - Click
 to clear all of your current
selections.
to clear all of your current
selections. - Click
 to select the reverse of the currently
selected items.
to select the reverse of the currently
selected items. - Click
 to dislay the item in the graphics area.
This selection affects each item’s local display control. You can also
use this on the entire folder. In such cases, this shows all of the
items within that folder (all components for example, etc.).
to dislay the item in the graphics area.
This selection affects each item’s local display control. You can also
use this on the entire folder. In such cases, this shows all of the
items within that folder (all components for example, etc.). - Click
 to turn off the item in the graphics area.
This selection affects each item’s local display control. You can also
use this on the entire folder. In such cases, this hides all of the
items within that folder (all components for example, etc.).
to turn off the item in the graphics area.
This selection affects each item’s local display control. You can also
use this on the entire folder. In such cases, this hides all of the
items within that folder (all components for example, etc.). - Click
 to works locally within a specific entity
type. For example, if Component(s) are isolated, then all display states
of other displayable entities (such as Systems) remain untouched.
Isolate displays only the selected entities, turning their display state
to on, and turning all other entities of the same type off.
to works locally within a specific entity
type. For example, if Component(s) are isolated, then all display states
of other displayable entities (such as Systems) remain untouched.
Isolate displays only the selected entities, turning their display state
to on, and turning all other entities of the same type off. - Click
 to display selected plots in the HyperGraph
window. If you do not want to see the plots on the graphics, deselect
the button. This button is on by default.
to display selected plots in the HyperGraph
window. If you do not want to see the plots on the graphics, deselect
the button. This button is on by default. - Click
 to display selected entities from the list
box in a HyperView window. If you do not want to see the entities on the
graphics, deselect the button. This button is on by default.
to display selected entities from the list
box in a HyperView window. If you do not want to see the entities on the
graphics, deselect the button. This button is on by default. - Click
 to display selected entities from list box
in a HyperMesh window. If you do not want to see the entities on the
graphics, deselect the button. This button is on by default.
to display selected entities from list box
in a HyperMesh window. If you do not want to see the entities on the
graphics, deselect the button. This button is on by default. - Right-click on an element listed to display the context sensitive
menu:
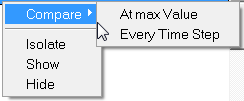
Figure 5.- Click the expansion button,
 , to undock the request list box
from the GUI.
, to undock the request list box
from the GUI.
- Result Component
- From the drop-down list, select a Y-Component. The list is automatically updated upon selecting items from the Y-Requests list box, with respect to the Y-Type selected.
- Threshold Limit
- To compare the reference file data with comparison file data, input a threshold value.
- Comparison Results
- A tree structure is displayed, if any number of y-requests violate the
threshold limit values while comparing.
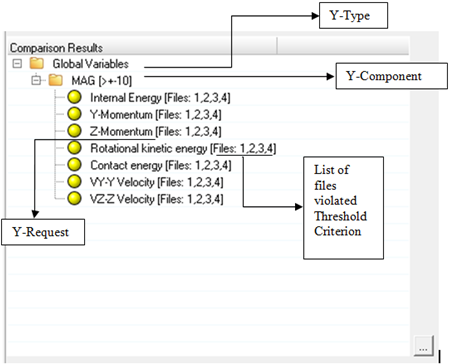
Figure 6. - Click to select all of the root-children present
in the compared results.
- Click to deselect all of the root-children
present in the compared results.
- Click to reverse the selected root-children
present in the compared results.
- Parts missing in comparison file
- The files displayed are the Y-Requests missing from the comparison file when compared to the Y-Requests in reference file.
- Back
- Click Back to go back to page one.
- Save Defaults
- Click Save Defaults to save the data from pages
one and two.Note: To save the Y-requests in the default file, select the items from request list box.
- Load Defaults
- Click Load Defaults to load a *.def file from the file browser window.
- Close
- Click Close to close the tool.