Create Pretension Bolt
Create pretension loads in 1D and 3D bolts.
ANSYS: Create Pretension Bolt
Create pretension loads in 1D and 3D bolts of ANSYS models using the ANSYS PRETS179 element type.
Element PRETS179 is a bar element with a third node used for pre-loading. Use the
Pretension Bolt tool to get a pre-loaded bolt with PRETS179 elements created at the desired
location with a third node. A pretension section is created and associated with the
pretension elements created. Also, the pretension load card SLOAD is created with the
defined load in the utility, as well as a load steps on and off values. You can edit this
load card after completing this process.
Restriction: The Pretension Bolt tool is
only available in the ANSYS solver interface.
-
Select source entities for the pretension bolt.
Option Description 1D pretension bolt - In the panel area, use the Nodes selector to select the nodes of the 1D elements where the pretension element needs to be created and then click proceed.
3D pretension bolt - In the panel area, use the Comps selector to select the
bolt component and then click proceed.Note: Multiple components are not allowed to be selected. If more than one bolt is selected, they will all be placed under one component.
- Use the elems selector to select the elements which form the cut section of the
bolt and then click proceed.Pretension elements are created at this section.
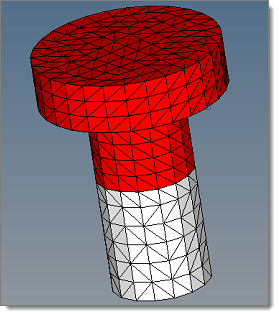
Figure 1. Example of a Typical Section - Use the node selector to select two or three nodes that define the load direction for the pretension load and then click proceed.
For 1D pretension bolts, PRETS179 elements are created at the node locations, with the pretension section created and associated to these elements. A SLOAD card with the given pretension load is also created.
For 3D pretension bolts, PRETS179 elements are created at the cut section with the pretension section created and associated to these elements. A SLOAD card with the given pretension load is also created.