ID-Management
Manage all of the IDs for the entities that you create, and define ID ranges for all of the entities in each Include file in relation to the full model in order to avoid ID duplication.
Once the ID ranges are defined for each Include file and child entity type, they will remain active and any new entities created will be assigned an ID within the ID range following the new ID rules. Entities that are imported into the Include file that have ID ranges already defined, will have the IDs that overflow after import automatically corrected by Move After Max option.
Aside from new entity creation and import, the ID Manager will not actively correct all of the IDs in the FE model. If there are entity IDs that result in overflow because of organization issues in the Include file such as renumbering, they will remain as overflow and must be corrected manually.
FE entities in CAE models are labeled and tagged using IDs and names. IDs are used by the solvers during analysis and then passed on by the solver to the results. This process enables you to interpret the results and relate them to the FE model. In most cases, the IDs of the FE entities in a FE model must be unique for efficient identification. In large models that involve several parts assembled into sub-assemblies and main assemblies, it is essential to have a tool that manages a model's IDs consistently in the part level, sub-assembly level, and in the global level for ease of identification using IDs.
In the Abaqus user profile, the following entity types are supported and impacted by the operations performed during ID-management: Assembly, Component, Element, Node, Property, Material, Beam Collector, Beam Section and Tags. Only these entity types will honor the Min and Max ID ranges defined in the ID Manager. Corrections made to an Include file only impact these entity types. During the creation of new entities that are not supported by the ID Manager, the Max ID + 1 is used to assign new IDs.
Manage IDs
Learn how to perform various ID-management operations.
Create/Delete Included Files
Create ID Ranges for New Entity Types
ID ranges can be defined for entity types that do not yet exist in the Master Model or in an Include file.
Edit ID Ranges
Edit the minimum and maximum ID range of the Master Model, Include files and entities.
Clear ID Ranges
Exclude Entities
-
Exclude entities in the following ways:
- To exclude a specific entity, right-click on a Master Model, Include
file, or entity and select from the context menu.
If you right-click on a Master Model or Include file you must select a type of entity to exclude in the Exclude dialog.
Exclusion is automatically applied if you right-click on an entity. When an entity is excluded, an X icon (
 ) displays in the Excluded
column.
) displays in the Excluded
column. - To exclude IDs of the same entity type across all Include files, right-click on an entity and select from the context menu.
- To exclude a specific entity, right-click on a Master Model, Include
file, or entity and select from the context menu.
Clear Exclusions
Lock/Unlock IDs
Lock IDs to prevent them from being changed by future ID management and renumbering operations, or unlock IDs so they can be changed.
-
Lock IDs.
-
Unlock IDs.
Reserve/Unreserve IDs
Reserve and unreserve available IDs for future use.
When reserving discrete IDs, if the ID or set of IDs being reserved does not fall within the defined ID range, then those IDs will still be reserved but will be listed under the Master Model.
If you reserve IDs for an entity that supports ID pools, the reserved IDs will be applied to each ID pool. For example, the count for elements reserves in LS-DYNA includes reserves for each element pool available for the given ID range.
After IDs are reserved, they cannot be changed from renumbering operations. When an ID range is cleared, reserved IDs will be moved to the Master Model. If the ID range is re-entered, reserved IDs will be moved back to the entity it was originally reserved for. If you create an exclusion or delete an ID range at the entity level, the reserve range defined and the reserves defined within that range will be removed.
-
Reserve IDs.
-
Unreserve IDs.
Compact Entities
IDs that are already occupied in an Include File can be compacted.
Review ID Overflow
Correct ID Overflow
Overflow IDs are corrected using the correction option assigned in the Correction Option column. If you do not right-click on an Include file or entity folder, then this operation will be performed on all of the overflow IDs inside of the model.
A message will appear before this action is performed, warning you that all of the overflow entities in the model will be corrected once you click OK.
If the ID Manager cannot correct all of the IDs, a warning message will be displayed and none of the overflow IDs within an Include file/entity folder will be corrected.
Correct Reserve Conflicts
Import/Export a CSV File of ID Management Rules
Import/export a .csv file of ID management rules
ID management rules can be exported for only the entities that are currently displayed in the ID Manager, or for all of the entities in the ID Manager including those excluded by ID management filters.
ID management data related to overflow, min/max occupied IDs, number of conflicts, number of reserves, and number of locks will be calculated while reading the .csv file.
When you are importing a .csv file, you will be notified if overlapped ID ranges are identified.
ID Manager Dialog
Overview of the ID Manager user interface.
Open the ID Manager from the menu bar by clicking .
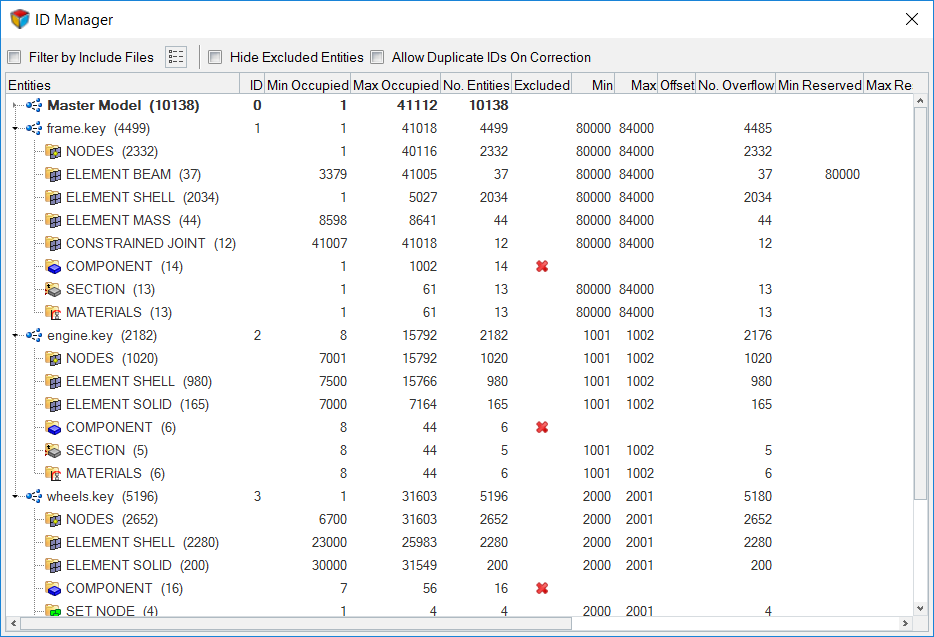
Figure 1.
| Option | Description |
|---|---|
| Filter by Include Files | When enabled, Include files selected in the Select
Includes dialog are filtered from the ID Manager. Click Data related to filtered Include files is saved to an .hm file. |
| Hide Excluded Entities | When enabled, entities marked as "Excluded" are hidden in the ID Manager.
Data related to "Excluded" entities is saved to an .hm file. |
| Allow Duplicate IDs on Correction | When enabled, duplicate ID pool's for supported entities are permitted to have the same IDs. |
| Entities | Displays the Master Model and its child entities, as well as each Include file and its child entities. |
| ID | Displays the ID of each Include file. |
| Excluded | Displays an X icon () when an entity is excluded from ID
management operations. |
| Min Occupied | Enter a minimum integer value for the ID range that does not overlap with any
other range definitions in the model. The Min should always be:
|
| Max Occupied | Enter a maximum integer value for the ID range that does not overlap with any
other range definitions in the model. The Max should always be:
|
| No. Overflow | Displays the number of IDs in an Include file or entity folder that are outside of the defined range. |
| Min | Minimum integer value for the reserve ID range. You can manually edit the Min
Reserved column as long as your modifications do not violate the Min and Max ID
range. When you reserve all IDs, the Min Reserved and Max Reserved columns are populated using the Min and Max ID range defined at the entity level. |
| Max | Maximum integer value for the reserve ID range. You can manually edit the Max
Reserved column as long as your modifications do not violate the Min and Max ID
range. When you reserve all IDs, the Min Reserved and Max Reserved columns are populated using the Min and Max ID range defined at the entity level. |
| Conflict |
Displays a conflict icon ( |
| No. Conflicts | Displays the number of conflicts in a reserve range. |
| User Status | Indicates the status of reserve conflicts.
|
| No. Reserved | Displays the number of IDs reserved at the entity level. When IDs are reserved, this column is populated for the corresponding entity. All IDs within a defined ID range for an entity can be reserved, or discrete IDs within a defined ID range can be reserved. For IDs being reserved that do not fall into the defined ID range, these entities will be moved into the #Reserved column of the Master Model. If an entity type supports ID pools, the #Reserved column will display the total number of reserves applied to each ID pool in that entity type. |
| Min Occupied | Displays the minimum ID occupied by all of the entities in an Include file. For individual entities, it displays the corresponding minimum ID occupied in the Include file. |
| Max Occupied | Displays the maximum ID occupied by all of the entities in an Include file. For individual entities, it displays the corresponding maximum ID occupied in the Include file. |
| No. Entities | Displays the total number of entities in Include files and entity folders. |
| No. Locks | Displays the number of IDs that have been locked from renumbering. |
| New ID | Determines where new IDs will be placed within the current Include file
range.
If the ID Manager cannot find any free IDs using the After Max and Before Min options, then newly created entities will be assigned IDs using the Fill in Gaps option. If the ID Manager cannot find any free IDs within the defined ID range using any of the above options, then newly created entities will be assigned IDs beyond the Max ID occupied or the Max ID defined in the model, whichever one is being the highest. |
| Correction | Determines how duplicate IDs are renumbered to correct overflow.
Note: IDs that are locked or reserved in an Include file will not be
renumbered.
|
ID Manager Examples
Examples to provide you with a more in-depth understanding of the ID-management functionality.
New ID
The example below explains how new components are assigned an ID after you have defined an ID range and established rules for ID management.
- After Max
- New components will be assigned IDs from 98, 99, and 100. Once the Max ID of 100 reached, any new component created will use the Fill in Gap option and be assigned IDs starting from 1.
- Before Min
- New components will be assigned IDs from 3, 2, and 1. Once the Min ID of 1 reached, any new component created will use the Fill in Gap option and be assigned IDs starting from 1.
- Fill in Gaps
- New components will be assigned available IDs starting from the Min ID of 1, 2, 3, 6, and so on.
ID Correction
The example below explains how the different correction options correct overflow IDs.
- None
- No correction is performed and the overflow IDs remain the same.
- Compact and Fit
- Compacts the IDs that are already occupied in the Include, and places the overflow
IDs into the range starting from the Min ID of the defined range. The overflow IDs
will be assigned the following new IDs:
IDs Before Correction IDs After Correction 4 10 5 11 20 -60 12 - 52 80 - 90 53 - 63 101 64 105 65 110 66 117 67 - Move After Max
- Places the IDs that overflow after the Max ID occupied in the defined range. The
overflow IDs will be assigned the following new IDs:
IDs Before Correction IDs After Correction 4 91 5 92 20 - 60 20 - 60 80 - 90 80 - 90 101 93 105 94 110 95 117 96 - Move Before Min
- Places the IDs that overflow before the Min ID occupied in the defined range. The
overflow IDs will be assigned the following new IDs:
IDs Before Correction IDs After Correction 4 19 5 18 20 - 60 20 - 60 80 - 90 80 - 90 101 17 105 16 110 15 117 14 - Insert in Gaps
- Places the IDs that overflow into the gaps in the defined range. The overflow IDs
will be assigned the following new IDs:
IDs Before Correction IDs After Correction 4 10 5 11 20 -60 20 - 60 80 - 90 80 - 90 101 12 105 13 110 14 117 15
Reserve ID
The following examples explain how to reserve IDs using the ID Manager.
An Include file contains components with the following IDs: 4, 5, 20 - 60, 80 - 90, 101, 105, 110, and 117. From the ID Manager, an ID range of 10 through 100 is defined for the Include file, resulting in six overflow components. To correct the overflow IDs, a correction option is selected.
By reserving all of the IDs within the range 1-100, the Number of ID reserves will be populated to 46, which is number of available IDs for the ID range 1-100 (available IDs include: 1-3, 6-19, 61-79 and 91-100).
If a reserve is applied to an entity that supports ID pools, the reserves will be applied to each ID pool of that entity. For example, consider a LS-DYNA model that has 10 ID pools for properties. If an ID range of 1-100 as defined, as in the above example with the same individual IDs for properties as opposed to components, the total count of reserves will be 460 (46 per pool and a total 10 pools).