


|
Creating Lookup Fields
A lookup calculated field provides a convenient table lookup where the value of a designated input field is checked against a lookup table. If a matching input value from the lookup table is found, then the corresponding output value is used. If no matching value is found, then the output is either the same as the input value, null or a default value. Comparisons can be case-insensitive or case-sensitive.
The central control on the Lookup page is the lookup table itself. This is a grid control where the user specifies the desired input value/output value pairs. The grid may be populated in a variety of ways: via the keyboard; via the Get Input Field Values button; by cutting/pasting from the Clipboard; or by using the Add Button to add extra rows. Input and/or Output values may appear in red if they are invalid, i.e., if they cannot be interpreted according to the data type of the input or output field.
Notes:
-
Note that when you are creating several similar fields you can save time by using the first definition as the starting point for subsequent definitions. Refer to Duplicating Fields for details.
-
When using the keyboard for quick manual data entry, there is always an extra blank row at the bottom of the grid. An asterisk (*) appears in the row header of this row to give a visual clue that this row is special. We call this the "auto-add" row. As you repeatedly press the Tab key, the current cell now moves across the row and then down to the start of next row to make data entry as quick and easy as possible.
Steps:
-
Do the following:
-
Select Lookup Fields from the Table Design ribbon, then select Click to add a new Lookup Field.
-
Select Add from the Table Design ribbon, then select Lookup Field.
-
On the General tab, enter an appropriate name for the calculated field in the Name box, and then click the green check icon
 to accept.
 -
From the Type drop-down list, select the appropriate field type. The available types are Character, Date/Time, Numeric, and Memo. For a description of each option, see Changing field types.
-
For numeric fields, specify the decimal accuracy in the Decimals box. Enter the number of decimal places that you want to calculate for this field. Ensure that the data length value (described below) is large enough to accommodate both the integer portion and the decimal portion of the largest number that your field expression is likely to produce.
-
From the Format drop-down list, select the desired setting. The format settings available are determined by which field type you specified in Step 5 above. For example, if you select the Date/Time field type, the format options available are General, Short Date, Long Date, Short Date & Time, Long Date & Time, and Time. If you select the Numeric field type, the format options available are General, Thousands, Currency, Percentage, and Time span. If you select the Character or Memo field types, only the General Format option is available. For a description of each of these format options see Changing field types.
-
Enter the desired column width in the Display Width box. The Display Width setting affects only the appearance of the data on screen; the underlying data is not affected. If the column width of a character field or a date field is not wide enough to accommodate a field value, the field value is truncated on screen. If the column width of a numeric field is not wide enough to accommodate a field value, the field value displays as pound signs (####).
-
Specify the desired alignment for the calculated field by selecting one of the following:
-
Left: select for a left-aligned calculated field.
-
Right: select for a right-aligned calculated field.
-
Center: select for a center-aligned calculated field.
-
Select the Hidden check box if you don't want the calculated field to be visible in the Table window. Hidden fields can be easily viewed by selecting Hide/Display Fields from View group of the Table tab.
-
Enter an appropriate data length in the Data Length box to specify the maximum data length that the field will hold.
-
Setting data length for character fields: Character fields may be up to 254 characters in length. Set the data length to a value large enough to accommodate the longest character string that your calculated field expression is likely to produce. If the data length is too short to accommodate a value, that value is truncated.
-
Setting data length for date/time fields: For date/time fields, Monarch Classic automatically sets the data length to 8 and the Data Length box is grayed.
-
Setting data length for numeric fields: Numeric fields may contain up to 15 significant digits and an optional decimal point and negation sign. Set the data length to a value large enough to accommodate the largest number, including decimal places, that your calculated field expression is likely to produce. If the data length is too short to accommodate a value, that value will be blanked.
-
Setting data length for memo fields: Memo fields have a fixed size of 65536 characters, so the Data Length box is grayed.
-
Click on the Lookup tab.
-
From the Input Field drop-down list, select the desired input field. The fields listed are those defined in the current model.
-
Populate the Lookup table.
-
On the Match section, specify matching options:
-
Exact: Select to specify that the values in the Input Values list must exactly match those in the Input Field.
-
Input Field Contains Input Value: Select to specify that the Input Field must only contain the values in the Input Values list (i.e., to specify that the input values do not have to exactly match the input fields, but only must be contained by them).
-
Case Sensitive: Select to specify that the case of the input values must match the case of the input field.
-
On the Output when no match is found section, specify the behavior when no match is found:
-
Value from Input Field: Select to output the input field value when no match is found.
-
Null Value: Select to output a null value (i.e., "null") when no match is found.
-
Value: Select to specify a default output value to be used when no match is found, then enter a value in the text box.
-
On the Output when input is null section, specify the behavior if the input is null:
-
Null Value: Select to output a null value (i.e., "null") when no match is found.
-
Value: Select to specify a default output value to be used when the input is null, then enter a value in the text box.
-
Choose OK to accept the calculated field definition, otherwise choose Cancel. The Field Properties dialog closes.
The Lookup Field Properties window displays.
Field names may be up to 62 characters in length and may contain uppercase and lowercase characters, spaces, and punctuation except for periods (.), exclamation points (!), accent graves (`), and brackets ([ ]). Names may begin with any character, except for an underscore or space. If a name is entered with leading spaces, the name is accepted but the leading spaces are ignored.
Note: If you elect to enforce DBF field naming rules, field names must adhere to the dBASE III field naming conventions. Names may be up to ten characters long and may contain any letter or number and the underscore character (_). The first character must be a letter. Spaces and punctuation are not allowed.
You can enter the lookup pairs manually by typing values into the Input Value and Output Value columns.
You can also click on Import values fltered by... to automatically populate the Input Value column of the lookup table, with values from the input field you specified. When you click on this button a list of filters defined for the currently-selected input field is displayed.
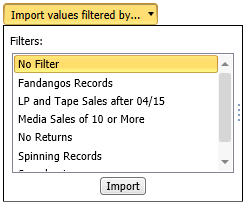
To import all field values, select No Filter and click Import.
To import only filtered values, select a specific filter and click Import.
Monarch Classic displays the new calculated field after the last field in the table. To view the field, scroll all the way to the right. To position the field elsewhere in the table, use the Field List Window within Table Design.