The HyperMorph module helps you alter models in useful, logical, and intuitive ways while keeping mesh distortion to a minimum. With the module, you can:
| • | Make smooth changes to die geometry parameters like the draw wall angle. |
| • | Use the morph volume feature to create a volume around a group of elements, which allows you to morph to the desired shape by dragging the handles at the corners of the volume. |
This tutorial assumes that you are familiar with HyperForm functionalities and the HyperMorph module. Information on HyperMorph topics can be found in the online help.
Exercise: Morphing the die using HyperMorph
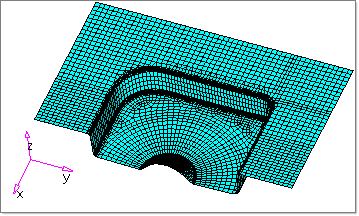
This exercise uses the model file form_tutorial.hf.
This tutorial uses the HyperMorph module, which can be found in the Tools menu.
|
| 1. | On the Preferences menu, click User Profiles. |
| 2. | For Application, select Manufacturing Solutions. Verify that HyperForm and RADIOSS One Step are selected. |
|
| 1. | From the File menu, click Open. |
| 2. | Browse to the file form_tutorial.hf. |
Note: The model files for this tutorial are located in the file mfs-1.zip in the subdirectory \hf\1Step\. See Accessing Model Files.
|
Morph volumes within the HyperMorph module allows you to enclose a given mesh with morph volumes, alter the morph volumes to fit your model, and then change the shape of your model by modifying the morph volumes.
| 1. | From the Applications menu, select HyperMorph. |
| 2. | Select the morph volumes button on the main menu. |
| 3. | Select the create subpanel. |
| 4. | Use the switch  to select create matrix. to select create matrix. |
| 5. | Enter the following values: |
| 6. | Uncheck auto-tangent. Keep all the other settings as they are. |
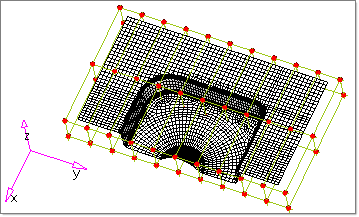
| 7. | Click elems and select displayed. |
The entire part is enclosed in twenty hexagonal morph volumes. These twenty morph volumes are the result of 2 x 10 x 1 input for X, Y and Z in the create matrix as shown in the figure below. Red color handles are created at the end corners of each of the twenty boxes.
| 8. | Select the split/combine subpanel. |
| 9. | Ensure that the selection of the left top toggle is split mvols. |
| 10. | Keep all the other settings as default except uncheck the box for make tangent. |
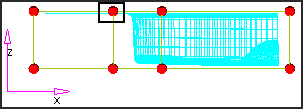
| 11. | Pick the edge close to the black X as shown in the figure below and type in 0.62 in the box for single split. |
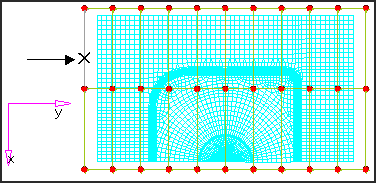
As a result of this split, ten more morph volumes will be created. The split is propagated to the other end. Red color handles are created at the corners of the morph volumes.
| 13. | Click return to exit from the Morph Volumes panel. |
|
| 1. | From the main menu, select Morph. |
| 2. | From the header bar, select the user view icon  . . |
| 3. | Click rear to change to rear view. |
| 4. | Select the move handles subpanel. |
| 5. | Make sure the top selector is set to translate mode. |
| 6. | Make sure the middle selector is set to along xyz. |
| 7. | Use the following values: |
X = 0
Y = -20
Z = 0
| 9. | Click handle again and select by window from the popup window. |
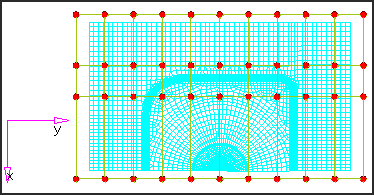
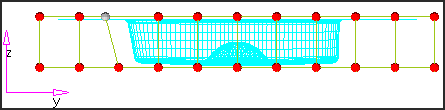
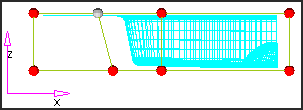
| 10. | With the points button activated, draw a window, as shown in the image below. |

Handles selected by window option
| 11. | Click select entities. |
| 12. | Click select again to go back to the Morph panel. |
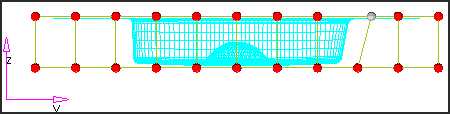
| 13. | Click morph. The die after morphing is shown below. |
|
| 1. | Select the save shape subpanel. |
| 3. | Toggle the as handle perturbations selection to as node perturbation. |
| 5. | Click yes to the message window "Save perturbations for node at global and morph volume handles? (y/n)". |
| 6. | Click undo. This will recover the model back to original model shape. |
|
| 1. | Select the move handles subpanel. |
X = 0
Y = 20
Z = 0
| 4. | Click handles again and select by window from the popup window. |
| 5. | With the points button activated, draw a window, as shown in the image below. |
Handles selected by window option
| 7. | Click select to go back to the Morph panel. |
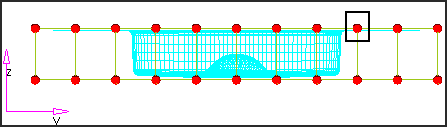
| 8. | Click morph. The die after morphing is shown below. |
|
| 1. | Select the save shape subpanel. |
| 3. | Verify the toggle is set to as node perturbation. |
|
| 1. | From the tool bar, click on the user view icon . |
| 2. | Click the left view from the pop up window. |
| 3. | Select the move handles subpanel. |
X = -20
Y = 0
Z = 0
| 5. | Click handles. You are now in entity selection mode. |
| 6. | Click handles again and select by window from the popup window. |
| 7. | With the points activated, draw a window, as shown in the image below. |
| 9. | Click select to go back to the Morph panel. |
| 10. | Click morph. The die after morphing is shown below. |
|
| 1. | Select the save shape subpanel. |
| 3. | Verify the toggle is set to as node perturbation. |
|
| 1. | Go to the apply shapes subpanel. |
| 2. | Click shapes and select the three saved shapes. |
| 4. | For multiplier, keep the default value, 1.0. |
All the three shapes are applied together.
| 6. | Click on the save shape subpanel and enter the name as combine for the combined shapes. |
| 8. | Rotate the model to see the results. |
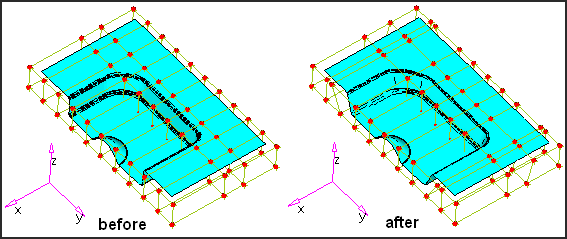
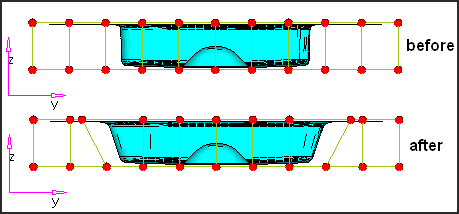
The resultant shape change of the part is shown in the figures below.
|
Return to Optimization Tutorials


