In this tutorial, you will learn how to query contoured results.
This exercise uses the file truck.key
and the corresponding d3plot file located in the
animation\truck folder.
To access the Query panel, click the Query panel button
on the Result toolbar. Figure 1. Query Panel
The Query panel allows you to view and
export properties, as well as other information, for all nodes, elements,
components, and systems contained in the active model. Once the model has been
contoured, you can also access the Query panel directly from the Contour panel by
clicking on the Query Results button.
Contouring the Model and Querying the Results
Load the truck.key model file and the corresponding
d3plot results file, located in the
animation\truck folder.
Click the Contour panel button on the Result toolbar to enter the Contour panel.
Contour the model for Stress (t) > vonMises
stresses.
Click Apply.
Animate the model .
Stop the animation.
Select the Query panel from the toolbar .
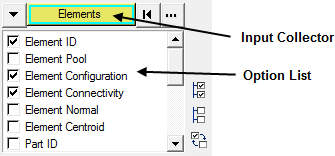
Verify that the entity input collector is set to
Elements.
Figure 2.
Click the icon to deselect all items in the option list.
Select the following four items in the option list: Element
ID, Contour(Stress), Load
Case, and Simulation Step.
In the graphics area, pick a few elements on the model.
Figure 3.
Return to the Contour panel .
From the Averaging method drop-down menu, select
Simple.
Click Apply.
Return to the Query panel .
Verify that the entity input collector is set to
Nodes.
Once the results are averaged, the values become nodal based and are no longer
elemental based. This change is reflected in the Query panel entity input
collector.
Deselect all items in the Option list except for the
following four items: Node ID, Contour
(Stress), Load Case, and
Simulation Step.
In the graphics area, pick a few nodes on the model.
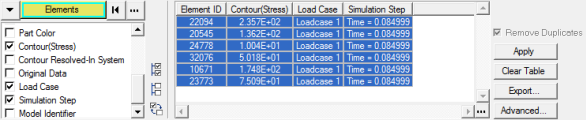
Click on the Export button (located in the lower right
corner of the panel), and save the table as
query.csv.
The Export option allows you to save the data that you have queried as a
.csv file, which can then be used for further study,
preventing the need to query the same data again.
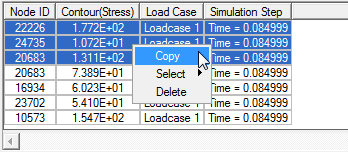
Highlight a few rows in the table.
Right-click on the highlighted rows, and select Copy
from the list of available options.
Figure 4.
You can now paste the copied rows into a text editor or a spreadsheet
application.

 on the Result toolbar to enter the Contour panel.
 .
.
 .
.
 icon to deselect all items in the option list.