Upfront Data Loader
A new workflow emphasizing upfront data loading for standard crash post processing use cases.
Some of the highlights and key benefits of this profile are:
- Uses a multi-threaded, asynchronous data loading engine resulting in faster load times.
- New Load Data Browser designed to:
- Select upfront and load only animation steps and results data of interest.
- Load several results at once, monitor load progress and cancel loading.
- Automatic caching of loaded data with option to unload data when no longer necessary.
- Interact with the application and do other tasks while data is loading instead of waiting until loading completes.
- Memory monitoring to warn if usage reaches a certain threshold and cancel any ongoing loading.
Load Data Browser
The Load Data Browser is displayed in the tab area and is broken down into three major sections, each of which corresponds with the process order of using the tool (see the figures below).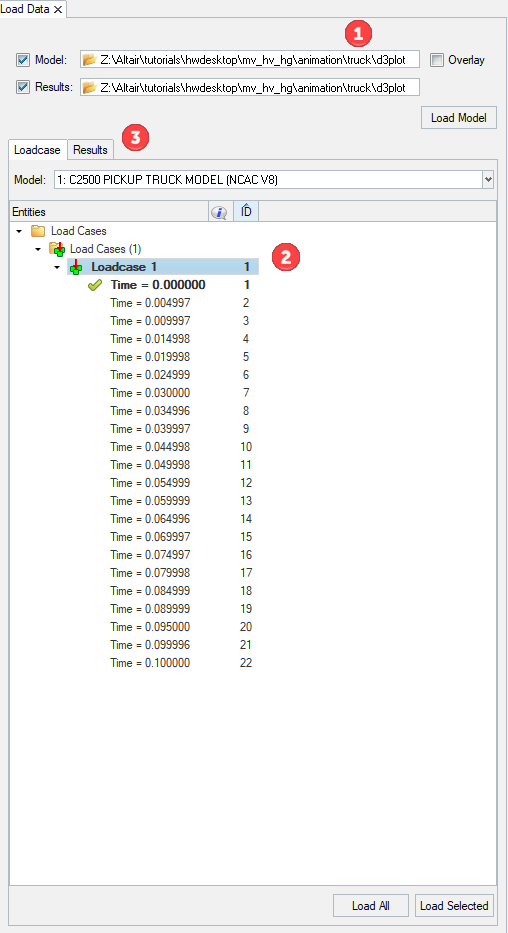
Figure 1. Load Data Browser
- Load Model and Results: Choose the model and result file to load into the HyperView window.
- Loadcase Tab: Choose the steps to load for viewing animation/deformation.
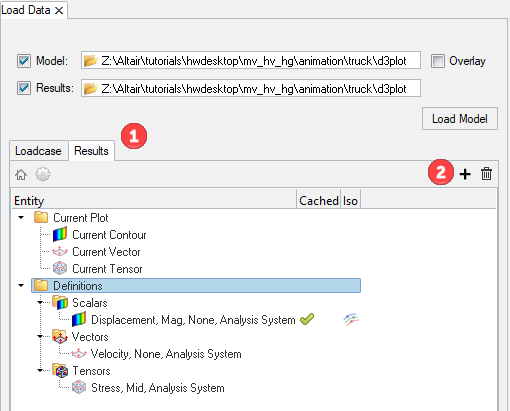
- Results Tab: Choose the results to load for contour/vector/tensor/iso plotting by creating result definitions.
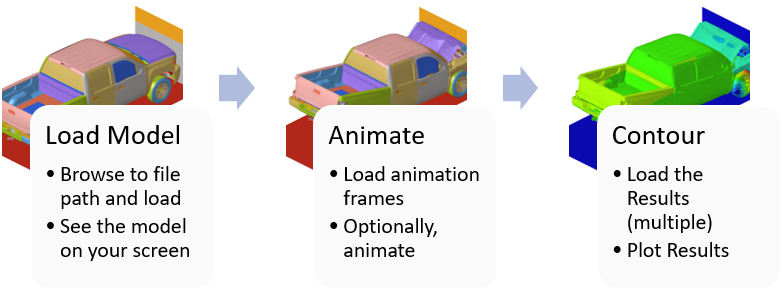
Figure 2. Suggested Upfront Data Loading Workflow
Access Upfront Data Loader
Load Model and Results

Figure 3.
- Overlaying Multiple Models
- You can load one or more models and their associated results into one window by
activating the Overlay check box. The last model you load automatically becomes the
current model. To make a previous model the current one, you must manually set it as
your current model. From the Results Browser, right-click on the
name of the model file that you would like to set as the current model and select
Make Current from the context menu.
When models are overlaid, the Loadcase tab has a drop-down menu to switch between the models so that the you can choose steps from a model to load. In the case of result definitions, the create definitions dialog will display data from all models, allowing you to create a single definition for data that is available in both models rather than creating one per model. At the time of loading a definition, HyperView will check if the requested data is available in all models and if not, it will display a warning message.
Loadcase Tab
Once the model/results are loaded, the Loadcase tab automatically populates to show the available steps in the file.
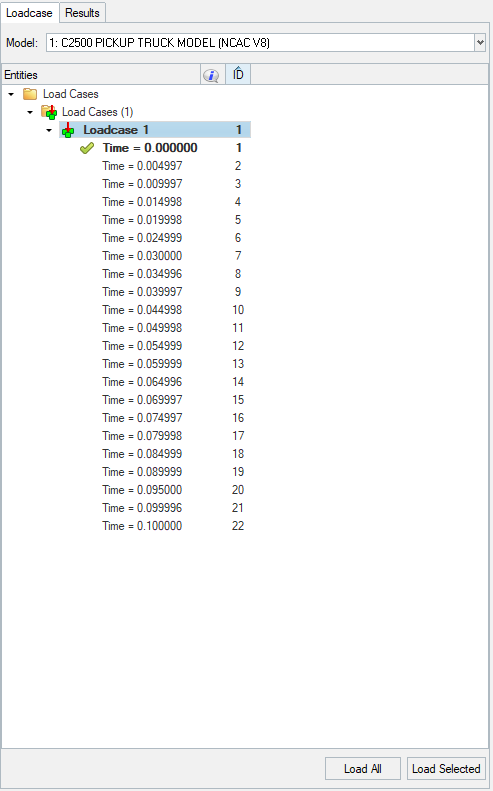
Figure 4.
Load Animation Steps
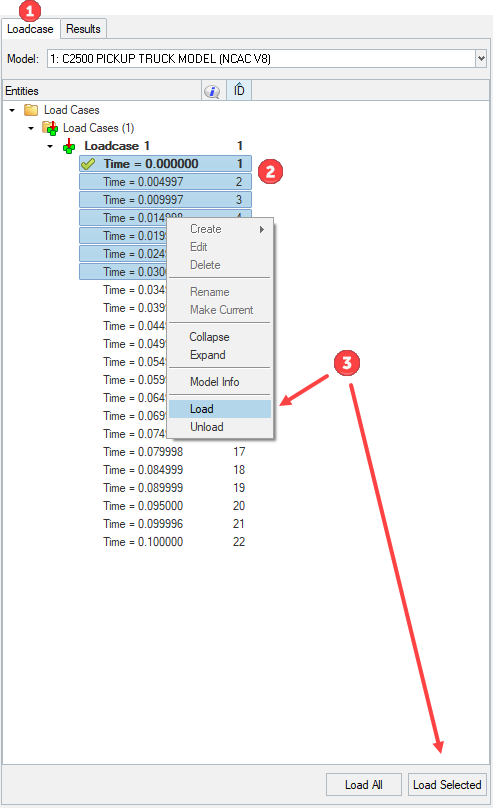
Figure 5.
Loadcase Context Menu
Clicking the right mouse button on a folder or entity/item within the Load Data browser’s tree structure brings up a menu with a variety of useful options.The visibility of browser context menu items is dependent on the current selection. Only menu items belonging to the type of selected items will appear. Options selected in an empty space apply to all items.
| Option | Description |
|---|---|
| Create | Not used. |
| Edit | Not used. |
| Delete | Not used. |
| Rename | Not used. |
| Make Current | Makes a selected item current (when more than one is available). |
| Collapse | Collapses all items in the tree structure so that only the top-most level of items displays. |
| Expand | Expands all items in the tree structure, exposing every item nested at every level. |
| Model Info | Opens the Model Info dialog for
the current model. The General tab provides information about the model and results file, and the Statistics tab displays the model and results files in a tree-like structure. |
| Load | Loads the selected animation steps. |
| Unload | Unloads the selected animation steps. |
Results Tab
Once model/results and the required animation steps have been loaded, click on the Results tab. The Results tab allows you to choose the results to load for contour/vector/tensor/iso plotting.
- Current Plot: Use current contour, vector or tensor results to plot data. This is an 'on-demand' approach to plotting. If you want to change the plot to a different result, use the Entity Editor section to modify the definition. In this approach, data remains in memory as long as the plot is displayed. Once you clear the plot or edit the definition to view a different result, data is again read from the file.
- Definitions: Define upfront what you would like to view as a contour, vector, iso or tensor plot. This is the 'upfront' approach to plotting. Definitions are loaded and remain cached in memory whether the plot is displayed or not and therefore, plotting is instantaneous.
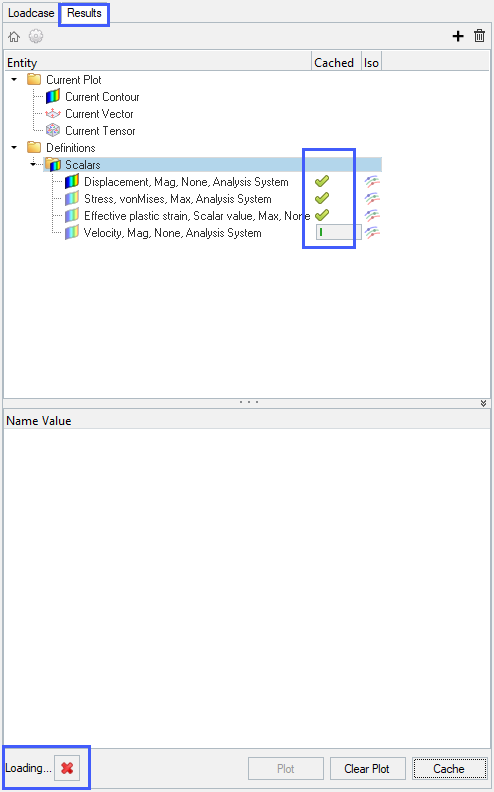
Figure 6.
Current Plot
- The current plot workflow follows the same 'on-demand' approach as the contour/vector/tensor panels in standard HyperView (non-Upfront Loading mode).
- There is a relationship between the current folder items and definition folder items. When you plot any definition from the definitions folder, depending on its type, the corresponding current item definition is updated and shown as plotted (the plot icon is highlighted). Similarly, when a current item is plotted, any cached entry created from it is also shown as plotted.
Definitions
- Create Definitions Dialog
- Import an XML File
- Preference Statement
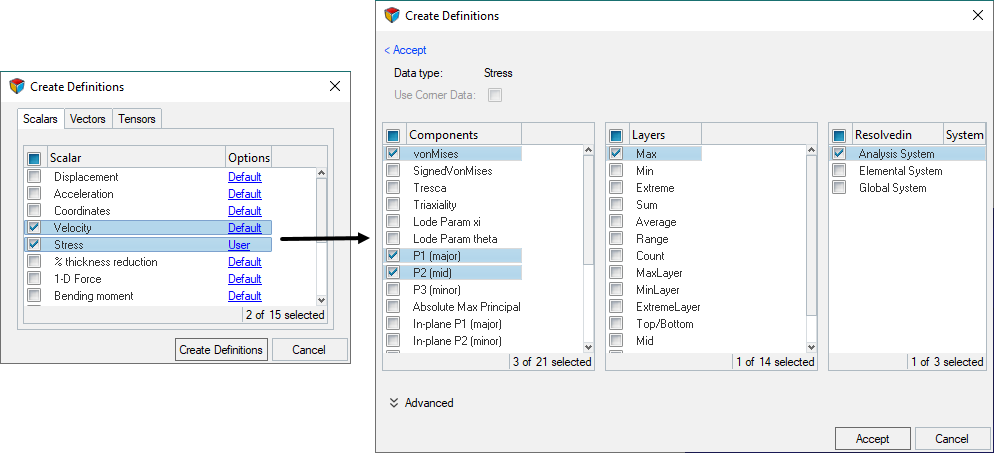
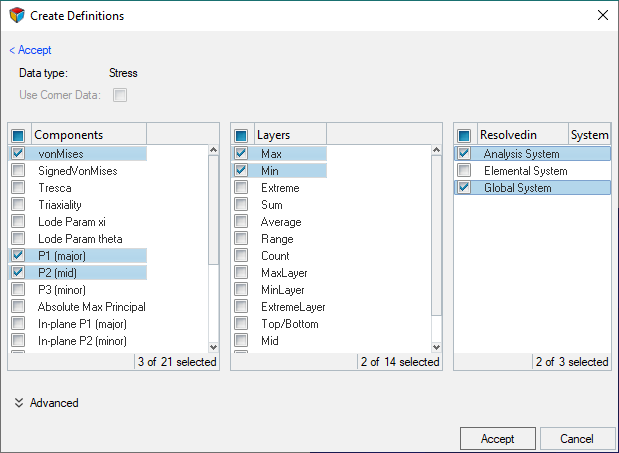
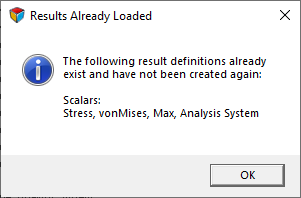
- Create Definitions Dialog
- Launched by clicking the “+” button or by right-clicking in browser, this dialog allows you to create multiple definitions across data types at one time.
- Import XML Files Containing Definitions
- Definitions that have been created can be exported and reused on a different model
easily. Simply select and right-click on the definitions that you want to reuse and
click Export, save it to an XML file, and import it on a new
model. You can choose to either append or replace the existing definitions or replace
them.
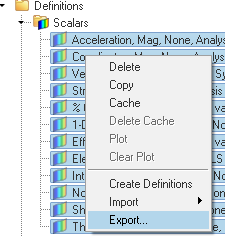
Figure 11. - Preference Statement
-
The preference statement, *DefaultResultDefinitionFile, defined in the preferences_post.mvw file, allows you to point to an XML file containing definitions, thus saving the time required to manually create the definitions each time. Every time a model is loaded into the session, the definitions contained in the file are automatically created and shown in the Results Tab.Tip: HyperView only checks if the data type and component necessary to create the definition are available in the file. You are therefore expected to set this option only when you load files containing all the relevant data required to create the definitions.
Cache and Plot Results
After creating a definition, you can cache the desired results by selecting them (one or multiple) and clicking on the Cache button located at the bottom of the tab, or by right-clicking and selecting Cache from the context menu.
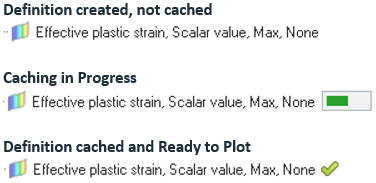
Figure 12. Various states of a result definition
- Click the icon next to the definition entry in the browser.
- Select the definition and click the Plot button.
- Right-click on the definition and select Plot from the context menu.
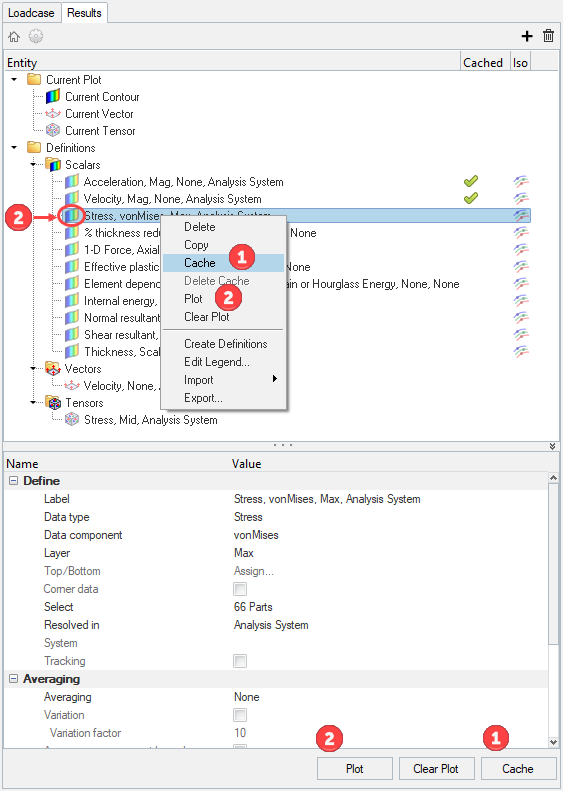
Figure 13. Different methods to cache and plot a result definition
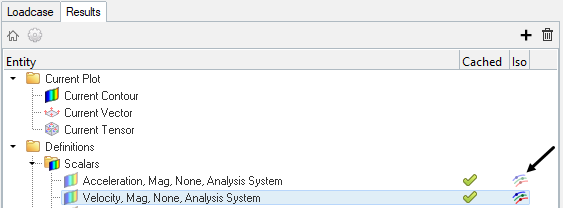
Figure 14. Iso plot of any scalar result definition
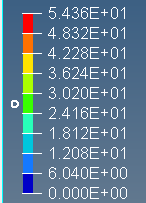
Figure 15.

Figure 16. Pop-up to switch a contour plot between different scalar definitions
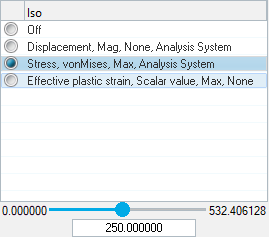
Figure 17. Pop-up to switch an iso plot between different scalar definitions
Results Context Menu
| Option | Description |
|---|---|
| Delete | Deletes the selected result(s). |
| Copy | Copies the selected result(s). |
| Cache | Adds the selected result(s) to an internal cache. |
| Delete Cache | Removes the selected results(s) from the internal cache. |
| Plot | Apply a contour, tensor, or vector plot to the model. |
| Clear Plot | Clear a contour, tensor, or vector plot or clear all the plots applied to the model. |
| Create Definitions | Create result definitions using the Create Definitions dialog. |
| Edit Legend | Displays the Edit Legend dialog. |
| Import | Append or replace a previously saved .xml result definition file. |
| Export | Export the current result definition to an .xml file. |
Updating Result Definitions
In the Upfront Data Loading profile, result definitions are cached only for the animation steps that have been loaded in the Loadcase tab. If additional steps/frames are loaded at a later stage, the cached (but not plotted) definitions are not automatically updated. You will see the green check mark on the cached definitions turning into a partially loaded progress bar, indicating that the data is not available for the additional steps. Also, if you plot a cached definition and animate, you will see an N/A plot on the additional frames. To get the data for the additional steps, simply cache the definition again.
Cancel Loading
Memory Monitoring
Memory monitoring is a useful feature available only in the Upfront Data Loading profile. It is enabled by default and can be turned off by going to dialog, clicking on Performance tab and unchecking the box.

Figure 18.
Once memory usage reaches 100%, the operating system starts swapping and this will cause the cause the system to slow down. Therefore, it is recommended that the monitoring is kept enabled with an optimum threshold value.
Once loading is canceled, the monitoring threshold gets set to the percentage at which it was canceled so that the next time any data is loaded, the tool uses this new value as the threshold.
Coverage
- Supported Formats
- Upfront Data Loading mode is primarily targeted towards crash post processing
(explicit, time-based animation and results). Accordingly, only certain formats are
supported.
- ABAQUS input (.inp, .pes)
- ABAQUS ODB (.odb)
- FEMZIP DSY (.fz)
- FEMZIP Radioss Reader (.fz)
- FEMZIP d3plot (*d3plot*, .fz)
- Hyper3D (.h3d) - see the note below
- LS-DYNA Keyword Input (.k*, .key, .dyn, and .bdf)
- LS-DYNA d3plot (*d3plot*, *d3int, *intfor and .ptf)
- PAM-CRASH DSY (.dsy)
- PAM-CRASH HDF5 (.erfh5)
- PAM-CRASH Input (.pc and .dat)
- PAMCRASH2G Input (.pc and .dat)
- RADIOSS (A) Result (*A001 and .gz)
- RADIOSS Format (*D00 and .RAD)
Note:- The file will not be loaded, and a dialog is displayed if you attempt to open an unsupported file format. However, in some cases the file might load by virtue of it being a supported format, however it is important to note that this might not be fully supported (for example, H3D generated by a non-crash solver such as OptiStruct or Abaqus ODB containing modal results). It is recommended that you use HyperView without the Upfront Data Loading profile for such files.
- Another exception to note is H3D generated by HyperView is not supported and an error message is shown when loading such files.
- Unsupported Tools
- The following tools are not available (access to corresponding panels is
disabled):
- Derived Results and Derived Loadcase
- Result Math Templates and related tools such as Free Body Diagrams
- Build Plots
- Stress Linearization
- FLD
- Add Object
- Streamlines/CFD Post-processing
- Add Multiple Result Files
- Reader Options Dialog
- Export H3D
- Modal or Linear animation mode
- Unsupported model/results data
- The following model/results are not supported (where possible an error message is
displayed):
- Model/results containing adaptive meshes
- Multi-Body Dynamics result files
- H3D created from HyperView
- Modal complex or linear static results
- Reading key model information from an input deck
-
- Model geometry (nodes, elements, components) will be read.
- Sets, Materials, Properties are not directly read at this time.Note: Assembly and Include Hierarchy can be directly read from an input deck starting with v2021. In addition, the Extract Solver Deck Data option from the Tools Menu can be used to import Assembly or Include Hierarchy information.
- Saving and reloading Session/Report Templates
- Saving and restoring sessions in Upfront Data Loading profile is different compared
to standard HyperView. In the latter, only information
necessary to restore the state of the active step is saved. But in this new profile,
additional information about what data is cached/loaded is also saved. For example, a
model may contain 50 steps however you could have loaded only 5 steps. This
information gets saved. The benefit of this is that when you reopen an Upfront Data Loading session, all this data will be automatically loaded and become readily available for you to resume work. This also means that it might take longer to restore the entire session in this profile compared to standard HyperView. In future releases, this functionality will be optimized.Attention: It is not possible at this time to load session files/report templates saved in standard (non-Upfront Data Loading) HyperView in the Upfront Data Loading profile. The application will ask if you want to switch the mode in order to load the session.
Known Issues
The following issues are documented here for awareness and will be addressed in future releases:- Certain glitches with copy and pasting or overlaying of models and report templates.
- Incorrect assembly hierarchy of models containing duplicate components.
- Displacement contour shows N/A when using Pam-Crash modular input decks as model and ERFH5 as result file. It is recommended to not use this combination but instead use the ERFH5 as model and result.
- Load Data Browser user interface issues when loading multiple Loadcase transient models, especially ones containing mixed analysis types, such as a transient subcase and complex modal subcase or ones where certain data types are not available across all subcases.
- Few minor user interface glitches such as missing options in the query panel or incorrect result definition loading status are seen with repeated loading and unloading of steps.
- Preference file does not switch to HyperWorks (Default) when loading a standard HyperView session file although Upfront Data Loading has been correctly turned off.
See the Upfront Data Loader APIs topic in the HyperWorks Desktop Reference Guide for additional information regarding the various Tcl/Tk commands that have been added for this workflow.
