Keyboard Shortcuts
Default keyboard shortcuts.
| Key | Function Key Only | Plus Shift Key | Plus Ctrl Key |
|---|---|---|---|
| F1 | Displays online help | Color | Print page |
| F2 | Delete panel | Temp Nodes panel | Saves a BMP file |
| F3 | Replace panel | Edges panel | |
| F4 | Distance panel | Translate panel | |
| F5 | Mask panel | Find panel | |
| F6 | Edit Element panel | Split panel | Saves a JPEG file |
| F7 | Align Nodes panel | Project panel | Display full screen |
| F8 | Nodes panel | Node Edit panel | |
| F9 | Line Edit panel | Surface Edit panel | |
| F10 | Check Elements panel | Normals panel | |
| F11 | Quick Edit panel | Organize panel | |
| F12 | Automesh panel | Smooth panel |
| Shortcut | Description |
|---|---|
    |
Rotate by increments |
| Ctrl
|
Incremental counterclockwise, clockwise, and reverse view |
| +,- | Zoom by increments. Note that "+" is actually Shift= on the main keyboard, but simply + on the numeric keypad. |
| A | Arc rotate |
| B | Return to a previous view |
| C | Center |
| Ctrl+Z | Undo last selection |
| Ctrl+Y | Redo last selection |
| Ctrl+R | (Spherical) Clipping panel |
| D | Display panel |
| F | Fill/fit model to window. |
| G | Global panel |
| H or F1 | Opens Help. When a panel is active, this opens help for that panel; from the main page menu, it opens the Help’s table of contents. |
| Ctrl h | Acts as a backspace |
| I | Isolate/isolate only for the browser |
| Ctrl i | Acts as a carriage return |
| M | Turn off the menus and display only the graphics window. Press M again to bring the menus back. |
| O | Options panel |
| P | Plot/refresh |
| R | Rotate |
| S | Selector in the browser |
| T | True view |
| Ctrl+T | transparent components panel |
| U | Show/hide for the browser |
| V | User View |
| W | Windows panel |
| Z | Circle-zoom |
Map Keyboard Shortcuts
Keyboard shortcuts can be used to map HyperMesh functions to keys or key combinations, so that you can quickly execute tasks that you use frequently simply by pressing one or more keys on the keyboard.
One example of this is the default mapping of the F key, which, when pressed, zooms and pans the graphics area view to fit the currently displayed model to the screen.
You can customize the default shortcut mappings to create your own shortcuts for a
variety of tasks. Examples include:
- Jumping to a specific HyperMesh panel
- Automatically performing a task using HyperMesh *commands
- Executing a macro
The following keys are usable when defining shortcuts:
- Letter and number keys ("standard" keys)
- Ctrl plus another "standard" key
- Shift plus another "standard" key
- Ctrl plus Shift plus another "standard" key
- Notes
-
- Some special-function keys, such as Tab,
Shift, Esc,
Ctrl, Alt
and Backspace, cannot be mapped. Those
keys are identified with a different color.

Figure 1. - Use the hm_pushpanelitem command in a
shortcut to jump to a specific subpanel
of a panel. For example, to enter the
combine subpanel in the Edit Element panel,
use:
This will take you to the last used subpanel in the specified panel.hm_pushpanelitem {edit element} {combine} - Any HyperMesh command file commands can be mapped to a shortcut key.
- Some keyboard shortcuts are mapped by default during
installation, and some utilize functions which are only
accessible via shortcut keys. Remapping such keys to new
functionality results in loss of original functionality.
Examples of such shortcuts are:
Shortcuts Description 
Incremental rotate left, up, right, and down respectively. Ctrl + 
Incremental clockwise, counterclockwise and reverse view. Ctrl + F1 Creates bitmap file of the screen and spools it to the printer. Ctrl + F2 Creates a bitmap file of the screen and writes it to disk. Ctrl + F3 Creates PostScript file of the screen and spools it to printer. Ctrl + F4 Creates a PostScript file of the screen and writes it to disk. Ctrl + F5 Creates a black and white PostScript file of the screen and spools it to the printer. Ctrl + F6 Generates a *.jpg screen capture or animation file.
- Some special-function keys, such as Tab,
Shift, Esc,
Ctrl, Alt
and Backspace, cannot be mapped. Those
keys are identified with a different color.
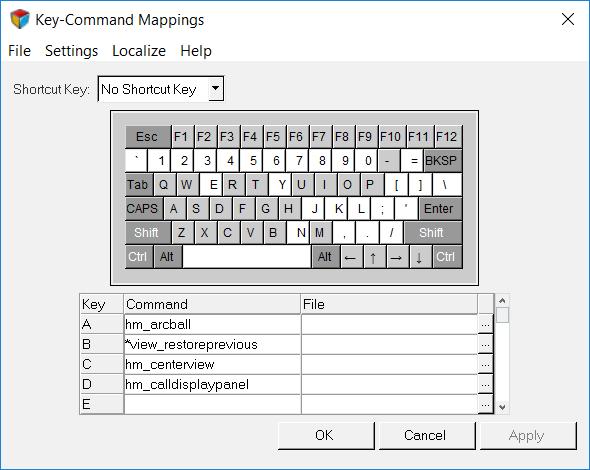
Figure 2.
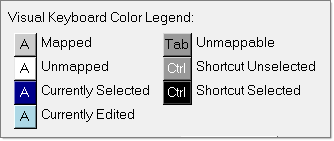
Figure 3.
Example: Keyboard Shortcut Mapping
To create a shortcut key "e" that deletes all the elements in the model, enter the
following commands in the command field next to the key
"E":
*createmark elements 1 "all"; *deletemark elements 1;To create a shortcut key "L" that accesses the Lines panel,
enter the following in the command field next to the key
"L":
hm_pushpanel ;To create a shortcut key "J" that runs a macro to find all the elements with jacobian
< 0.7: this macro already exists in the QA page of the Utility menu. To call the same macro, enter the following in the
command field next to the key
"J":
*evaltclstring "macroElementJacobian 0.7" 0To create a shortcut key <Shift + K> that runs a macro to
check whether any beam/bar elements exist in the model and display them only:
- Create a findbeams.tcl file with following
commands:
Proc displayonlybeams {} *createmark elements 2 "by config" 60 63 set beams [hm_getmark elements 2] *clearmark elements 2 if { ![Null beams]} *displaycollectorwithfilter comps "none" "" 1 1; eval *createmark elements 1 $beams; *findmark elements 1 0 1 elements 0 2; } else { hm_usermessage "No beam elements in this model" } } - In the Key-Command Mappings dialog, select Shift from the Shortcut Keymenu.
- Enter the following in the command field next to the K
key.
*evaltclstring displayonlybeams - In the file field, click the "…" button to browse to and select the findbeams.tcl file.