Connect to existing Teamcenter instances and query for and retrieve CAD files
directly into SimSolid.
Teamcenter versions 10.0 to 12.1 are currently supported.
Use a repository to
manage files on your PDM system. You will need to obtain the Name, Host, and File
Server for the repository to access it. These can be provided by your network
administrator.
Add a repository.
Click the (Import from PDM system) button on the main
window toolbar.
Pick the Teamcenter tab and click (Settings).
Click Add repository and enter the Name, Host,
and File Server information for the repository.
Example:
Host = http://adm10sa1dev2:8080/tc, where "tc" is the
Teamcenter site ID. Note that your site ID may be
different.
File server =
http://adm10sa1dev2:45444
Note: You can add more repositories or
edit/delete existing ones in Teamcenter settings.
Connect to a repository.
In the Repository drop-down menu, select a repository that has been
added.
Figure 1.
Enter username and password to connect.
Optional: Activate the Save credentials checkbox to save
your username and password.
Query and browse contents.
Choose they type of query - Item,
Revisions, or CAE Model
Revisions.
Choose to query content by Item,
ID, Name, or
Revison.
Enter text and click Search.
Optional: Select Latest revison only to display only the
latest revision of a file in the search results.
The search results are displayed in the window.You can click the
< on an assembly to expand it. You cannot edit properties from this
dialog, as they are defined in your PDM system. You can request more
properties by right-clicking on an item in the tree and selecting
Get more properties in the context menu.
Select a file and click Open to import
geometry.
You can select a master file to open an entire assembly or a single
file to open a part.
Optional: Filter files based on the file type at the bottom of the window.
Only files of the selected type will be imported.
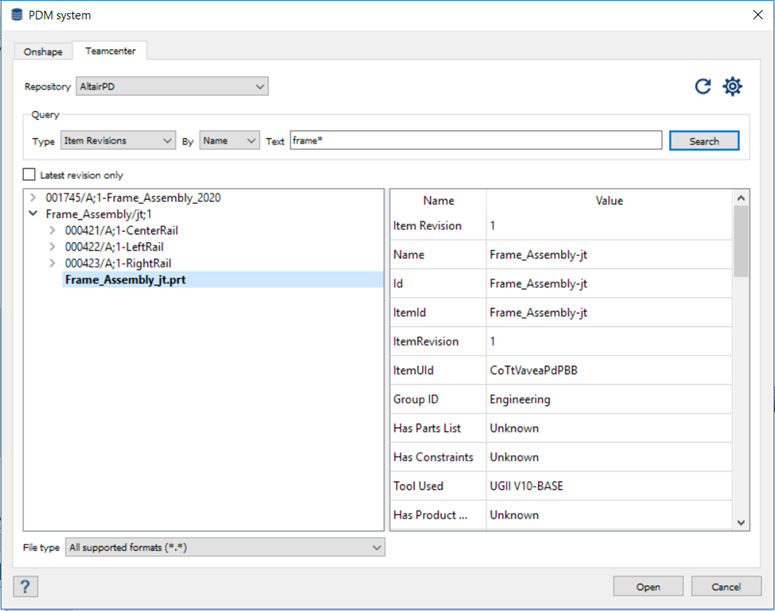
Tip: As an example of how to form a query: to search for Frame
Assembly, choose query by Name and enter the text
Frame*. Figure 2.
Optional: If necessary, edit faceting parameters to control tesselation by doing one of
the following:
In the Resolution menu from geometry import settings, choose,
Standard, Enhanced, or
Fine. The values will automatically populate the
Angular deviation and Chordal deviation fields.
In the Resolution menu, choose Custom. Then,
enter the desired values in the Angular deviation and Chordal deviation
fields.
Note: As a best practice, start with
Standard and refine only as required to capture
geometry curvature. Setting these values smaller will increase the analysis
solution time.
 (Import from PDM system) button on the main
window toolbar.
(Import from PDM system) button on the main
window toolbar.
 (Settings).