Triggers
Running, it's ready to be
invoked. Invoking a Function consists in making a request to one
of the two invocation endpoints: /spaces/<space>/functions/<function_name>/invokewill invoke your Function synchronously, so the response to that request will be the output of the Function./spaces/<space>/functions/<function_name>/async-invokewill invoke your Function asynchronously, which is best suited for long-running tasks. That means your Function will run and send the response as a request to the URL you choose.
Synchronous Invocation
This is the most straightforward way to invoke a Function and is probably enough for most cases where the tasks performed are short.
When a synchronous invocation is made, a connection will be established from the moment the request is sent until the Function execution finishes its execution and returns its response. This is great if the process takes just a few seconds (no more than 5-10 seconds). For longer processes, the connection will probably time out, and you won't receive any response. For these cases, you should consider switching to asynchronous invocation.
To invoke a Function synchronously, make a request to this
endpoint with all the data you want to pass to the Function:
/spaces/<space>/functions/<function_name>/invoke
Methods allowed are POST, GET,
PUT, PATCH, and DELETE
You can add any query parameters your Function may need to work with to this URL.
You can also append to the URL a custom path (up to three levels). For example, you could make the next request
GET /spaces/<space>/functions/<function_name>/invoke/stock/market/today?company=Google to tell your Function to return today's Google stock prices. In
this example, your Function will receive
/stock/market/today as the request's path. It's up to you how
to handle this information.
Asynchronous Invocation
For long-running tasks, or just if you want all your Function results being sent to the one place (for example, to keep a history), asynchronous invocation is the way to go.
To make an asynchronous invocation, you need to tell the Function
where you want to receive the response adding a callback URL to your request. This
callback URL will be added in a header called X-Callback-Url.
After sending the request to the asynchronous invocation endpoint, you'll get a
202 response immediately meaning that the request was accepted.
Your Function will perform its task and, when finished, it will
send the response as a request to the URL you specified in the
X-Callback-Url header. This request will contain the Function output in the body, all the headers you've set inside your
function and an additional X-Function-Status header with the
response status code.
/spaces/<space>/functions/<function_name>/async-invoke
POST.
As with synchronous invocation, you can use query parameters and custom extended paths in your requests when asynchronously invoking your Functions.
MQTT Trigger
An MQTT Trigger connects to an MQTT broker and creates a subscription to one or more topics. When a message is received, the Trigger will compare the topic of that message with the topics configured in the Functions. All the matching Functions will be invoked.
When a MQTT Trigger invokes a Function, the payload of the MQTT message is sent in the body of the HTTP invocation request. The topic of the message is sent in the X-Topic header of the request.
You can create multiple MQTT Triggers to connect to different brokers or subscribe to different topics, but you should try to keep the number of Triggers as low as possible to prevent duplicated invocations and make your setup clearer. You can use multiple topics per Trigger and use wildcards to keep things simple.
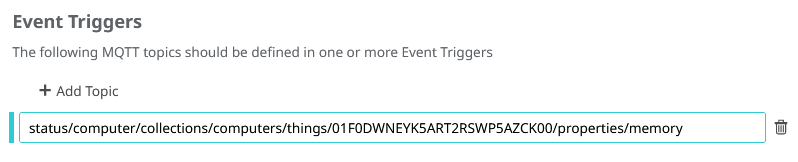
Figure 1.
The Event Trigger must be defined in the Triggers tab. It works as a listener to a particular endpoint. In the previous example, the Trigger points to the property memory, of the thing “01F0DWNEYK5ART2RSWP5AZCK00” that is in the collection “computers” inside the space “computer”.
Callback URL
Triggers invoke Functions asynchronously, so to get the response of these Functions after its execution you can configure a Callback URL in the Trigger. This way, the response of every Function invoked by that Trigger will be sent to the Callback URL using a `POST` HTTP request.
You can use the webhook website to generate your unique url for easily inspect and test the incoming requests.
Create an MQTT Trigger
Complete the steps below to create a trigger.
-
Click New Trigger.

-
In the New Event Trigger panel, enter the Trigger
description and type.
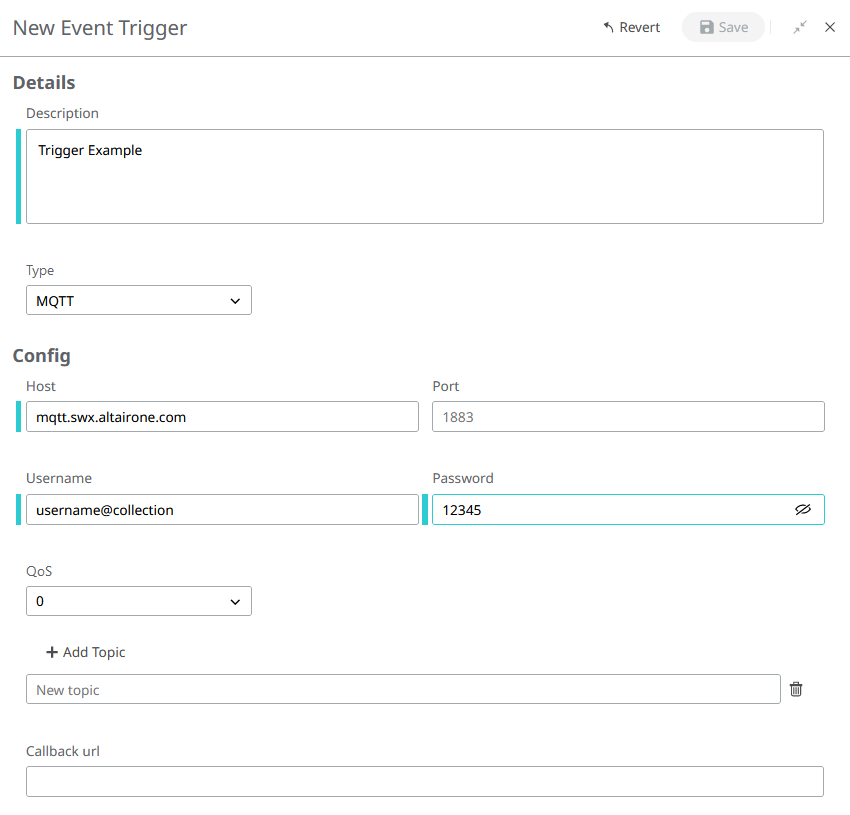
Figure 2. -
Under Add Topic, enter the topic endpoint.

Figure 3.This endpoint must be the same as the Event Trigger in Workers.
Cron Trigger
*/10 * * * *to fire the Function every 10 minutes.0 0 1 * *to fire the Function once at 00:00 on the first of each month.0 0 * * 3to fire the Function at 00:00 every Wednesday.
@yearlyor@annually@monthly@weekly@dailyor@midnight@hourly
Create a Cron Trigger
Cron Triggers require no configuration, so just one Cron Trigger can be created for space. Once you have created a Cron Trigger, the option to add a new Cron Trigger will disappear from the type drop-down menu.
-
Click Add.

Figure 4. -
From the Type drop down menu, select Cron.
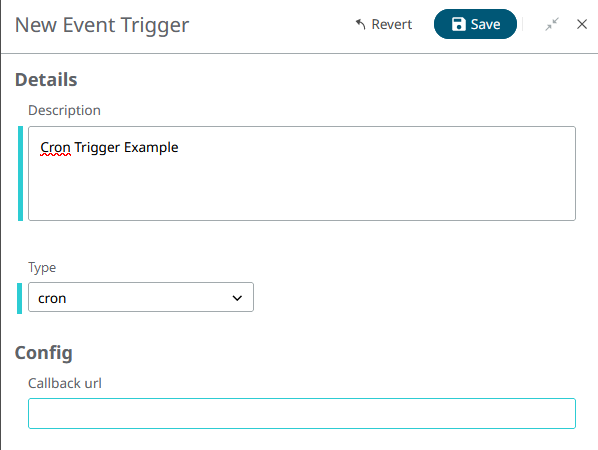
Figure 5.