


|
Adding an Alert
Let’s add an alert to our Automator Tutorial project file.
Steps
1. On the Navigation Tree, click Show Advanced options. Under Automator, click Standard Processes, and select Alerts.
2. On the Alerts page, click the Add icon  to create a new alert.
3. From the Code drop-down list, select SystemAlertProcessFailed. This predefined alert will notify us if any process fails to run successfully.
Note that Automator automatically enters A process has failed in the Description field.
4. Click the Add Actions button to add actions to the alert.
5. On the displayed page click the Add New Action icon . The Action page where we can select the kind of alert action to occur will be displayed.
6. Let’s choose the Email action, which is selected by default. By doing so, we will be alerted, via an email message, if a process fails to run.
7. Specify the recipients' email addresses in the corresponding boxes: To, Cc, Bcc.
|
|
NOTES You can also select recipients from the contacts list by clicking the Contacts icon |
|
|
|
|
|

 . For more information, refer to the "Email Alert Action" topic in the web help.
8. In the Subject field enter A process has failed.
9. Click the Save button to add the action and save the alert. The "SystemAlertProcessFailed" alert is now listed on the Alerts page.
Let’s see how this alert will work.
1. On the Navigation Tree, click Server Library, and select Projects. The Projects page is displayed.
2. Select the ClassFeb project file from the list, and clickthe Edit Selected Project icon  .
.
3. On the project file page of ClassFeb, click the Open in Project Editor button. The Project Editor window displays.
4. In the Project Editor, select the Input tab.
5. Enter a non-existent input file, e.g., Classic999.prn, by double-clicking on the field for the file path. Click Commit, and click Commit again in the Save Project to Server Library dialog box.
6. Let’s return to Automator. On the Navigation Tree, click Automator, and select Processes under Standard Processes.
7. Select the February Sales process, and then click the Run Now icon .
.
8. Automator displays a Submitted for Processing message.

Proceed to the Jobs page. You will notice that the status text for the job you just ran displays as "Process prerequisites failed, but no retry information is available. Process will not be retried.”
In addition to the message on the Jobs page, you should receive an email message with "A process has failed" in the Subject line. This is the result of the SystemAlertProcessFailed alert that we configured earlier, and for which we specified an email action.
You can view the log file for failed process through the Jobs page.
Let's view the job's log file for the failed process we created previously.
To view the job’s log file for the failed process
1. On the Navigation Tree, click Automator. Under Standard Processes, select Jobs.
2. On the displayed page, select the failed process.
3. Click the View Job Log icon  . The Job's log will be displayed.
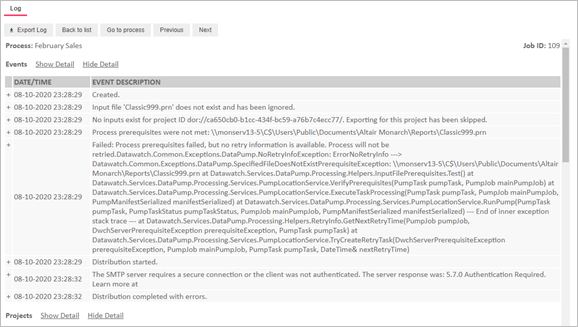
Note that in the illustration above the first line states:
Input file 'Classic999.prn' does not exist and has been ignored.
No inputs exist for project…
Failed: Process prerequisites failed, but no retry information is available. Process will not be retried.Datawatch.Common.Exceptions.DataPump.NoRetryInfoException: ErrorNoRetryInfo