


|
Scheduling a Process
In addition to running processes manually, as we already did with the Automator Tutorial, we can schedule a process to run at a specific time on a particular day and at a definite interval. Let’s try scheduling a process to run.
Since we have already run the January Sales process manually, we need to create a new process to specify a schedule for it. Let's create a new February Sales process.
Steps
1. Create a new ClassFeb project. For instructions, refer to the "Creating a Project File with the Project Editor" topic.
|
|
NOTES Specify the ClassFeb.prn as an input file for the ClassFeb project located at C:\Users\Public\Documents\Altair Monarch\Reports\ClassFeb.prn. |
|
|
|
|
|

2. Create a new February Sales process on the Processes page according to the workflow described in the "Creating a Process" topic.
|
|
NOTES When assigning a project file to the process select the ClassFeb project from the Server Library. |
|
|
|
|
|
3. After you specify parameters of the February Sales process, click the Save/Edit button.
4. On the displayed page, select the Schedule tab.
5. On the Schedule tab, click the Add New Schedule icon  .
.
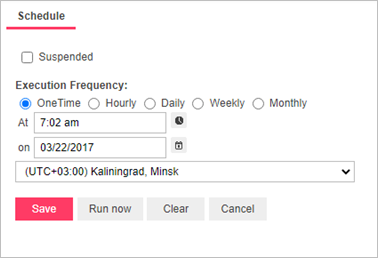
6. On the displayed page, under Execution Frequency select the One Time option since we only need to run our process once.
|
|
NOTES If we needed to run the process on a hourly, daily, weekly, or monthly basis we could select the corresponding option. For detailed information about execution frequency settings, refer to the "Execution Frequency" topic in the web help. |
|
|
|
|
|
7. In the At field, set the time you want the process to run. We will add five minutes to the current time (for example, if the current time is 6:57, enter 7:02).
8. In the On field, set the start date of the process. For this click the Calendar icon  adjacent to the field and choose the current date.
9. Select the appropriate timezone from the drop-down list. We will select (UTC+03:00) Kaliningrad, Minsk.
10. Click the Save button, to save the schedule.
In five minutes, when the specified run time arrives, the process will be run, spawning a job on the Jobs page. If the process fails to run, you can consult the web help for possible explanations. You can also refer to the project’s log file for additional information.
After the February Sales process runs, check the FirstQuarterSales2010 output file to see if the data were successfully extracted and exported from the ClassFeb report.
Steps
1. Using Windows Explorer, navigate to the Exports folder typically located in C:\Users\Public\Documents\Altair Monarch\Export.
2. Double-click the FirstQuarterSales2010 spreadsheet to open it in MS Excel. You will see that the output file now contains January Sales and February Sales worksheets.
3. Proceed to the February Sales worksheet to make sure that the data from the ClassFeb report has been successfully extracted.
4. Close the FirstQuarterSales2010 spreadsheet.
Now that we’ve run processes both manually and via a scheduled runtime, let’s go on to Lesson 4, where we will work with distributions.