


|
Pivoting Columns
Pivot allows you to transform column values into columns headers, in effect transforming data from a tall/skinny to a short/wide format. This transformation enables quick summarization and extraction of important information from large data sets.
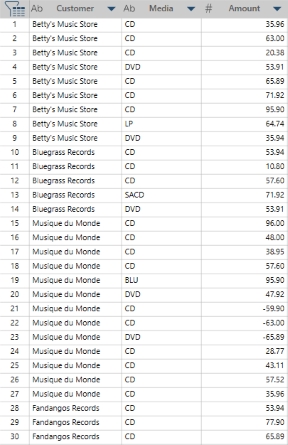
For example, a table (with 91 rows) that looks like this:
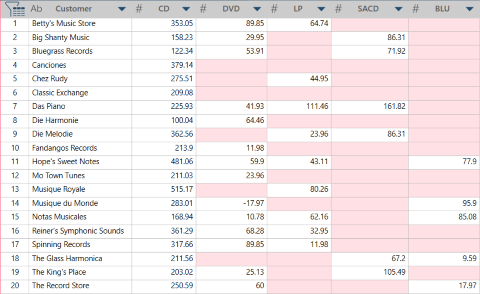
Can be pivoted on Media and grouped on Customer to obtain a table with only 13 rows:
You can only pivot columns from the Prepare Window.
Pivoting columns
Steps:
-
In the Prepare window, select the table you want to transform.
-
Select Transform on the Monarch Data Prep Studio Toolbar.
-
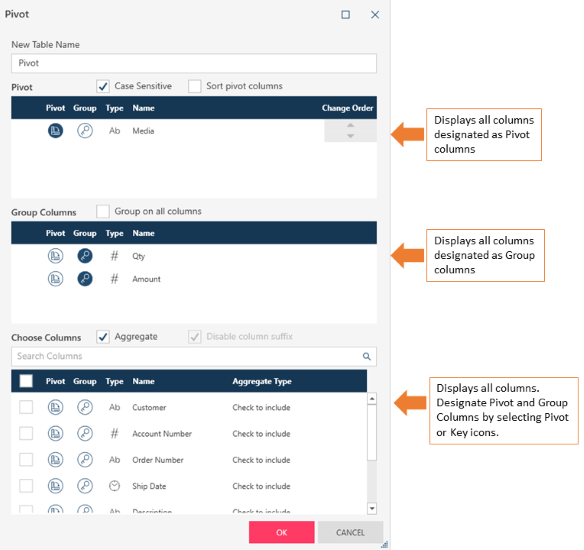
Select Pivot Column to display the Pivot Columns dialog:
-
Set the pivoting options.
-
Enter the name of the resulting table
-
Click the Case Sensitive box if you want to differentiate values based on case. For instance, CD and cd are considered two distinct values if case sensitivity is on.
-
Click Aggregate if you want to define totals and/or subtotals for each grouping.
-
Select the column(s) to pivot.
When selecting which column to pivot, think of the column that can best summarize your data (i.e., yield the most compact table) and give you the information you need. In the example above, the table includes 13 customers, 5 media types, and 91 different amounts. If you want to answer the question, "Which customer bought the most (in terms of amount) of a specific media type," you can select either Customer or Media Qty as the column to pivot. However, choosing the former yields a table with 13 columns, whereas choosing the latter yields a table with only 5 columns. Thus, choosing Media Qty as the column to pivot may be the more logical action.
-
Select the columns to group.
-
Select the column to use as values (rows) in the resulting pivot table.
-
Select the operation to apply to the values column. In the present example, since we want to know total amounts, we select the operation "Sum".
-
Select OK when you are finished.
A dialog box allows you to select a transformation.
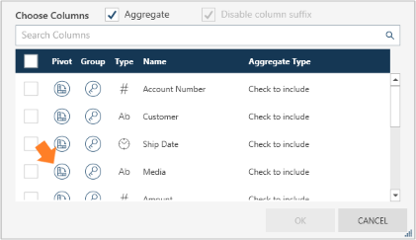
To select a pivot column, select the pivot icon beside a column on the Choose Columns section of the dialog box.
In this example, we are selecting Media as a pivot column:
The pivot columns you select are moved to the Pivot Columns section of the dialog box.
You can select more than one pivot column.
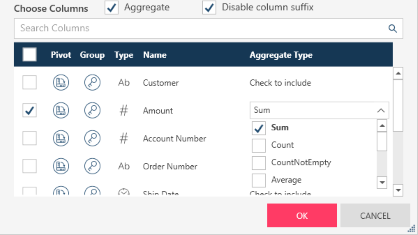
To do so, select the key icon beside a column on the Choose Columns section of the dialog box.
In this example, we are selecting Qty as a group column:

The group columns you select are moved to the Group Columns section of the dialog box.
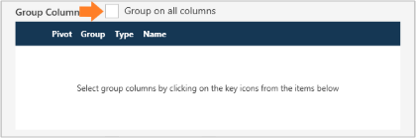
You can select more than one group column. If you want to group on all columns, click the Group on all columns box at the top of the Group Columns panel:
Similar to Step 5, thinking of the column to use as values requires some consideration of the information you are trying to obtain. Recall that we are trying to answer the question, "Which customer sold the most (in terms of amount) of a specific media type" in Step 5. Since we want to find out how much each customer bought, we use Amount as the values column.
To select a specific columns to use as a value, check the box beside a column.
To select all columns check the box on the header row at the top of the Choose Columns panel:

The new table is created and displayed in the Prepare window.
Modifying pivot and group columns
As discussed earlier, columns you select as pivot or group columns are moved to the corresponding (Pivot or Group) section on the Pivot dialog. Also, note that the icon for pivot or group is highlighted to indicate the column's role in the transform:
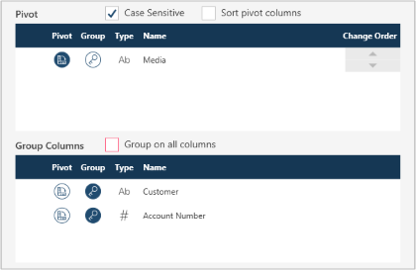
To modify the role, click on the icon beside the column.
For example:
-
To remove Customer as a group column, click the key icon beside it on the Group Columns section to deselect it.
-
To make Customer a pivot column instead of a group column, click the pivot icon beside it on the Group Columns section.
-
To modify the order of Pivot columns, click the up or down arrows beside a pivot column.