Manufacturing Solutions

Multistage Setup

Multistage Setup

Previous topic Next topic Expand/collapse all hidden text  

Multistage Setup

Previous topic Next topic JavaScript is required for expanding text JavaScript is required for the print function  

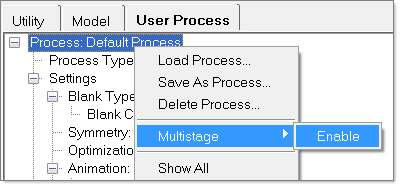
The following sections show you how to set up and run a Multistage process from the Process Browser:

hmtoggle_plus1greySetting Up a Multistage Process
1.Select View > User Process. The User Process browser appears.
2.Position your mouse in the empty space of the browser, right-click and then select Multistage > Enable:

multistage_process

3.The Multistage browser appears:

multistage

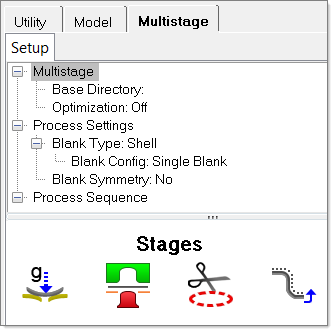
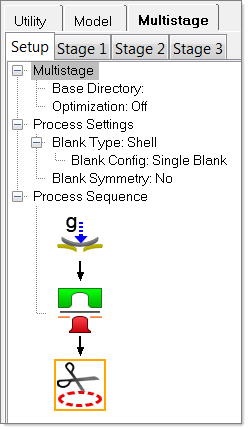
Once you enable Multistage, the User Process browser displays a Setup tab with options for you to define your process.  A new tab appears for each stage you add to your process.

4.To add stages to your process, double-click any of the Stages tools that are located on the bottom of the Multistage browser. The stages you add appear on the tree under Process Sequence.

The following image shows a multistage process with three stages:

multistage_setup

5.To define, delete or change the sequence of stages, right-click Process Sequence, and then select from the options on the context menu.

Note: The Multistage setup is not available for the Blank type, Composite.


hmtoggle_plus1greyRunning a Multistage Analysis in Batch Mode

To run a multistage analysis in batch mode on a remote system, do the following:

1.Open a command window.
2.Change the current directory to the folder where the multistage process is located.
3.Call HyperMesh in batch mode hmbatch.exe with the –tcl option pointing to the file: batch_msm.tbc at this location: <install_directory>\hm\scripts\hyperform\userprocess.


The following sections provide information about the specific tools and options that are available to you when setting up a multistage process:

hmtoggle_plus1Setup Options

Once you enable the Multistage option from the User Process browser, a Setup tab appears with the following options.  To modify an option, right-click it, and then select from the options on the context menu.

Option

Action

Base Directory

Select Set. A dialog appears for you to specify a directory to save your multistage process.

Optimization

Select on or off to activate or deactivate the Optimization option.

Process Settings

Define settings for Blank Type, Blank Config, and Blank Symmetry.

Process Sequence

Select Delete, Move up or Move down to change the sequence of stages in the process. Select Details to define a stage.


hmtoggle_plus1Stages Tools

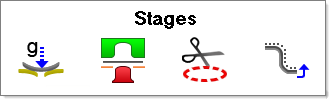
The Setup tab includes a series of tools that you can use to add specific stages to a multistage process. The tools include Gravity, Forming, Trimming, and Springback as shown respectively in the following image:

HF_3003_02_stages

To add a stage to your process, double-click a stage. The stage is added to your process and appears on the tree under Process Sequence.


Stages and Blank Setup

The setup for each stage in a multistage setup is similar to the setup in the User Process. An exception is the setup of the blank. In a multistage setup, the blank is defined in Stage 1, and the following applies:

All successive stages inherit the blank from Stage 1.
Blanks include a context menu that you can use to call information from the previous stage.
Settings for the blank material and thickness are sourced from Stage1, and do not need to be re-entered.


hmtoggle_plus1Context Sensitive Menu

On the Setup tab, right-click and the following menu appears:

Option

Description

Open

Opens an existing multistage setup from a specified directory.

Save

Saves the multistage setup in a base directory. Each stage of the setup is saved in a unique sub-folder in the base directory.

Multistage

Turns the multistage analysis on or off.

Run Live

Runs the multistage process from the current active stage. HyperForm is open in the background while the analysis is running.

Run Batch

Runs the multistage setup in batch mode from the current active stage.