HyperXtrude® is a finite element program that enables you to:
| • | Analyze material flow and heat transfer problems in extrusion and rolling applications |
| • | Perform several analyses starting from a coarse mesh |
| • | Perform mesh refinements automatically |
| • | Solve problems commonly encountered in the metal and polymer extrusion industries where materials undergo plastic deformation |
| • | Solve both isothermal and non-isothermal flows |
| • | Handle several material models with robust solution algorithms |
The process flow for a typical HyperXtrude run is shown in the diagram below:
The HyperXtrude Solution Process
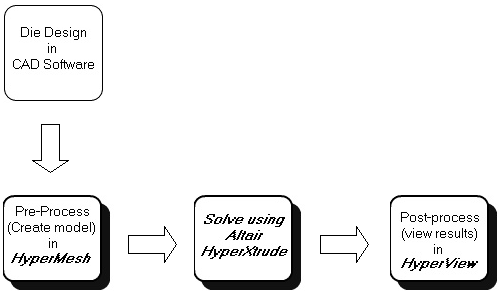
HyperXtrude process flow
The HyperMesh Window

There are several main areas in the window:
Area
|
Description
|
Title bar
|
The bar across the top of the interface is the title bar. It contains the version number you are running and the name of the current file.
|
Graphics area
|
The graphics area under the title bar is the display area for your model. You can interact with the model in three-dimensional space, in real time. In addition to viewing the model, entities can be selected interactively from the graphics area.
|
Menu bar
|
Located just under the title bar. Like the drop down menus in many graphical user interface applications, these menus "drop down" a list of options when clicked. Use these options to access different areas of functionality.
|
Toolbar
|
These buttons provide quick access to commonly used functions, such as changing display options.
|
Command Window
|
You can type HyperMesh commands directly into this text box and execute them instead of using the graphical user interface.
|
Utility Menu
|
This area contains macros and steps that guide the user to create HyperXtrude solver input files. Other macro pages also available and the content of the Utility Menu changes based upon the selected user profile.
|
Status bar
|
Any warning or error messages display in the status bar. Warning messages appear in green and error messages appear in red.
|
Panel menu
|
The panel menu displays for each page the functions available on that page. You access those functions by clicking on the button corresponding to the function you wish to use.
|
Utility Menu
The Utility menu allows you to customize the standard interface to include: buttons, radio options, and text that has HyperMesh-supplied and user-defined macros associated with it. The menu can be docked on either the left or right side of the graphics area.
A macro file controls the display and available operations of the Utility menu. Attributes that you can change include:
| • | Page that displays the menu |
| • | Text to be displayed on the control |
| • | Location and size of the menu |
| • | Help message to be displayed on the menu bar |
| • | Macro to call, with optional arguments to pass |
Using the Mouse
The mouse attached to your system is integral to HyperMesh and can be used in almost every aspect of user input. A two- or three-button mouse may be used.
The mouse buttons have these functions:
Button
|
Function
|
Left mouse button
|
Performs selection operations.
|
Right mouse button
|
Deselects entities in the graphics area. Aborts graphics operations.
|
Middle mouse button
|
In the rotate (r) and arc dynamic motion (a) modes, selects a new center of rotation when you pick a node in the model.
|
CRTL + left mouse button
|
Dynamically rotates the model
|
CRTL + middle mouse button
|
Zooms into an area of the model
|
CRTL + right mouse button
|
Pans the model
|
You can also use CTRL + C and CTRL + V to copy and paste text and numeric information.
HyperXtrude User Profile
HyperMesh is designed to accommodate many different FE solvers. As a result, some panels may be too general for HyperXtrude users. By selecting the HyperXtrude user profile, you can work with pre-defined panels that are more specific to HyperXtrude usage.
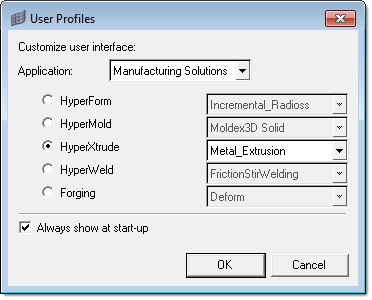
Step 1: Load the HyperXtrude user profile
| 1. | Select Start Menu > All Programs > Altair HyperWorks > Manufacturing Solutions > HyperXtrude to launch the HyperXtrude user interface. |
| 2. | The User Profiles dialog appears with Manufacturing Solutions as the default application. If it does not appear, you can access it from the menu bar by clicking Preferences > User Profiles. |
| 3. | Select HyperXtrude and Metal Extrusion. |
HyperXtrude Utility Menu
The buttons in the Utility Menu fall into three categories: a) shortcuts to native HyperMesh panels, b) TK popup menus, and c) opens other macro panels.
Import Data
|
CAD
|
Import CAD drawing
|
HM
|
Import a HyperMesh file
|
HX
|
Import HyperXtrude mesh (*.grf file) and the parameter (*.hx) files with process parameters
|
Select Units
|
Set the units used in modeling the problem
|
2D Elems
|
Control 2D element display
|
3D Elems
|
Control 3D element display
|
BCs
|
Control display of loads
|
Lines
|
Control display of lines
|
Surfs
|
Control display of surfaces
|
Clear Temp Nodes
|
Remove all temporary nodes
|
Extrusion Wizard
|
Process automation tool to help create HyperXtrude analysis files
|
Material Data
|
Select materials from material database and assign material properties to different components. You can also view Viscosity/Flow stress graph for a material
|
Boundary Conditions
|
Create/Edit BC
|
Define and assign boundary conditions on element faces
|
Check Undefined BC
|
Check for the element faces without any loads defined for them
|
Check Duplicate BC
|
Identify element faces with duplicate loads
|
Update 7.0 BC
|
Read old data files created for HyperXtrude 7.0 and converts boundary conditions to native HyperMesh format
|
Process Data
|
Parameters
|
Specify run control parameters
|
Extract Points
|
Define solution monitoring points in the mesh
|
Model Summary
|
Displays a summary of number and types of elements in the model
|
Export Data
|
HX
|
Create HyperXtrude data files
|
Save HM
|
Save the data in HyperMesh format
|
Launch Solver
|
Launch the HX Solver using the current model, using the data deck or using a restart file
|
Step 2: Retrieve a HyperMesh Database File
The model files for this tutorial are located in the file mfs-1.zip in the subdirectory \hx\MetalExtrusion\. See Accessing Model Files.
To work on this tutorial, it is recommended that you copy this folder to your local hard drive where you store your HyperXtrude data, for example, “C:\Users\HyperXtrude\” on a Windows machine. This will enable you to edit and modify these files without affecting the original data. In addition, it is best to keep the data on a local disk attached to the machine to improve the I/O performance of the software.
| 1. | From the File menu, click Open. |
| 2. | Browse to the file HX_0000.hm. |
Step 3: Save Your Work as a HyperMesh Binary Database
| 1. | From the File menu, click Save As. |
| 2. | Type the file name in the file browser. Make sure to give it a .hm file extension. |
Return to HyperXtrude Tutorials


