The Export Data group of the HyperXtrude Utility menu enables you to export .grf and .hx files, which make up the HyperXtrude data deck or save the model as a HyperMesh (.hm) file.
The .grf file contains nodes, elements, boundary faces, material data, material assignment, boundary data, and other problem data. The .hx file contains the process parameters and control commands.
The HX macro, which opens the Export HyperXtrude File dialog, also provides several other options, such as renumbering entries and whether to automatically start the solver.
How Do I…
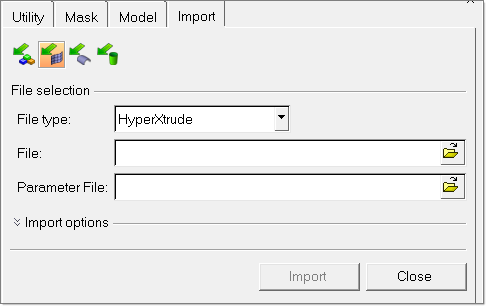
To import HyperXtrude data decks, click on the import icon on the toolbar  or click on File > Import > Solver Deck. Select HyperXtrude under File Type. If you are sharing files with your customers or colleagues, the ideal way to share the data is with a HyperMesh file, not the HyperXtrude data decks. The principal reason for this is because HM files have additional metadata that is not exported to the data decks. or click on File > Import > Solver Deck. Select HyperXtrude under File Type. If you are sharing files with your customers or colleagues, the ideal way to share the data is with a HyperMesh file, not the HyperXtrude data decks. The principal reason for this is because HM files have additional metadata that is not exported to the data decks.
When you import a model using the import tab, specify .grf file in the File field and a .hx or .tcl file in Parameter File. It is not necessary to import the TCL file and at this point, all the parameters in the TCL file are not read back into HyperMesh.
|
| 1. | Click Export/Launch Solver in the HyperXtrude Utility menu. |
| 2. | Type a directory name in which you want to store the data files. You can also click the  button to browse for a directory. Type a name for the file and click Save. button to browse for a directory. Type a name for the file and click Save. |
| 3. | Select the model type in the Model type field: three-dimensional, axisymmetric, or two-dimensional. |
| 4. | Choose whether to renumber all entities in the Renumber all entities field. |
| 5. | Select which entities to export in the Export entities field: all, displayed, or select. The Select option enables you to create partial .GRF files by individually selecting any combination of components, load collectors (for boundary condition faces or boundary data), and materials. |
| 6. | Select whether to start the HyperXtrude solver after exporting the data files in the Launch solver field. |
Advanced options allow you to configure the export for using multiple CPU/Core in a shared memory system and also to export the parameter with a TCL extension or HyperXtrude extension.
|
| 1. | Click on the File menu and select Save as. Select the suitable location in the pop-up window. |
Or
| 2. | Click File > Save to save the current changes to the HM model file. |
|
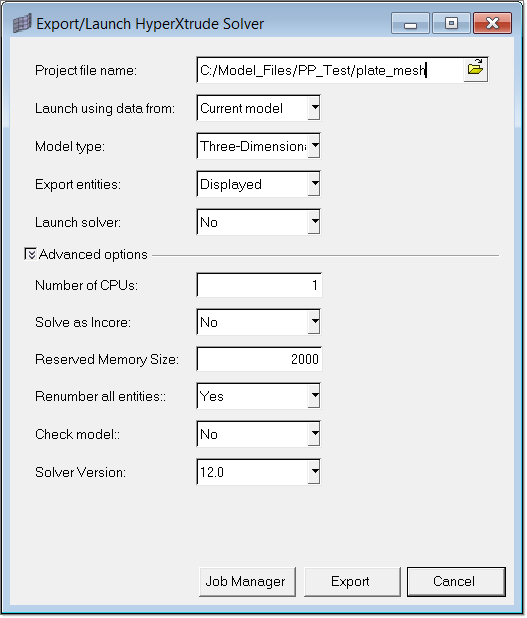
Select options on the dialog and click Export to both export the HyperXtrude output files and start the solver with the parameters you have specified.
Field
|
Description
|
Project file name
|
Click the button to select a location to store the data files.
|
Launch Using Data From
|
Select whether to load data from the current model, an existing data deck (*.hx or *.tcl file), or a restart file (*.phx file).
|
Model type
|
Select the type of model. This option will be disabled if the Launch using is current model and restart file.
|
Renumber all entities
|
Choose whether to renumber all entities.
|
Export entities
|
Select which entities to export: all, displayed, or select. The Select option enables you to create partial .grf files by individually selecting any combination of components, load collectors (for boundary condition faces or boundary data), and materials.
|
Check model
|
Choose whether to run a quality check on the model before exporting the files. If a check fails, the export is canceled.
|
Launch solver
|
Select whether to start the solver in interactive mode or batch mode.
|
Advanced Parameters
These parameters are disabled if the Launch using data from field is set to current model.
Field
|
Description
|
Number of CPUs
|
Specify the number of CPU’s
|
Solve as Incore
|
If you select yes, specify appropriate Reserved Memory Size. This will disable scratch files and improve the speed-up in parallel operations. However, your computer should have a large RAM (32+ GB) to handle large models.
|
Reserved Memory Size
|
Specify suitable reserved memory size
|
Renumber all entities
|
Choose whether to renumber all entities.
|
Check Model
|
Choose whether to run a quality check on the model before exporting the files. If a check fails, the export is canceled.
|
Solver Version
|
If the solver version is 12.0, then the extension of parameter file will be HX. This will work only with 12.0 solver.
If the solver version is 10.0 or older, then the extension of the parameter file will be TCL. This will work with all versions.
|
When you click Export on the dialog, the solver starts automatically reading the directory from the .hx or .tcl file. If you chose Data Deck in the Launch using data from field, the .hx or .tcl file can also load a .grf or .phx file in that directory.
| Note: | This feature is only available on the Windows platform. |
|
See Also:
HyperXtrude User Profile
Exporting HyperXtrude Data Files


