The Bend tool is a macro that lets you set up tube bending models for both the RADIOSS Incremental and LSDYNA user profiles. The model setup occurs in two stages: building the tools of the model using Bend > Model Creator, and then setting up the model using Bend > Setup.
Model Creator
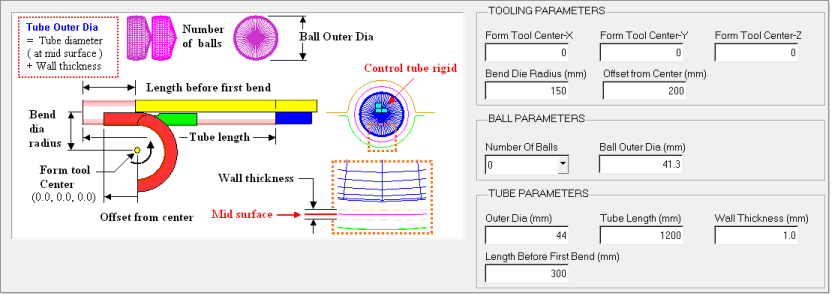
The Model Creator dialog allows you to input the tool geometry and tube parameters. The mandrel parameters can be added as an optional data and referred as Ball parameters. If the number of the ball is set to zero then a tube bending model without mandrel is created. The input geometry parameters are self explanatory with the picture embedded in the dialog.
Apply builds the tool and tube model on the screen based on the input parameters. This is one time operation; the created geometry model cannot be edited later using this macro.
After the model is created, you need to create and assign material and property to the tube component.
Bend Setup
| 1. | Select Tools > Bend > Bend Setup. The following dialog appears for you to pick a component for the Tube and each of the tube bending tools: Form die, Mandrel, Wiper die, and Pressure die.
|
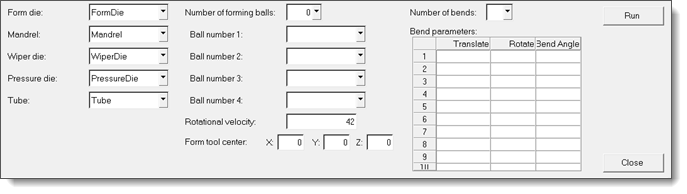
| • | The components are auto-selected if you created the bending tools using the Model Creator. |
| • | The Rotational velocity is set by default to 42 rad/sec.
|
| 2. | To complete the model setup, you must provide the number of bends and the following descriptions for each bend: |
| • | Translate: Distance the tube needs to be translated before bending. |
| • | Rotate: Angle the tube needs to be rotated before bending. |
| • | Bend Angle: Angle at which the tube needs to bend. |
Note that for the first bend, the value for Translate and Rotate is zero as the model is already built with Translate and Rotate for the tube.
| 3. | To create the necessary deck and start the solver, click Run. |
| 4. | Once the run has started, you can click Close to hide the dialog. |


