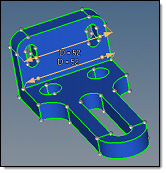
In practice, changing of a linear dimension in a model normally implies either stretching/compressing in the direction of the modified dimension or changing of a diameter/radius. With the dimensioning tool, a combination of both modification types is provided. For the example below, one of the two D=52 dimensions is changed to D=60. How the offset is performed will give different results (both of which may be valid) depending on which of the two manipulators is changed.
|
|
|
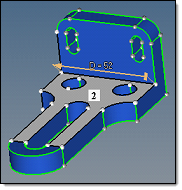
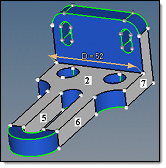
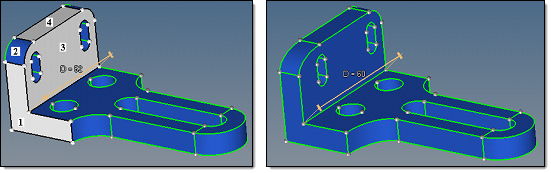
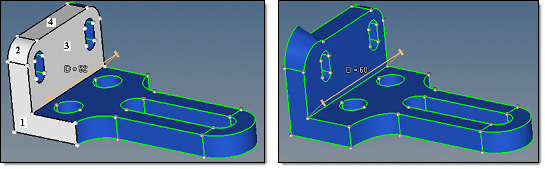
Original model
|
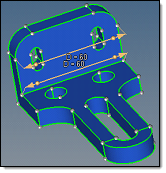
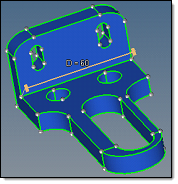
Edge fillet surfaces selected; fillet radius is scaled
|
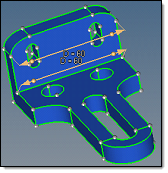
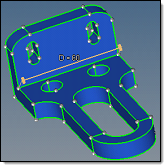
Edge fillet surfaces involved; linear scaling only, fillet curvature changes.
|
When the value of the upper dimension manipulator is modified from 52 to 60, the edge fillet surfaces are adjacent to the modified manipulator and are offset as selected surfaces. As such, they are offset with the LSC interpolation, which results in a preservation of their shape along with the change in radii.
When the value of the lower dimension manipulator is modified from 52 to 60, the edge fillet surfaces are not adjacent to the modified manipulator and are curved, so they are offset as involved surfaces. Using automatic interpolation, it is recognized that these two curved surfaces can be simply stretched to provide the model continuity via the global interpolation method.
When using manual surface selection and changing the same lower dimension, a variety of results are obtainable depending on the selected surfaces. Some of the possible results are shown below.
| Note: | In each row of 3 images, the first two show the initial selection from two angles (to reveal all of the selected surfaces), while the third shows the results of the dimension change based on those selected surfaces. |
|
|
|

|
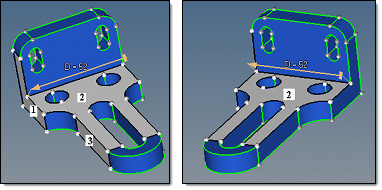
Original model, 3 surfaces selected
|
Original model, 3 surfaces selected
|
Result of the dimension 52 change to 60
|
|
|
|
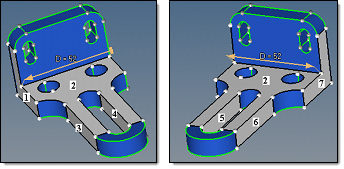
Original model, 4 surfaces selected
|
Original model, 4 surfaces selected
|
Result of the dimension 52 change to 60
|
|
|
|
Original model, 5 surfaces selected
|
Original model, 5 surfaces selected
|
Result of the dimension 52 change to 60
|
|
|
|
Original model, 6 surfaces selected
|
Original model, 6 surfaces selected
|
Result of the dimension 52 change to 60
|

|
|
|
Original model, 7 surfaces selected
|
Original model, 7 surfaces selected
|
Result of the dimension 52 change to 60
|
The following steps are used to calculate the offset values of the selected surfaces:
| 1. | The required shift in the manipulator direction is calculated as a difference between the requested distance and the actual distance between the manipulator ends. |
| 2. | If both manipulators ends are allowed to move, the required shift is divided by two. |
In the auto sides selection mode, an end is allowed to move if it belongs to a surface that is automatically selected to move. When this can be overridden manually by you, the lock controls appear.
In the manual sides selection mode, an end is allowed to move if it belongs to a manually selected surface, and the surface normal at the manipulator end forms an angle with the manipulator direction that is less than arccos(0.05) (87.134016 degrees).
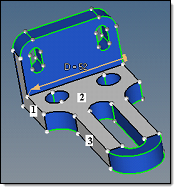
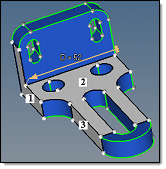
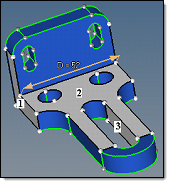
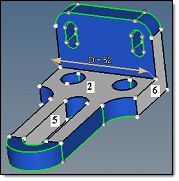
For example, the right end of the manipulator belongs only to selected surface 2. The normal to surface 2 at the right end creates a 90 degree angle with the manipulator and thus the end is not allowed to move. The left manipulator end belongs to both selected surfaces 1 and 2. The normal to surface 1 at the left end makes a 0 degree angle with the manipulator direction, and thus the left end is allowed to move.
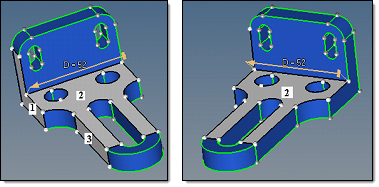
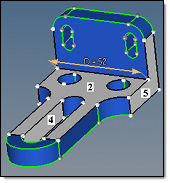
In the following example, the right end belongs to selected surfaces 2 and 7, with the left end belonging to selected surfaces 1 and 2. Thus, both ends are allowed to move.
| 3. | When only planar surfaces are selected, the absolute value of its normal offset is defined as the absolute value of the required shift multiplied by the cosine between the normal to the surface and the manipulator direction. |
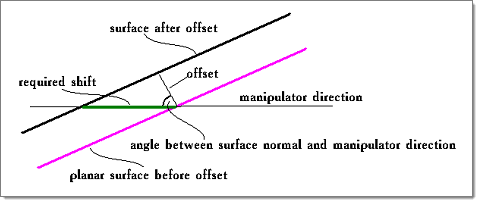
For a planar surface, this provides that its shift in the manipulator direction is equal to the required shift.
When curved surfaces are included in the manual sides selection, the rules of the offset value calculations are more complex. The problem in this case originates from the fact that a selected curved surface can provide a smooth link between the selected planar surfaces that are tilted by different angles versus the manipulator direction. When smoothly adjacent surfaces are offset, they must be offset by the same value to ensure continuity of the result, because in this case it is not possible to reconcile the different offset values as discussed earlier. This means that the planar surfaces with a different tilt towards the manipulator direction cannot be offset by different distances, as shown above, when the planar surfaces are smoothly linked by a selected surface.
The current algorithm to define the offset value in the general case (for both curved and planar surfaces) is as follows. For a selected surface adjacent to the manipulator end, its offset is calculated as shown in the image above, based on the normal to the surface at the manipulator end. For a selected surface that is not adjacent to the manipulator end, a chain of selected surfaces that links it to the related end is detected, and the offset is calculated along the chain, from the previous surface to the next one. The calculation along the chain is based on the following:
| • | If the surfaces are smoothly adjacent, the offset value is directly passed from one surface to the next. |
| • | If the surfaces are not smoothly adjacent, the offset is calculated in such a way that for a planar surface the result as shown in the image above is obtained. |
The problem here is that when several chains of selected surfaces connect a selected surface with the related manipulator end, the offset results for the surface obtained along the different chains can contradict each other. Then the dimensioning result may be corrupt. Therefore, it is important to make appropriate manual surface selections.
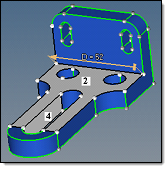
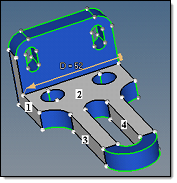
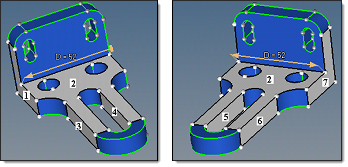
Surfaces 1, 2 and 4 selected, D=52 changed to D=60. Surfaces 1, 2 and 4 offset by 8.
Surfaces 1, 3 and 4 selected, D=52 changed to D=60. Surface 1 offset by 8, Surfaces 3 and 4 by 0.
Surfaces 1, 2, 3 and 4 selected, D=52 changed to D=60. The result is corrupt.
| 4. | For each selected surface the sign of the offset is defined so that it will move in the same direction as the manipulator end to which it is related. |
A surface can be related to one, and only one, of the manipulator ends. For this, first, the manipulator end must be allowed to move. Second, the surface should be linked to the manipulator end over a chain of adjacent selected surfaces. Third, in the case when the surface is linked to both manipulator ends which are allowed to move, the surface will be related to the end that is closer to it.
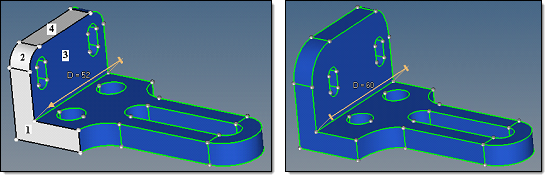
As an example, selected surface 2 will have an offset of 0, because cos(90) = 0. The purpose for selection of this surface is just to provide a link from the manipulator ends to the other selected surfaces. Surface 1 is at the moving manipulator end, and surface 3 moves as surface 1.
Following the same rules, surfaces 1 and 7 are at the moving manipulator ends. Surfaces 3 and 5 move as surface 1, and surfaces 4 and 6 move as surface 7.
See also
Dimensioning panel
Dimension Manipulators
Dimensioning Panel Options


