PostgreSQLのインストールとコンフィギュレーション

PostgreSQLは、Postgresとも呼ばれる、拡張性と標準の準拠に重点が置かれた、オブジェクト関係データべース管理システムです。

PostgreSQLは、単一マシンの小さなアプリケーションからインターネット向け、またはデータウェアハウス向けの多くの同時ユーザーを有する大規模アプリケーションまで、さまざまな作業負荷を処理できます。ACIDに準拠し、トランザクションを行います。PostgreSQLは、更新可能ビューおよびマテリアライズドビュー、トリガー、外部キーを備え、関数およびストアドプロシージャをサポートし、その他の拡張性を提供します。

PostgreSQLは、多くの企業および個々のコントリビューターによる多様なグループである、PostgreSQL Global Development Groupによって開発されています。無償のオープンソースで、パーミッシブソフトウェアライセンスであるPostgreSQLライセンスの下でリリースされています。詳細は、https://www.postgresql.org/をご参照ください。

前提条件

システム要件

プラットフォーム 64ビット 32ビット
Windowsバージョン 2016、2012 R2およびR1、2008 R2、7、8、10 2008 R1、7、8、10

PostgreSQLインストーラー

次のインストーラーを使用して、PostgreSQL: postgresql-10.1-2-windows-x64.exeまたはこれ以降を設定します。PostgreSQLの実行ファイルは、HyperMeshソフトウェアのインストールの一部としてインストールされます。PostGresDBをインストールするための別のインストーラが表示されます。

PostgreSQLのインストール

ここでは、PostgreSQLのインストール方法について学習します。

このインストールは、デフォルトの値およびオプションを使用して実行することをお勧めします。また、Windowsの管理パスワードの入力を求められたら、ご自身のWindowsパスワードを使用できます。

  1. 管理モードでコマンドプロンプトを開きます。
  2. コマンドプロンプトからインストーラー(postgresql-10.1-2-windows-x64.exeまたはこれ以降)を起動します。
    注: インストーラーは、コマンドプロンプトのみから起動する必要があります。これにより、PostgreSQLが正しくインストールされ、機能するために必要なWindowsネイティブユーティリティへのパスが自動的に解決されます。
  3. pgAdmin 4ツール(インストールに含まれます)を起動し、すべての権限を持つユーザーを1人追加します:
    1. 以下のイメージのように、Login/Group Rolesノードが表示されるまで、Serversノードを展開します。
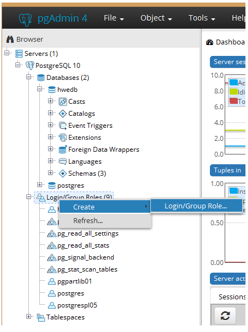

      図 1.
    2. Login/Group Rolesで右クリックし、コンテキストメニューからCreate > Login/Group Role...を選択します。
      Login Roleダイアログボックスが表示されます。
    3. GeneralタブのName欄にhweuserと入力します。
    4. Definitionタブでクリックし、Password欄にhwe_123と入力します。
    5. Privilegesタブでクリックし、すべての欄をYesに設定します。
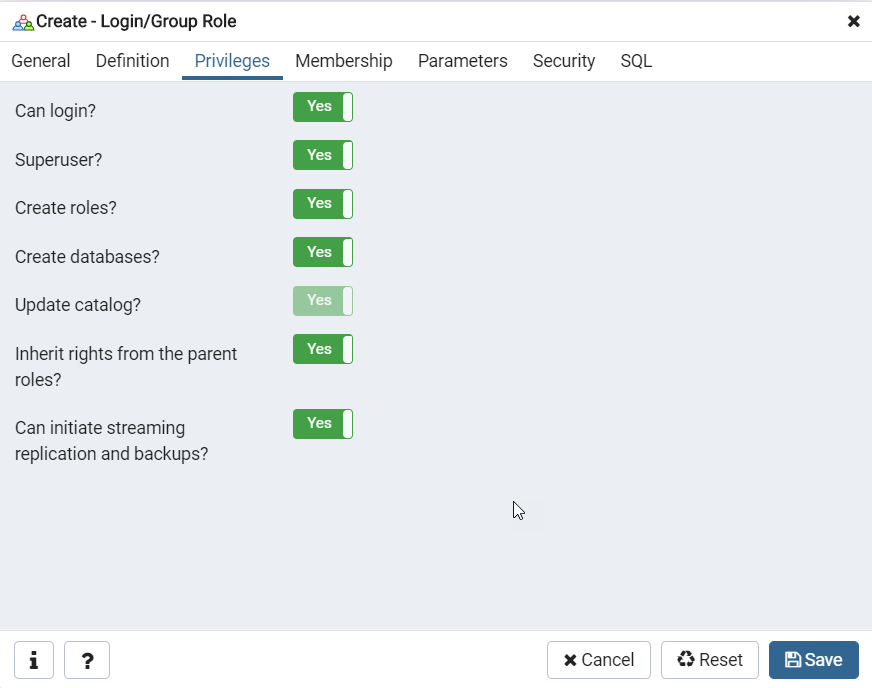

      図 2.
    6. Saveボタンをクリックします。
      注: 接続制限は30で設定する必要があります。
  4. カスタマイズされたpg_hba.confファイルを作成します。
    1. Notepadなどのテキストエディタをシステム上で開きます。
    2. 以下のコードをコピーしてテキストエディタに貼り付けてください。
      # PostgreSQL Client Authentication Configuration File
      # ===================================================
      #
      # Refer to the "Client Authentication" section in the PostgreSQL
      # documentation for a complete description of this file.  A short
      # synopsis follows.
      #
      # This file controls: which hosts are allowed to connect, how clients
      # are authenticated, which PostgreSQL user names they can use, which
      # databases they can access.  Records take one of these forms:
      #
      # local      DATABASE  USER  METHOD  [OPTIONS]
      # host       DATABASE  USER  ADDRESS  METHOD  [OPTIONS]
      # hostssl    DATABASE  USER  ADDRESS  METHOD  [OPTIONS]
      # hostnossl  DATABASE  USER  ADDRESS  METHOD  [OPTIONS]
      #
      # (The uppercase items must be replaced by actual values.)
      #
      # The first field is the connection type: "local" is a Unix-domain
      # socket, "host" is either a plain or SSL-encrypted TCP/IP socket,
      # "hostssl" is an SSL-encrypted TCP/IP socket, and "hostnossl" is a
      # plain TCP/IP socket.
      #
      # DATABASE can be "all", "sameuser", "samerole", "replication", a
      # database name, or a comma-separated list thereof. The "all"
      # keyword does not match "replication". Access to replication
      # must be enabled in a separate record (see example below).
      #
      # USER can be "all", a user name, a group name prefixed with "+", or a
      # comma-separated list thereof.  In both the DATABASE and USER fields
      # you can also write a file name prefixed with "@" to include names
      # from a separate file.
      #
      # ADDRESS specifies the set of hosts the record matches.  It can be a
      # host name, or it is made up of an IP address and a CIDR mask that is
      # an integer (between 0 and 32 (IPv4) or 128 (IPv6) inclusive) that
      # specifies the number of significant bits in the mask.  A host name
      # that starts with a dot (.) matches a suffix of the actual host name.
      # Alternatively, you can write an IP address and netmask in separate
      # columns to specify the set of hosts.  Instead of a CIDR-address, you
      # can write "samehost" to match any of the server's own IP addresses,
      # or "samenet" to match any address in any subnet that the server is
      # directly connected to.
      #
      # METHOD can be "trust", "reject", "md5", "password", "scram-sha-256",
      # "gss", "sspi", "ident", "peer", "pam", "ldap", "radius" or "cert".
      # Note that "password" sends passwords in clear text; "md5" or
      # "scram-sha-256" are preferred since they send encrypted passwords.
      #
      # OPTIONS are a set of options for the authentication in the format
      # NAME=VALUE.  The available options depend on the different
      # authentication methods -- refer to the "Client Authentication"
      # section in the documentation for a list of which options are
      # available for which authentication methods.
      #
      # Database and user names containing spaces, commas, quotes and other
      # special characters must be quoted.  Quoting one of the keywords
      # "all", "sameuser", "samerole" or "replication" makes the name lose
      # its special character, and just match a database or username with
      # that name.
      #
      # This file is read on server startup and when the server receives a
      # SIGHUP signal.  If you edit the file on a running system, you have to
      # SIGHUP the server for the changes to take effect, run "pg_ctl reload",
      # or execute "SELECT pg_reload_conf()".
      #
      # Put your actual configuration here
      # ----------------------------------
      #
      # If you want to allow non-local connections, you need to add more
      # "host" records.  In that case you will also need to make PostgreSQL
      # listen on a non-local interface via the listen_addresses
      # configuration parameter, or via the -i or -h command line switches.


      # TYPE  DATABASE        USER            ADDRESS                 METHOD
      
      # IPv4 local connections:
      host    all             all             127.0.0.1/32            md5
      host    all 	     all 	      0.0.0.0/0 	      trust
      # IPv6 local connections:
      host    all             all             ::1/128                 md5
      # Allow replication connections from localhost, by a user with the
      # replication privilege.
      host    replication     all             127.0.0.1/32            md5
      host    replication     all             ::1/128                 md5
    3. システム上の任意の場所に保存してください。このファイルは次のステップで使用します。
  5. Windowsエクスプローラを使用して、前の手順で作成したpg_hba.confファイルを探し、<PostGres_INSTALLATION_DIR>/dataフォルダに移動して、既に存在するファイルを置き換えます。
  6. Windowsタスクマネージャーのサービスタブを開き、postgresql-x64サービスを検索します。
  7. postgresql-x64サービスを再起動するには、この名前を右クリックして、コンテキストメニューからRestartを選択します。
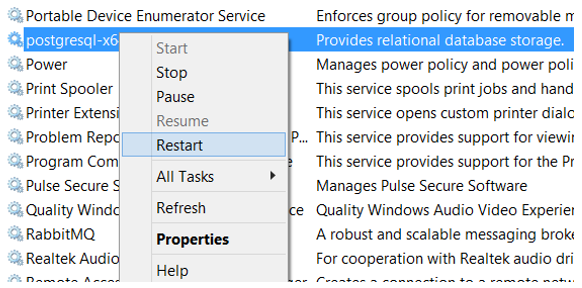

    図 3.
    注: これにより、すべてのユーザーが認証せずに接続できるようになります。
  8. ユーザー名hweuserをクリックし、再接続するよう求められたらYesを選択することにより、サーバーに再接続します。
  9. オプション: サーバー接続のためのポート番号を検索する必要がある場合は、サーバーの名前をクリックしてからPropertiesタブをクリックします。
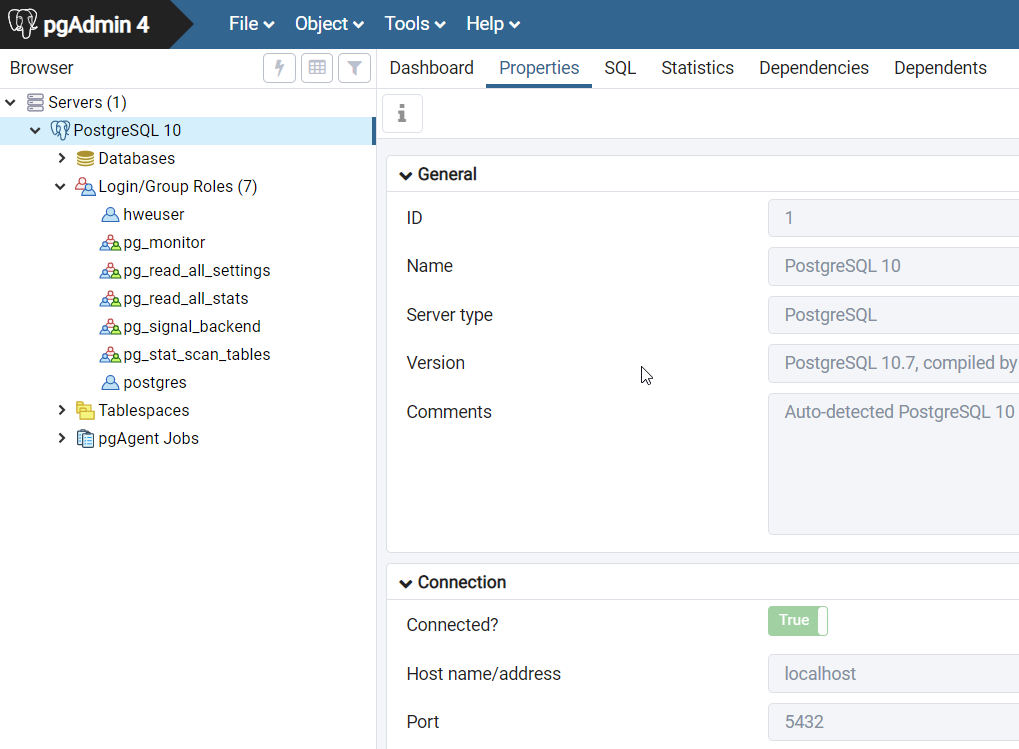

    図 4.
    上のイメージに表示されているように、Connectionの下にポート番号がリストされます。ポート番号がわかれば、他のユーザーと接続を共有できます。

共有ライブラリへの接続

このタスクでは、PostgreSQL Shared Libraryに接続する方法について学習します。

パート、サブシステム、および材料のライブラリはすべて共有ライブラリをサポートしていますが、それぞれが独立しています。PostgreSQLサーバーは、ファイル(.hm.femなど)が格納されるボールトをホストするために使用できます。
注: PostgreSQLは、ライブラリをホストしているシステム上にインストールする必要があります。これは一般に、チームがアクセスでき、オフにされる恐れのないマシンです。
  1. 共有ライブラリを作成するには、以下の手順に従います:
    1. 作成するライブラリのタイプに応じて関連するブラウザを開きます。
    2. ブラウザで右クリックし、コンテキストメニューからLibrary > Libraries...を選択します。
      Librariesダイアログが表示されます。
    3. ダイアログの右中央にある+記号をクリックします。
    4. Library type欄で、Sharedを選択します。
    5. Library host欄で、PostgreSQLを実行するホストマシンの名前を入力します。デフォルトがlocalhostとして表示されます。
    6. Library port欄で、PostgreSQLインストールで使用しているポートの番号を入力します。Postgresインストールの指示に従う場合は5432のままにする必要があります。
    7. Library path欄で、ライブラリフォルダーの位置を参照します。これは、新しい空のフォルダーにすることができます。
    8. Library name欄で、ライブラリの名前を入力します。前の手順で作成されたフォルダーの名前がデフォルトになります。
    9. Addをクリックします。
      ライブラリが作成されます。
  2. 既存のライブラリを追加するには、以下の手順に従います:
    1. 作成するライブラリのタイプに応じて関連するブラウザを開きます。
    2. ブラウザで右クリックし、コンテキストメニューからLibrary > Libraries...を選択します。
      Librariesダイアログが表示されます。
    3. ダイアログの右中央にある+記号をクリックします。
    4. Library type欄で、Sharedを選択します。
    5. Library host欄で、PostgreSQLを実行するホストマシンの名前を入力します。デフォルトがlocalhostとして表示されます。
    6. Library port欄で、PostgreSQLインストールで使用しているポートの番号を入力します。Postgresインストールの指示に従う場合は5432のままにする必要があります。
    7. Library path欄で、ライブラリフォルダーの位置を参照します。これは、新しい空のフォルダーにすることができます。
    8. Library name欄で、ライブラリの名前を入力します。前の手順で作成されたフォルダーの名前がデフォルトになります。
    9. Addをクリックします。
      ライブラリが追加されます。
    10. ライブラリに接続するには、リスト内のライブラリを選択し、Connectをクリックします。