Manage Handles and Domains for Shell Models
Create handles and domains, divide your shell model, and group, split, merge domains.
Create Handles and Domains for Shell Models
-
Click create.
A 2D domain is created for each group of continuous shell elements. Parts joined by 1D or 3D elements are separated into different domains. If partition domains is checked, the 2D domains will be partitioned according to the settings selected in the partitioning subpanel of the Domains panel. Once partitioned, edge domains are placed around the 2D domains and handles are placed at the ends of the edge domains. All of this is automatic, but 1D and 3D elements will not be placed into 1D and 3D domains unless you set the selector to local domains instead of 2D domains. In many cases, the domains and handles will be generated where you want them to be. If not you can always add, edit, or delete the handles and domains to meet your needs.
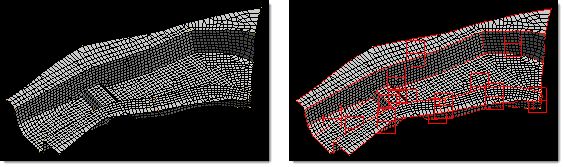
Figure 1. Shell Model Partitioned into 2D Domains
Divide Shell Model
- From the Tools page, click HyperMorph.
- Click Domains.
- Select the create subpanel.
- Set the selector to 2D domains.
- Select the elements to be placed into a new 2D domain.
- Click create.
When selecting the elements for the new domain you do not need to select only shell elements. HyperMorph automatically removes any other elements before creating the domain. It does not matter if the elements selected are already in a 2D domain. When the new domain is created, the elements are moved from the old domains to the new domain.
Handle influences need to be recalculated every time handles, domains, or symmetries are added, edited, or deleted. They are also recalculated during radius changes and geometry mapping. These calculations occur when you enter or leave any HyperMorph panel or when you leave the Delete panel. Thus, for models with large domains you will want to make all of your domain changes before exiting the Domains panel. HyperMorph only recalculates the handle influences for handles in regions that have been edited.
If the domains are not created exactly how you want them to be, you can edit them in the Domains panel. The create subpanel allows you to create new domains. The organize subpanel allows you to edit domains by adding and removing elements to or from a domain and by grouping domains together. The edit edges subpanel allows you to split, merge, and place handles along edge domains. It is suggested that you create and edit all the 2D domains, then create and edit the edge domains. This order works better since creating or editing 2D domains will result in the regeneration of the surrounding edge domains with the previous modifications to those edge domains being discarded.
Sometimes partitioning does not divide the mesh in the ways that would be most useful to you. Occasionally, elements end up in domains adjacent to where you want them or placed in their own domain. Partitioning is not an exact science, so some cleanup is sometimes required.
Organize Elements in Domains
Move elements from one domain to another.
- From the Tools page, click HyperMorph.
- Click Domains.
- Select the organize subpanel.
- Change the selector to add nodes/elems.
- Change the toggle to local domain.
- Select the elements to be moved.
- Select the target domain.
- Click organize.
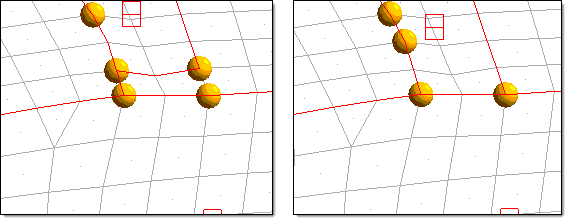
Figure 2. Partitioning Problems. The model on the left shows problems that partitioning can encounter for some meshes. The model on the right has been corrected using the organize subpanel of the domains panel. For this example the retain handles option was left unchecked resulting in the elimination of handles that are no longer on the corners of the 2D domains. Note that the edge domains are always partitioned for any new domain and handles are placed at the end of the edge domains. For the example above, a handle was created in a new location due to the edge partitioning being different for the two domain configurations.
When you hold the mouse button down and the mouse is either over the icon for a 2D domain or over an element inside a domain, the edge domains surrounding the domain are highlighted as well. This allows you to better visualize the domain that you are selecting. The domain icon is placed at the centroid of the domain, and some domains can end up away from the elements of the domain and near other domain icons. Having the edges for the domain highlighted during selection is often necessary to tell which icon goes with which group of elements.
Group Domains
Group two or more domains together.
- From the Tools page, click HyperMorph.
- Click Domains.
- Select the organize subpanel.
- Change the selector to combine domains.
- Select the domains to be grouped together.
- Click organize.
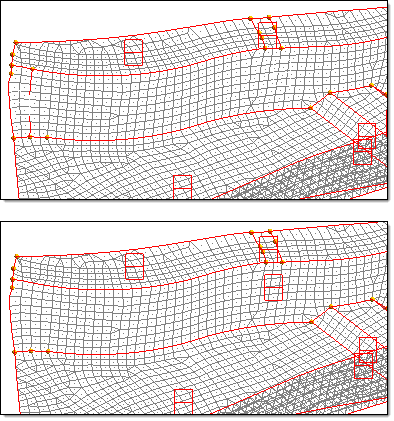
Figure 3. Two Domains Organized into One
Edge domains are automatically partitioned when they are created. They are also updated whenever a change occurs for a domain of which they are on the edge. This is why any editing of the edge domains should come after the editing of the other domains. If you do your edge editing first, your changes may be erased when you edit the 2D domains.
Edge domains are used to make radius changes, so it is important to make sure that any radius in the model that you intend to change be captured correctly by edge domains. HyperMorph tries to partition edge domains where curvature begins and ends, but in some cases it may not identify the proper starting and ending points. You may need to correct this by hand.
Split Edge Domains
- From the Tools page, click HyperMorph.
- Click Domains.
- Select the Edit Edges subpanel.
- Change the selector to split.
- Select an edge domain.
- Select a node on that domain that is not on the edge.
- Click split.
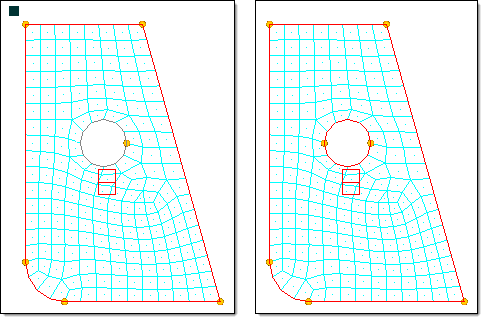
Figure 4. Splitting an Edge Domain. A circular edge domain is divided into two half circles. A handle was created at the joint to allow you to manipulate the edges.
Merge Edge Domains
- From the Tools page, click HyperMorph.
- Click Domains.
- Select the Edit Edges subpanel.
- Change the selector to merge.
- Select any number of connected edge domains.
- Click merge.
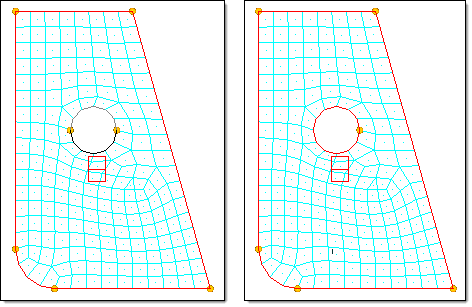
Figure 5. Merge Two Edge Domains. The two half circles are merged into a single domain. Since retain handles was unchecked, the handle at the joint was deleted.
You may also create dependent handles along an edge domain. This feature is quite useful for saving time when you are changing the radius for the edge domain. If the domain containing the radius to be changed is very large you may find it more efficient to place dependent handles on the edge domains whose radii you wish the change before you go into the Morph panel.
Create Dependent Handles along Edge Domains
Create dependent handles on edge domains whose radii you wish the change.
-
Click create.
The dependent handles are created on the selected edge domains. These handles are dependent on the independent handles to either side of them along the edge domain.
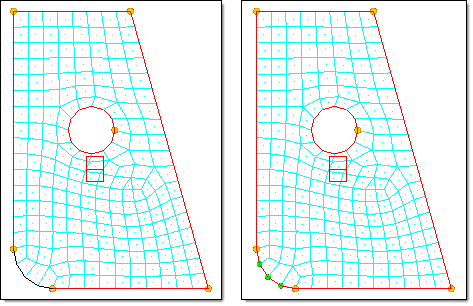
Figure 6. Create Handles on Edge Domain. A dependent handle is created on each node of the edge domain.Creating dependent handles in this way has two significant effects. The first is that since they are dependent, movements applied to any of the independent handles on the edge will be transparently applied to the dependent handles. It will be as if they were not there. Secondly, when you make a radius change to an edge domain that has a handle at each of its nodes, the influences do not need to be recalculated, which makes the radius change process much faster for large models.